When you purchase through links on our site, we may earn an affiliate commission. Here’s how it works.
How to Configure NordVPN on pfSense
Last updated January 3, 2025

The only way to configure NordVPN on pfSense is by creating a VPN connection manually. This is a lengthy process (pfSense is on the complex side), but NordVPN gives you everything you need, thanks to its unified dashboard. All you need is a subscription to the VPN and a pfSense-ready router or a spare PC with pfSense installed.
We'll also note that NordVPN doesn't provide a list of supported pfSense firmware versions, but it does mention versions 2.4.4, 2.4.5, and 2.5. Theoretically, the VPN should work fine on any VPN-ready pfSense that supports OpenVPN, up to 2.7.2, the latest pfSense version available.
How to Configure NordVPN on pfSense
Setting up NordVPN on pfSense follows the same general procedure no matter which pfSense version you use. However, based on the VPN's technical documentation, we'll explain the needed steps for pfSense versions 2.4.x and 2.5.x. If you've updated your router's firmware to version 2.7.x, follow the steps for the most recent pfSense version found below.
Option #1: Configure NordVPN on pfSense 2.5
On pfSense 2.5 and newer (up to pfSense 2.7.x), you can configure NordVPN by gathering the required info from its site (server hostname, OpenVPN information, etc.) and adding that information via pfSense's interface. These are the steps you need to take:
1. Sign up for NordVPN using your computer and a Web browser.
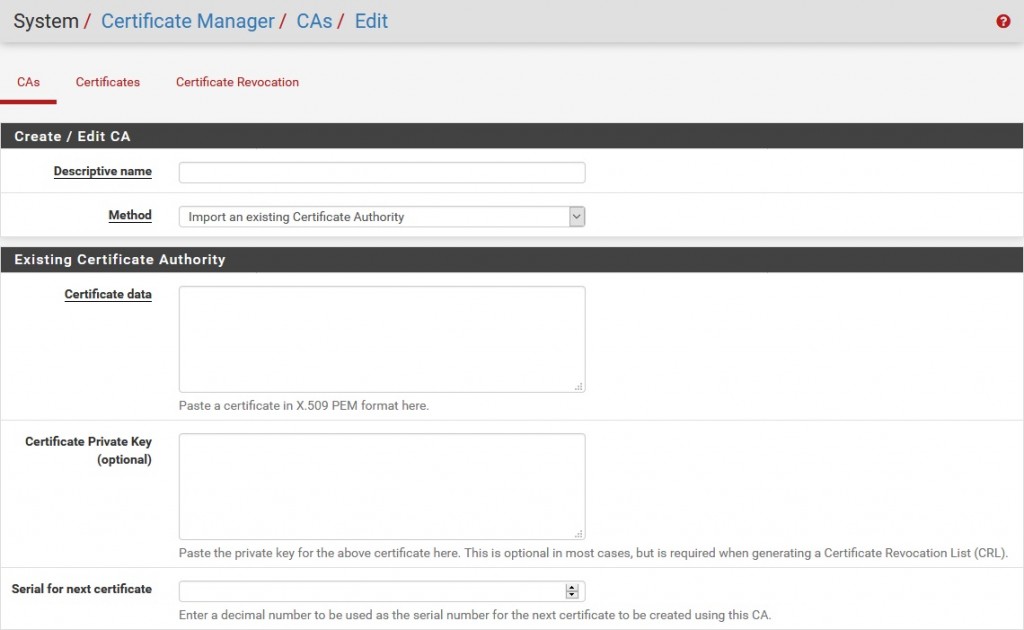
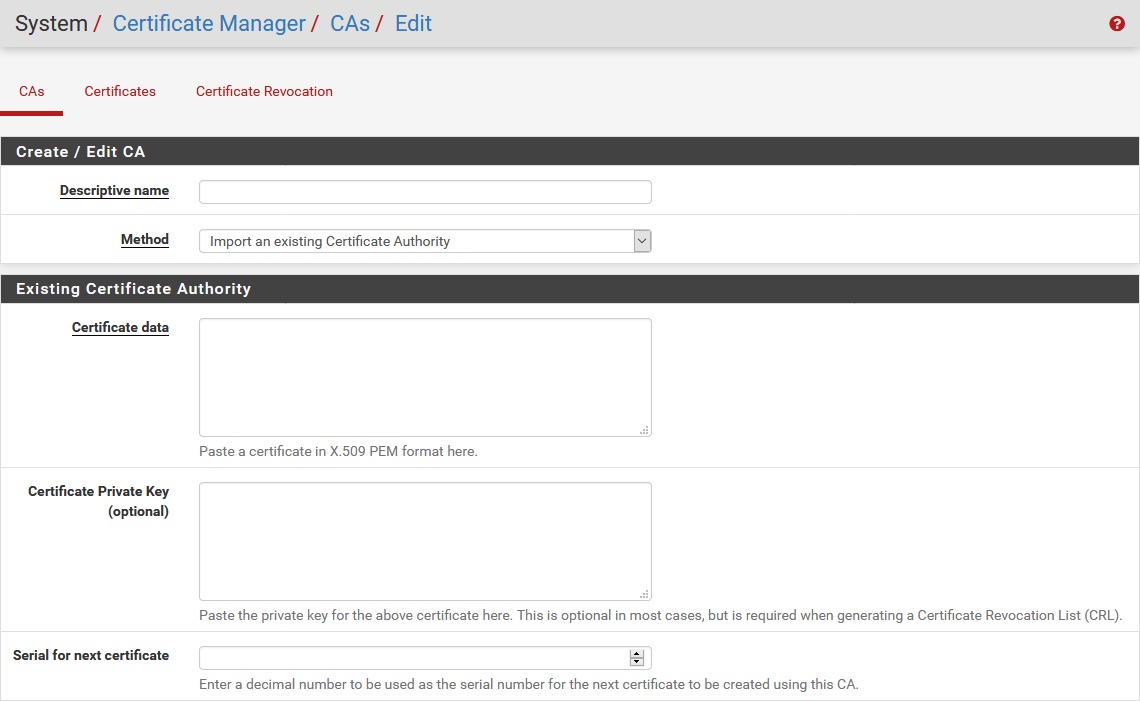
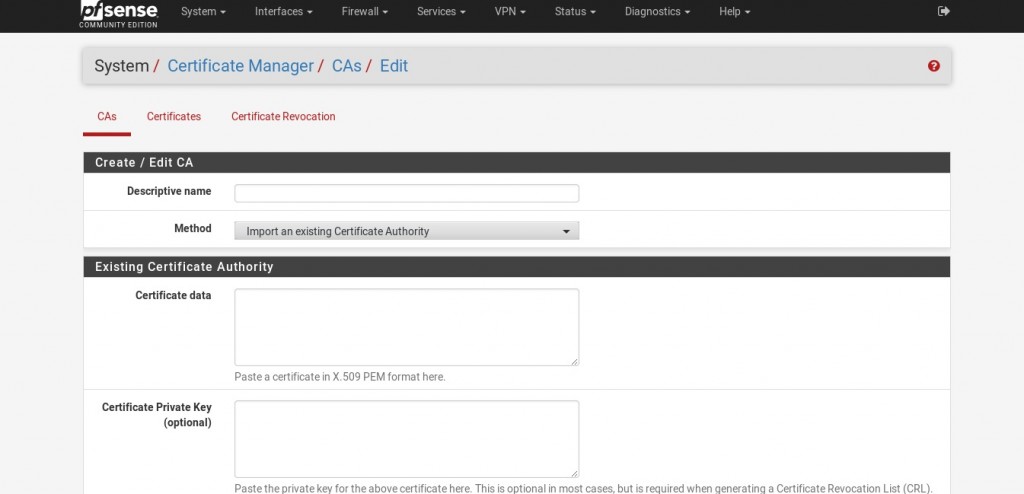
2. On your pfSense router, go to 'System' > 'Certificate Manager' > 'CAs' and choose the '+Add' button.
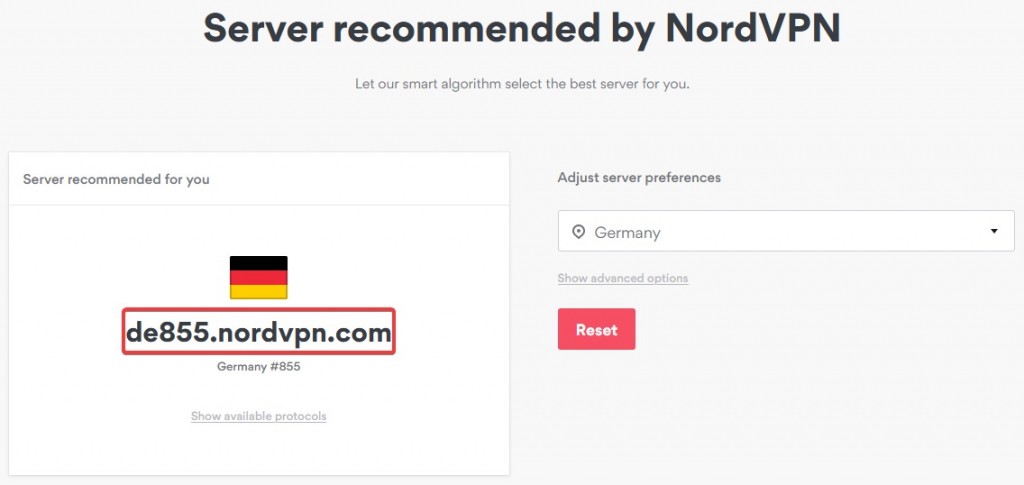
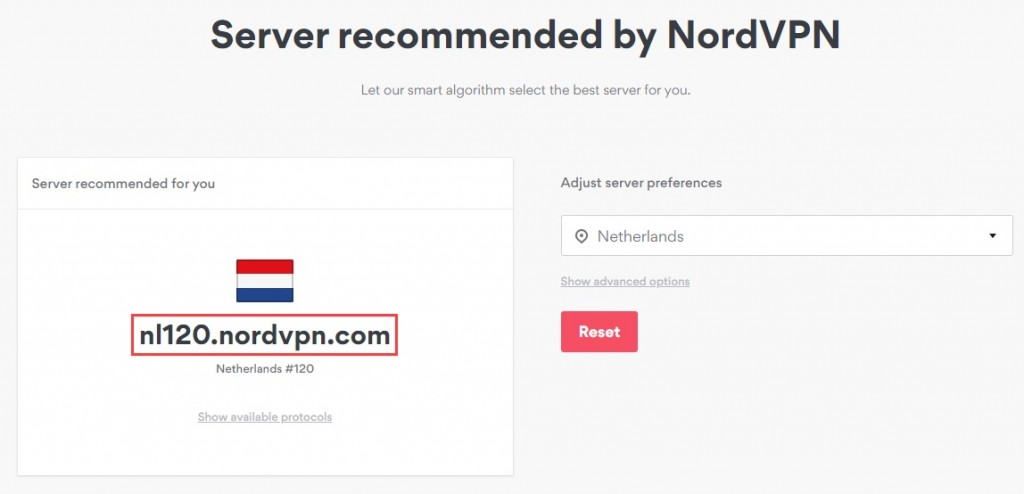
3. Visit NordVPN's server recommendation page and copy the hostname of your preferred VPN server.


4. Once done, enter the details on your router’s web page as mentioned below.
- Descriptive Name: Any name,
- Method: Choose Import an existing Certificate Authority,
- Trust Store: Uncheck this box.
- Randomize Serial: Uncheck this box.
- Certificate data: Paste the following:
-----BEGIN CERTIFICATE-----
MIIFCjCCAvKgAwIBAgIBATANBgkqhkiG9w0BAQ0FADA5MQswCQYDVQQGEwJQQTEQ
MA4GA1UEChMHTm9yZFZQTjEYMBYGA1UEAxMPTm9yZFZQTiBSb290IENBMB4XDTE2
MDEwMTAwMDAwMFoXDTM1MTIzMTIzNTk1OVowOTELMAkGA1UEBhMCUEExEDAOBgNV
BAoTB05vcmRWUE4xGDAWBgNVBAMTD05vcmRWUE4gUm9vdCBDQTCCAiIwDQYJKoZI
hvcNAQEBBQADggIPADCCAgoCggIBAMkr/BYhyo0F2upsIMXwC6QvkZps3NN2/eQF
kfQIS1gql0aejsKsEnmY0Kaon8uZCTXPsRH1gQNgg5D2gixdd1mJUvV3dE3y9FJr
XMoDkXdCGBodvKJyU6lcfEVF6/UxHcbBguZK9UtRHS9eJYm3rpL/5huQMCppX7kU
eQ8dpCwd3iKITqwd1ZudDqsWaU0vqzC2H55IyaZ/5/TnCk31Q1UP6BksbbuRcwOV
skEDsm6YoWDnn/IIzGOYnFJRzQH5jTz3j1QBvRIuQuBuvUkfhx1FEwhwZigrcxXu
MP+QgM54kezgziJUaZcOM2zF3lvrwMvXDMfNeIoJABv9ljw969xQ8czQCU5lMVmA
37ltv5Ec9U5hZuwk/9QO1Z+d/r6Jx0mlurS8gnCAKJgwa3kyZw6e4FZ8mYL4vpRR
hPdvRTWCMJkeB4yBHyhxUmTRgJHm6YR3D6hcFAc9cQcTEl/I60tMdz33G6m0O42s
Qt/+AR3YCY/RusWVBJB/qNS94EtNtj8iaebCQW1jHAhvGmFILVR9lzD0EzWKHkvy
WEjmUVRgCDd6Ne3eFRNS73gdv/C3l5boYySeu4exkEYVxVRn8DhCxs0MnkMHWFK6
MyzXCCn+JnWFDYPfDKHvpff/kLDobtPBf+Lbch5wQy9quY27xaj0XwLyjOltpiST
LWae/Q4vAgMBAAGjHTAbMAwGA1UdEwQFMAMBAf8wCwYDVR0PBAQDAgEGMA0GCSqG
SIb3DQEBDQUAA4ICAQC9fUL2sZPxIN2mD32VeNySTgZlCEdVmlq471o/bDMP4B8g
nQesFRtXY2ZCjs50Jm73B2LViL9qlREmI6vE5IC8IsRBJSV4ce1WYxyXro5rmVg/
k6a10rlsbK/eg//GHoJxDdXDOokLUSnxt7gk3QKpX6eCdh67p0PuWm/7WUJQxH2S
DxsT9vB/iZriTIEe/ILoOQF0Aqp7AgNCcLcLAmbxXQkXYCCSB35Vp06u+eTWjG0/
pyS5V14stGtw+fA0DJp5ZJV4eqJ5LqxMlYvEZ/qKTEdoCeaXv2QEmN6dVqjDoTAo
k0t5u4YRXzEVCfXAC3ocplNdtCA72wjFJcSbfif4BSC8bDACTXtnPC7nD0VndZLp
+RiNLeiENhk0oTC+UVdSc+n2nJOzkCK0vYu0Ads4JGIB7g8IB3z2t9ICmsWrgnhd
NdcOe15BincrGA8avQ1cWXsfIKEjbrnEuEk9b5jel6NfHtPKoHc9mDpRdNPISeVa
wDBM1mJChneHt59Nh8Gah74+TM1jBsw4fhJPvoc7Atcg740JErb904mZfkIEmojC
VPhBHVQ9LHBAdM8qFI2kRK0IynOmAZhexlP/aT/kpEsEPyaZQlnBn3An1CRz8h0S
PApL8PytggYKeQmRhl499+6jLxcZ2IegLfqq41dzIjwHwTMplg+1pKIOVojpWA==
-----END CERTIFICATE-----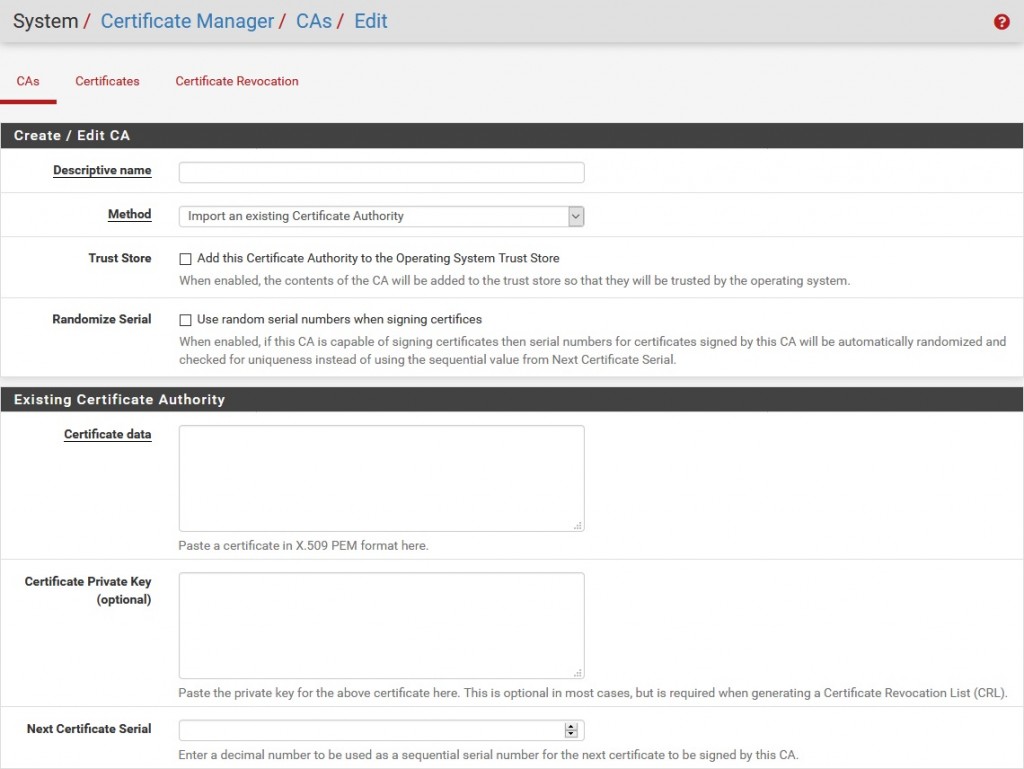
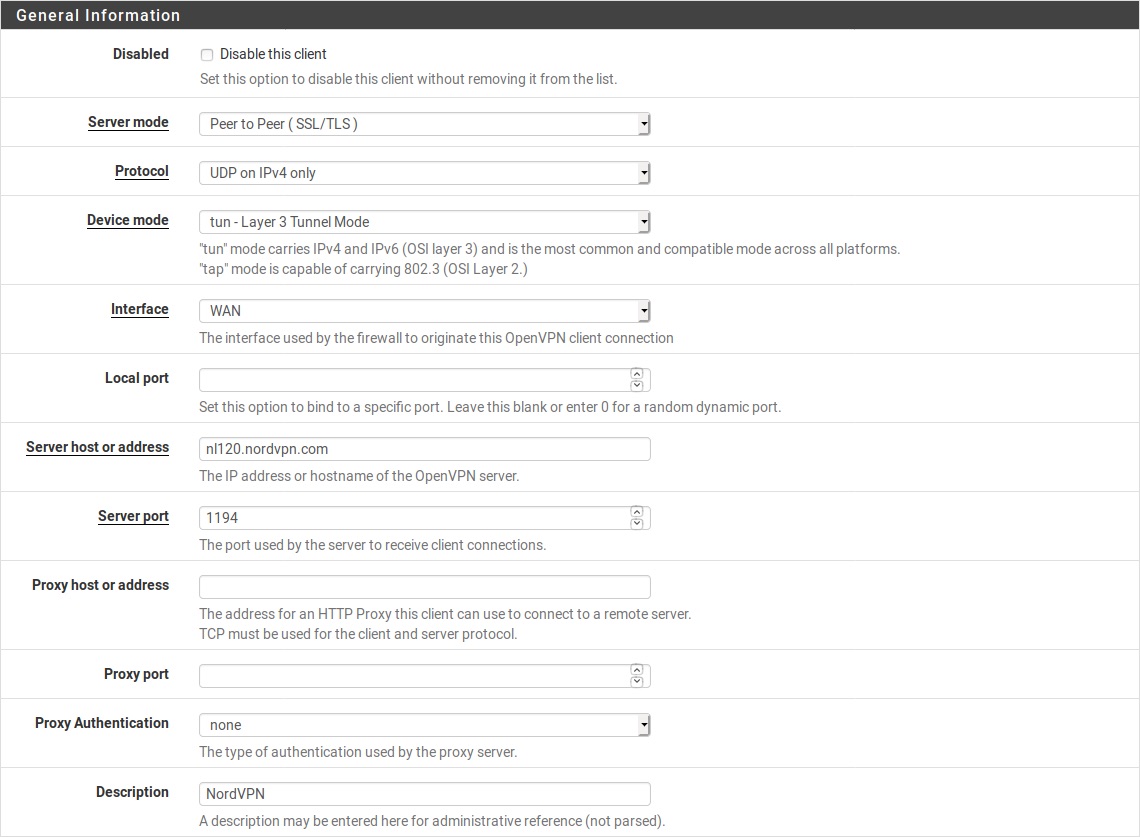
5. Click 'Save' now and navigate to 'VPN' > 'OpenVPN' > 'Clients.'
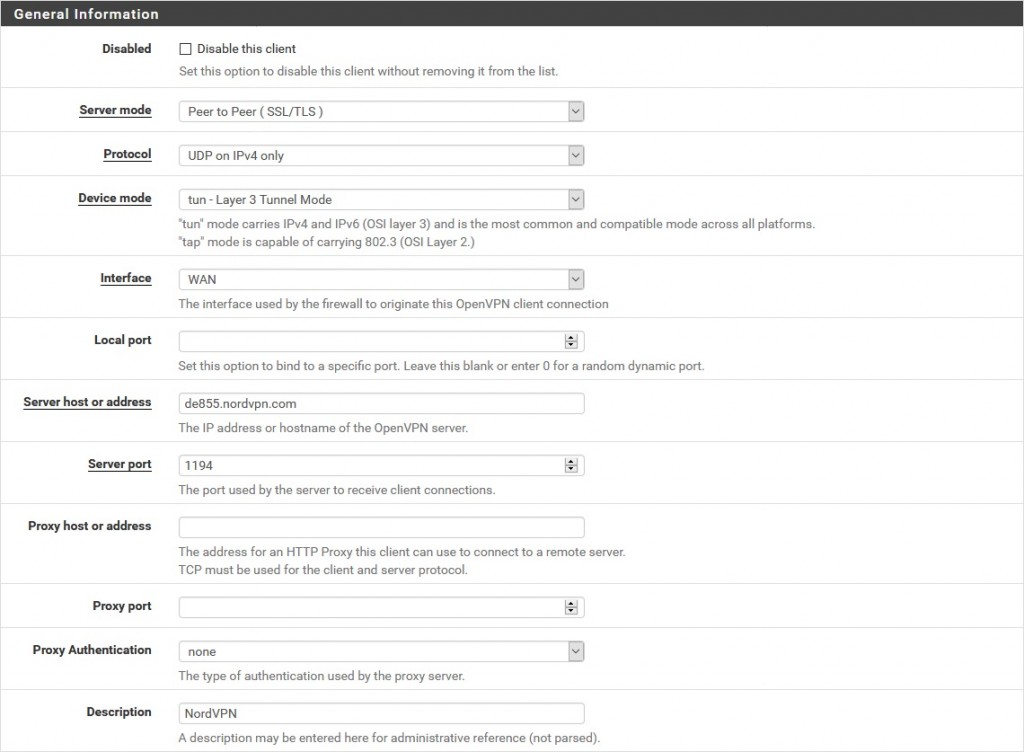
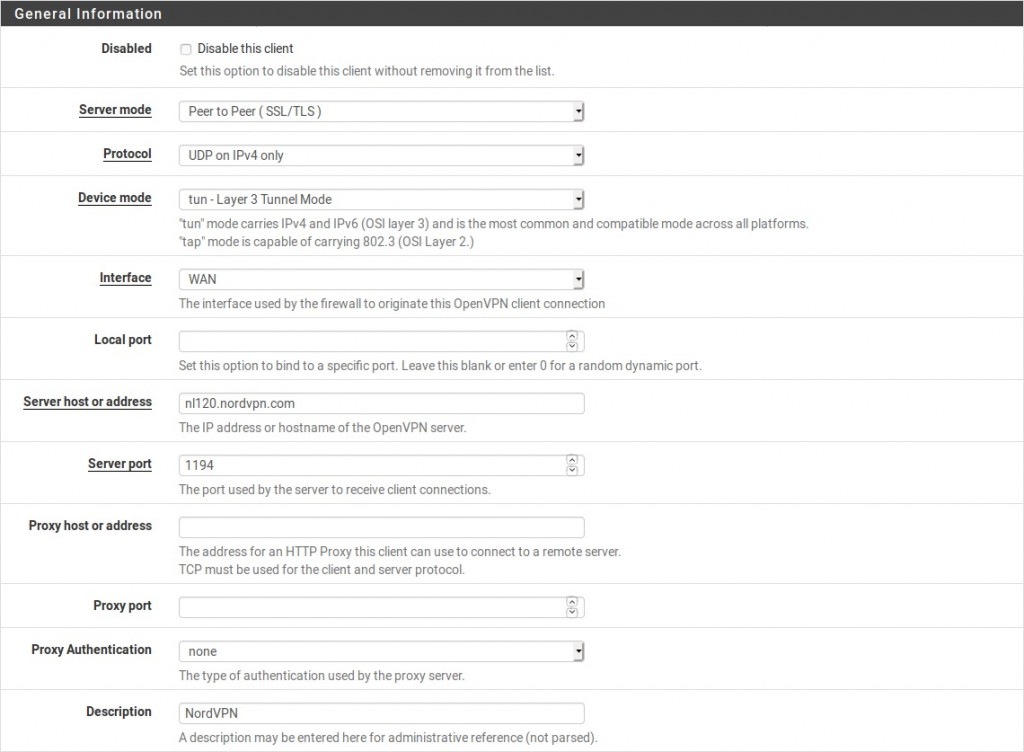
6. Choose '+Add' and fill in the below details:
- Disable this client: Uncheck.
- Server mode: Peer to Peer (SSL/TLS).
- Protocol: UDP on IPv4 only (alternatively, you can use TCP).
- Device mode: tun – Layer 3 Tunnel Mode.
- Interface: WAN.
- Local port: Blank.
- Server host or address: The hostname of the server you've picked.
- Server port: 1194 (use 443 in case of TCP).
- Proxy host or address: Blank.
- Proxy port: Blank.
- Proxy Authentication: None.
- Description: Any name.
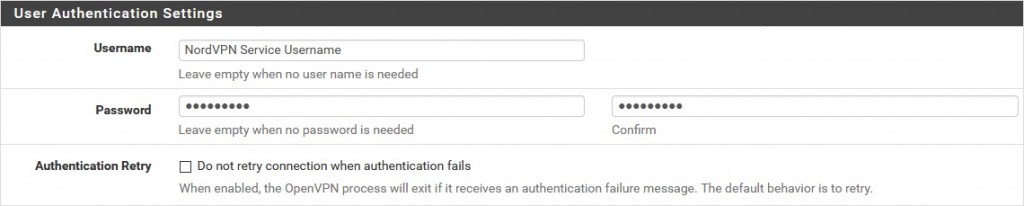
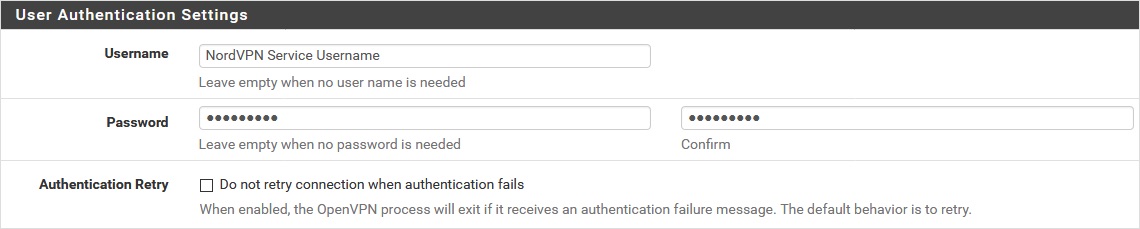
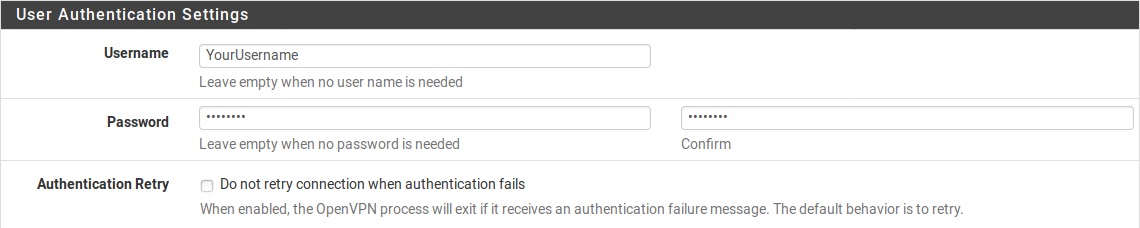
User Authentication Settings
- Username: This should have your NordVPN service username.
- Password: These fields require your NordVPN service password.
- Authentication Retry: Uncheck.
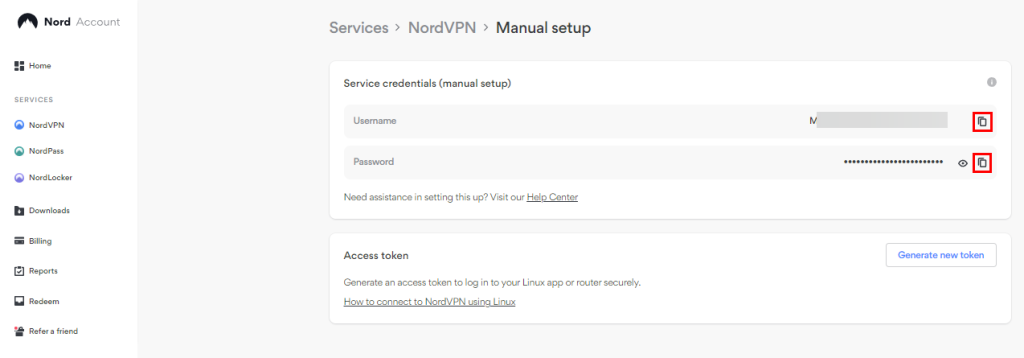
Here's how you can get your NordVPN service credentials:
- Visit NordVPN account dashboard and the click on 'NordVPN' from the left bar.
- Now choose 'Set up NordVPN manually.'
- You'll receive a verification code on your NordVPN-associated email.
- Enter this code to access your dashboard.
- Copy your service Username and Password from under 'Service credentials (manual setup).'

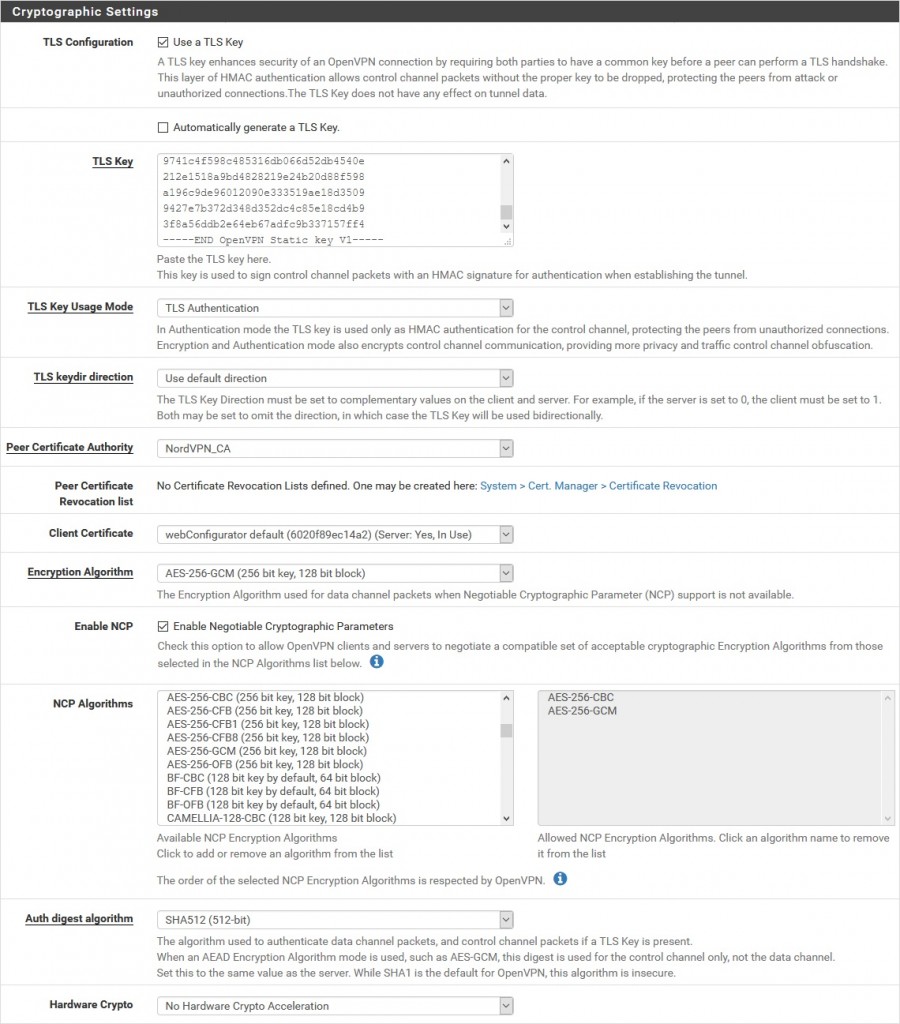
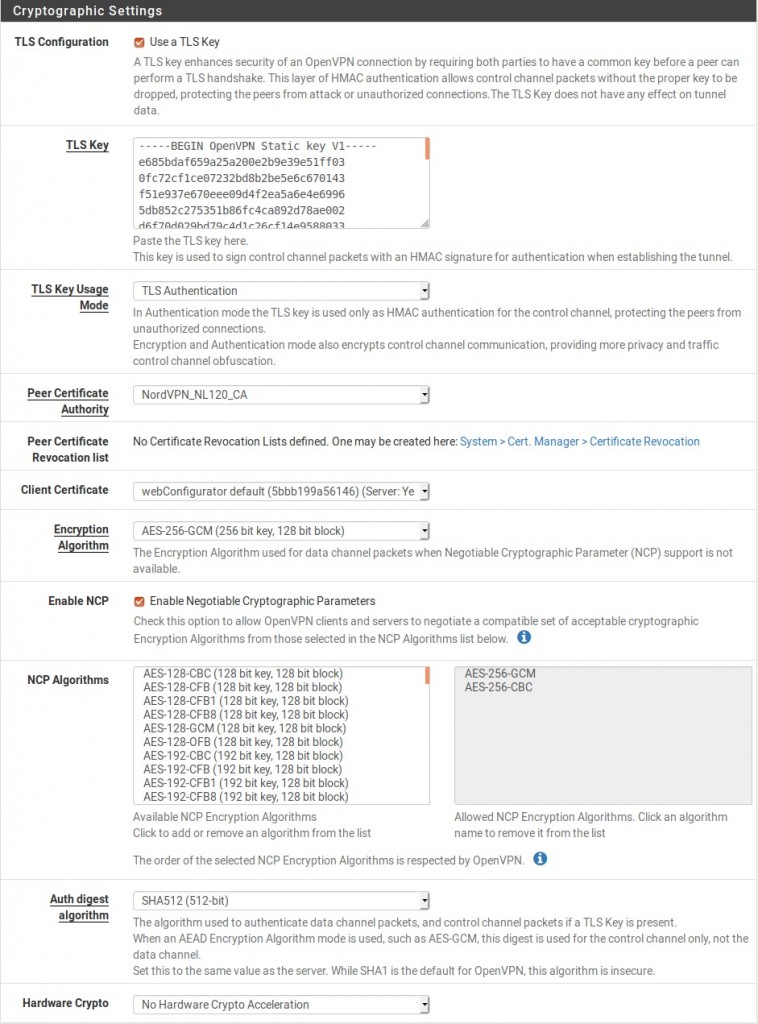
Cryptographic Settings
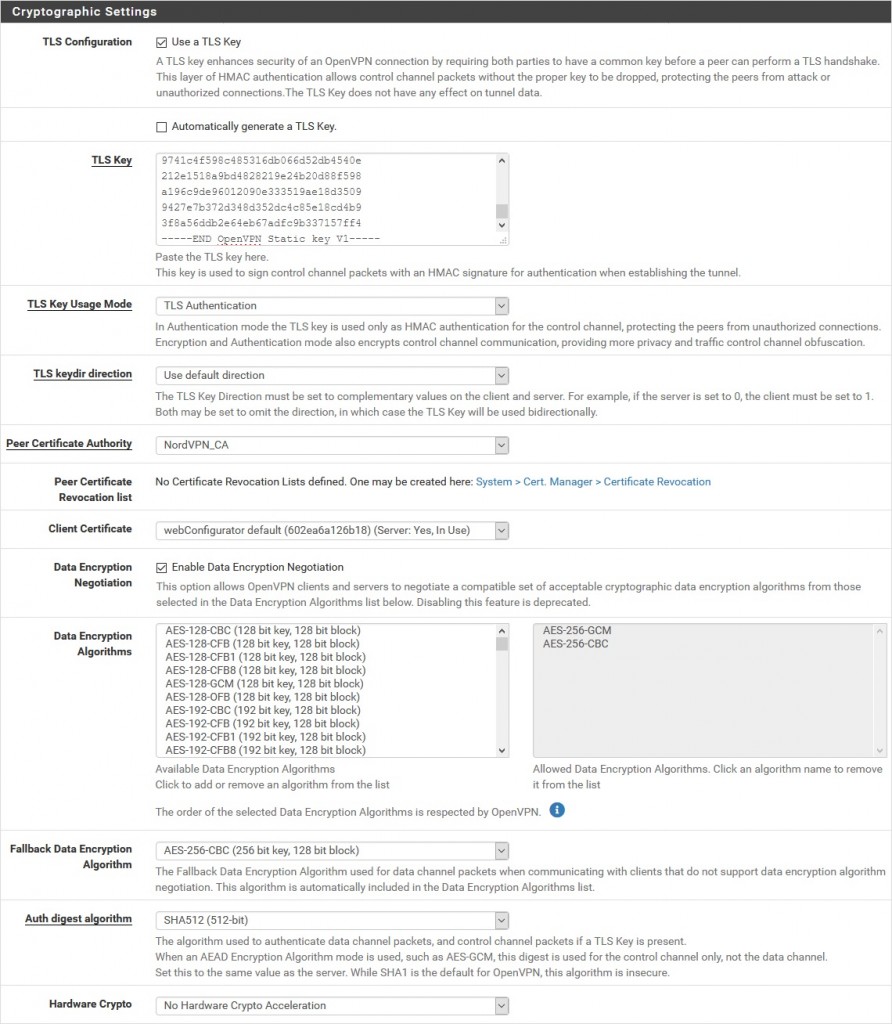
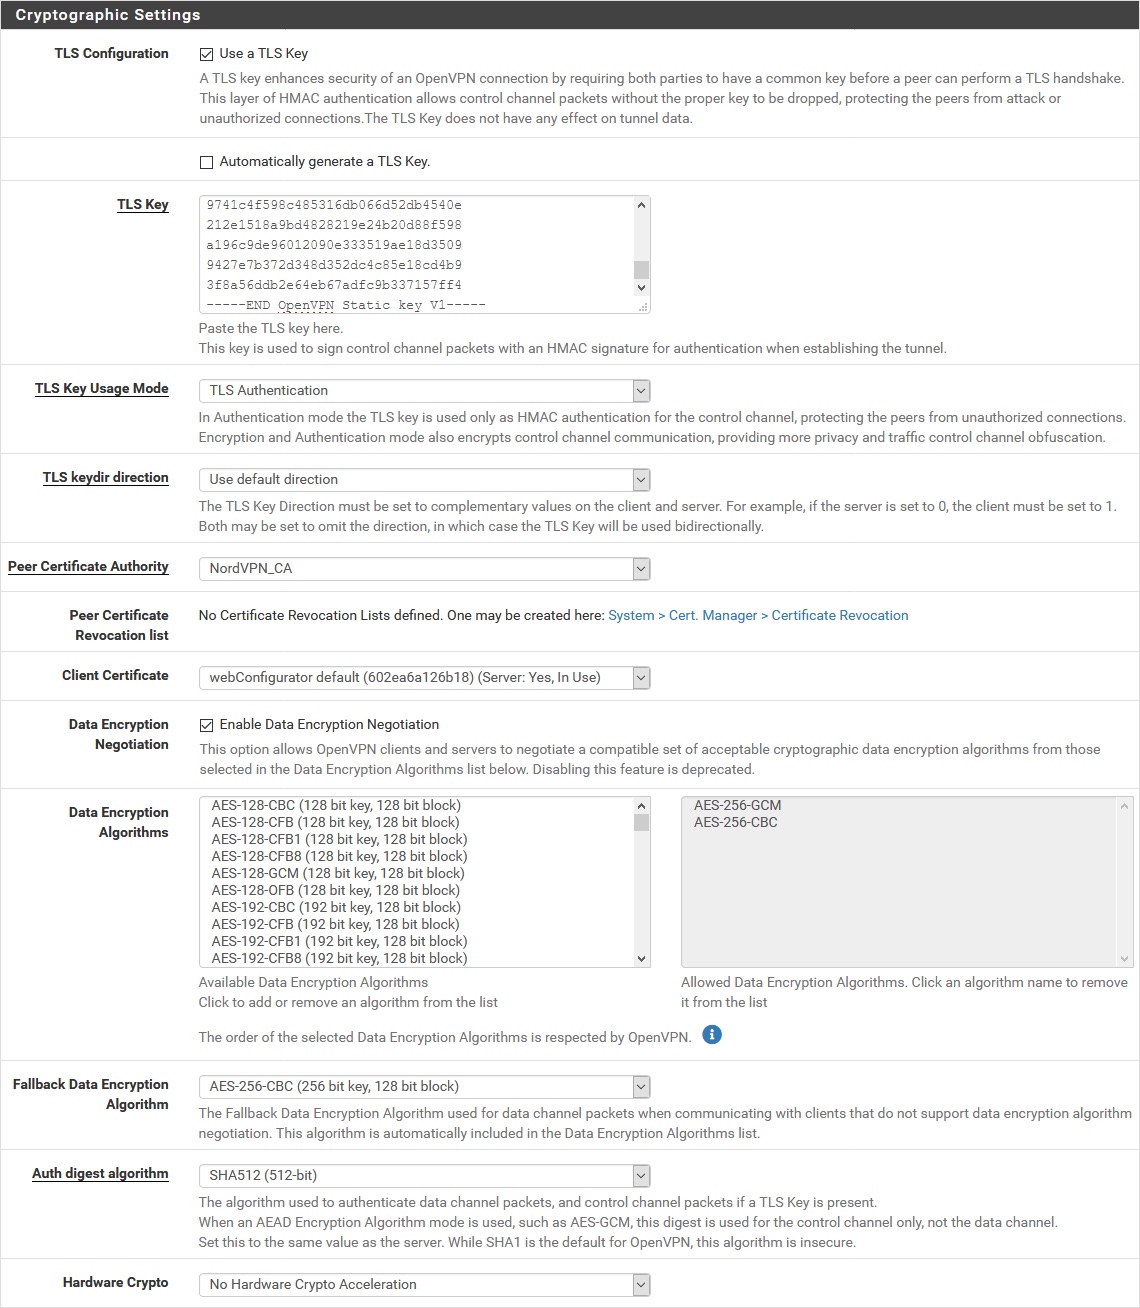
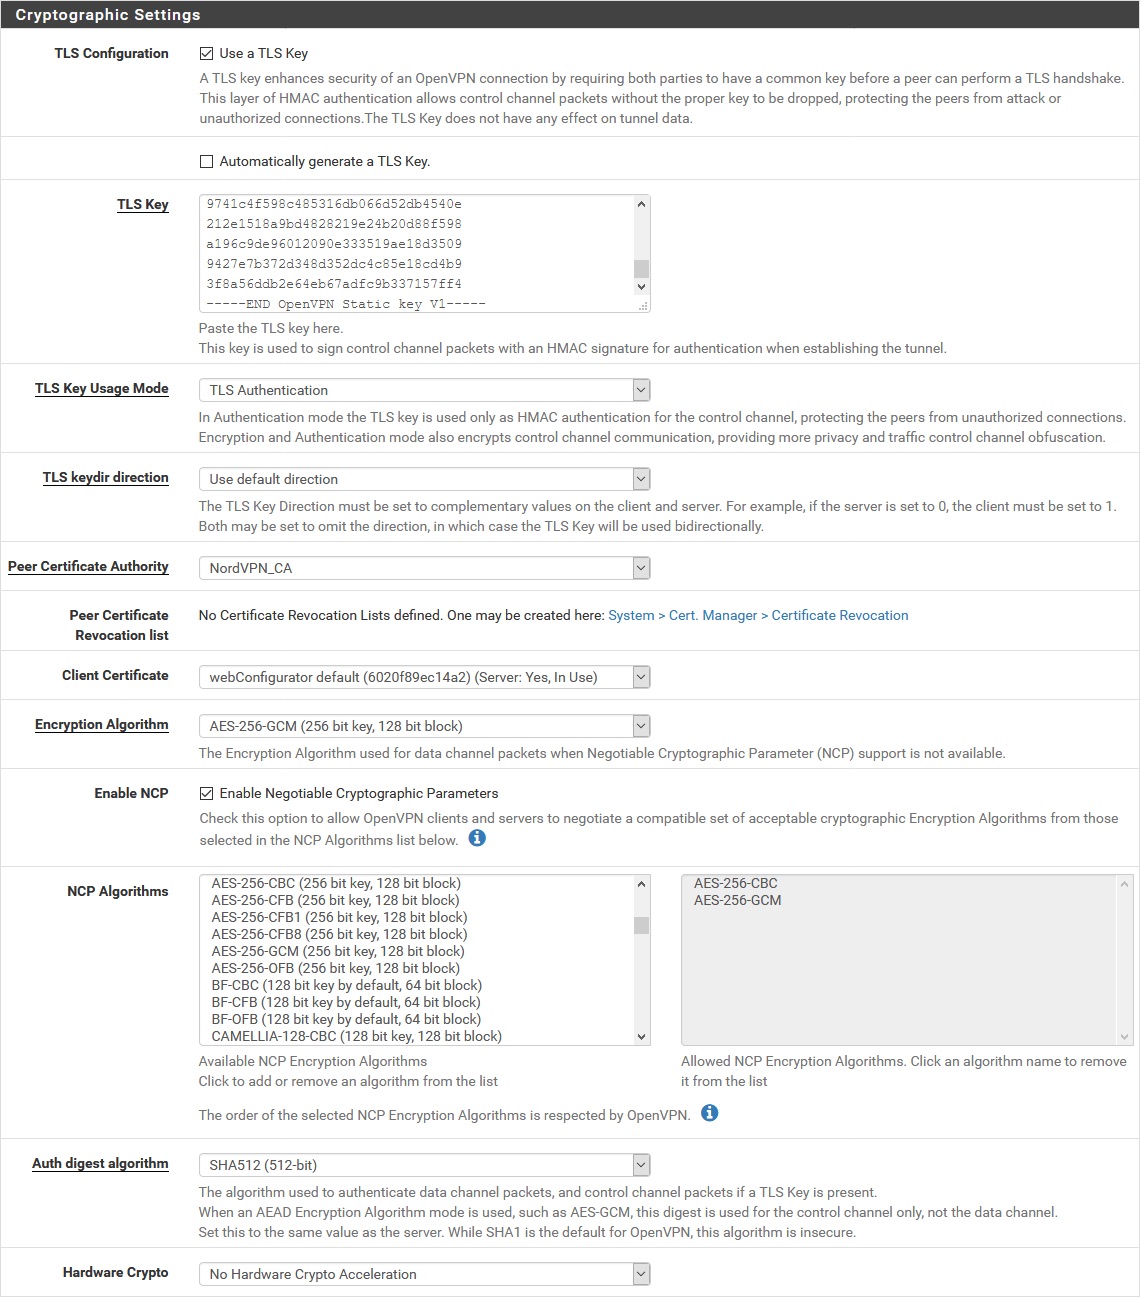
- TLS Configuration: Check the Use a TLS Key option; Uncheck the Automatically generate a TLS key option.
- TLS Key: Paste the following code:
-----BEGIN OpenVPN Static key V1-----
e685bdaf659a25a200e2b9e39e51ff03
0fc72cf1ce07232bd8b2be5e6c670143
f51e937e670eee09d4f2ea5a6e4e6996
5db852c275351b86fc4ca892d78ae002
d6f70d029bd79c4d1c26cf14e9588033
cf639f8a74809f29f72b9d58f9b8f5fe
fc7938eade40e9fed6cb92184abb2cc1
0eb1a296df243b251df0643d53724cdb
5a92a1d6cb817804c4a9319b57d53be5
80815bcfcb2df55018cc83fc43bc7ff8
2d51f9b88364776ee9d12fc85cc7ea5b
9741c4f598c485316db066d52db4540e
212e1518a9bd4828219e24b20d88f598
a196c9de96012090e333519ae18d3509
9427e7b372d348d352dc4c85e18cd4b9
3f8a56ddb2e64eb67adfc9b337157ff4
-----END OpenVPN Static key V1------ TLS Key Usage Mode: TLS Authentication.
- TLS keydir direction: Use default direction.
- Peer certificate authority: NordVPN_CA.
- Peer Certificate Revocation list: No need to define.
- Client certificate: webConfigurator default (59f92214095d8) (Server: Yes, In Use).
- Data Encryption Negotiation: Check.
- Data Encryption Algorithms: AES-256-GCM and AES-256-CBC.
- Fallback Data Encryption Algorithm: AES-256-CBC.
- Auth digest algorithm: SHA512 (512-bit).
- Hardware Crypto: No Hardware Crypto Acceleration.
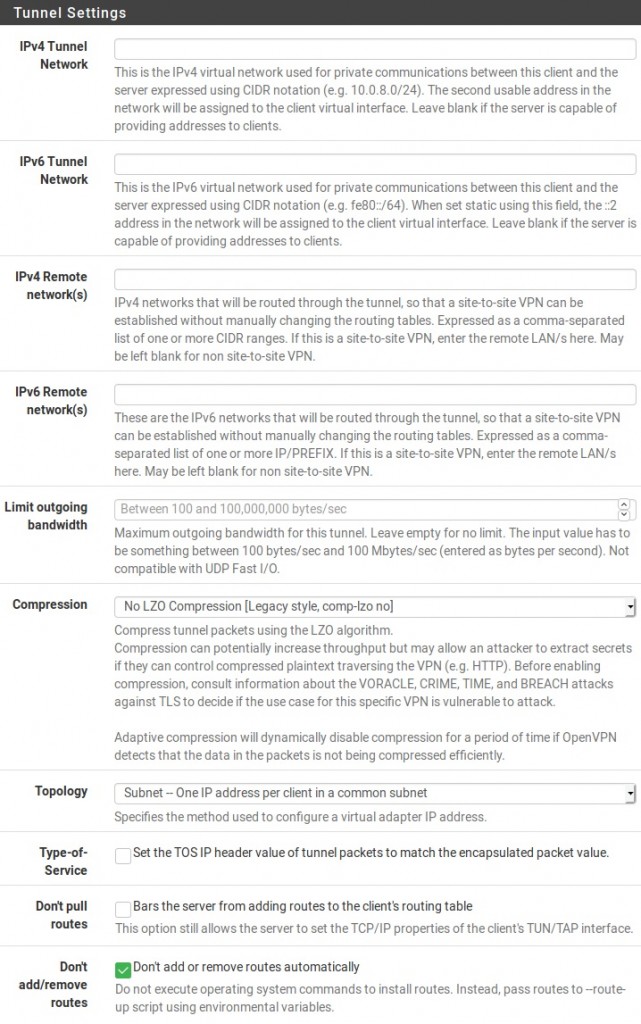
Tunnel Settings
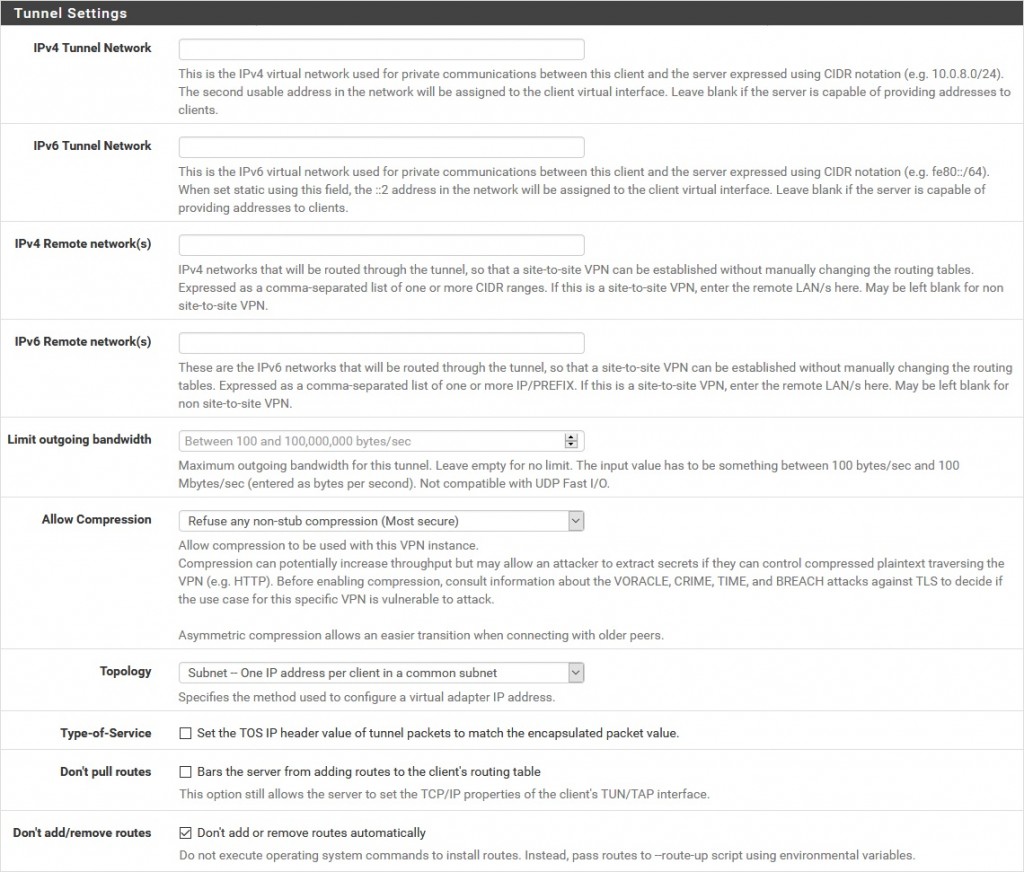
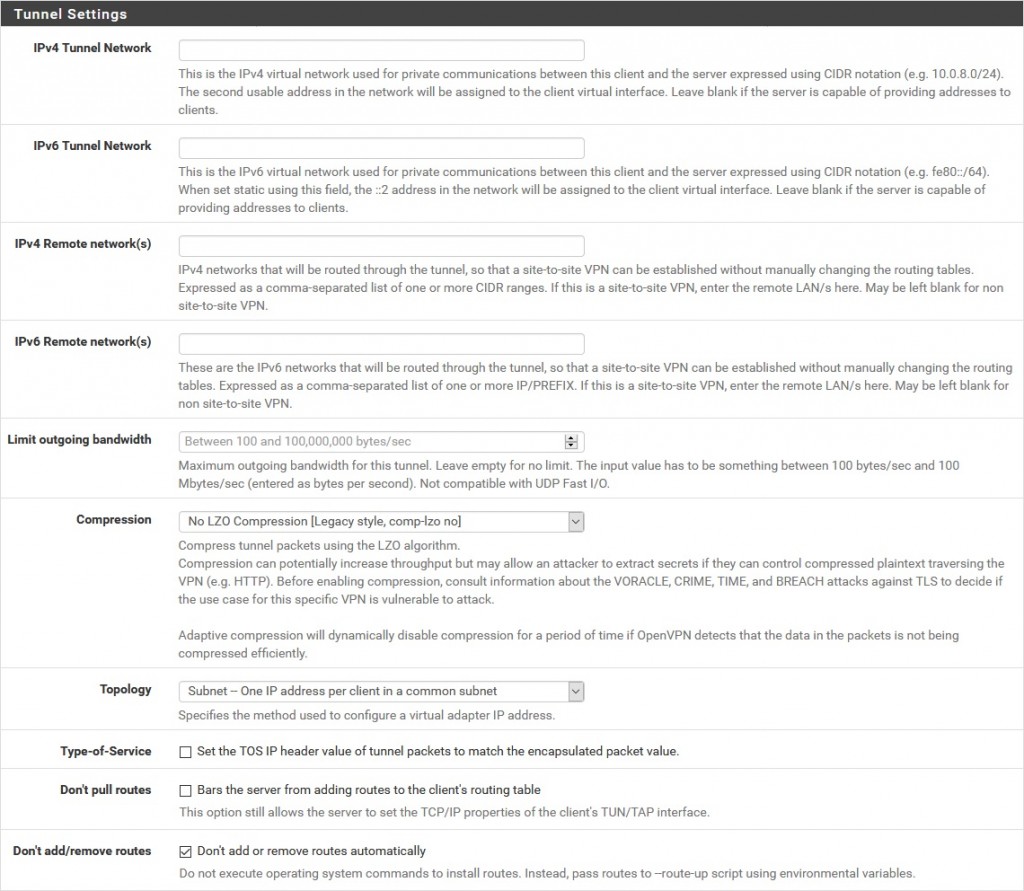
- IPv4 tunnel network: Leave blank.
- IPv6 tunnel network: Leave blank.
- IPv4 remote network(s): Leave blank.
- IPv6 remote network(s): Leave blank.
- Limit outgoing bandwidth: Leave blank.
- Allow Compression: Refuse any non-stub compression (Most Secure).
- Topology: Subnet – One IP address per client in a common subnet.
- Type-of-Service: Uncheck.
- Don’t pull routes: Uncheck.
- Don’t add/remove routes: Check.
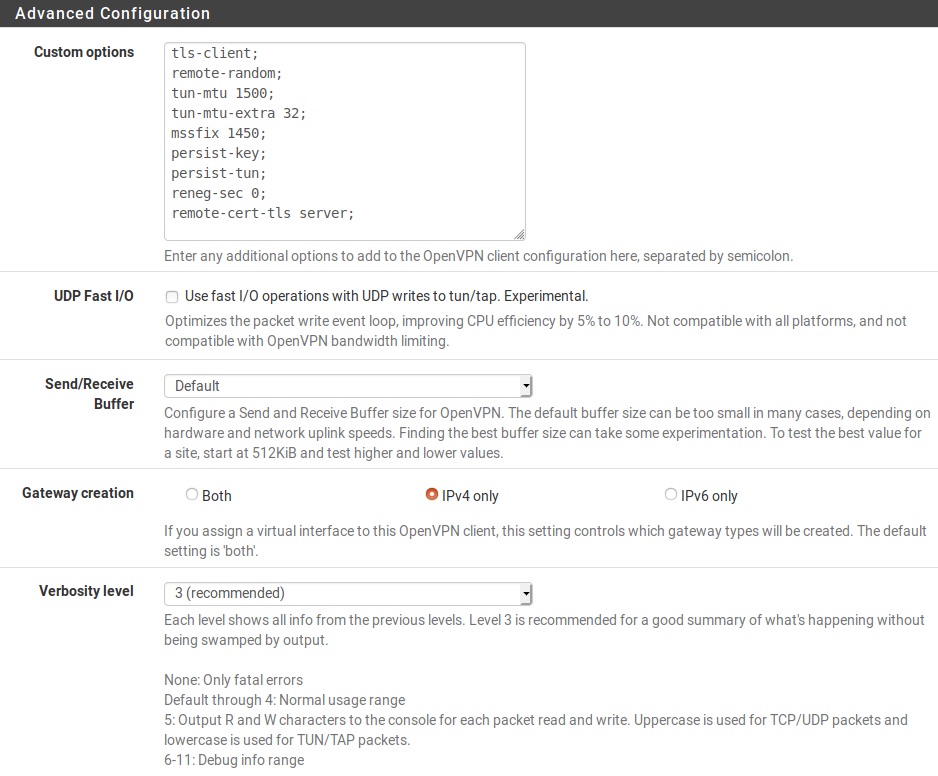
Advanced Configuration
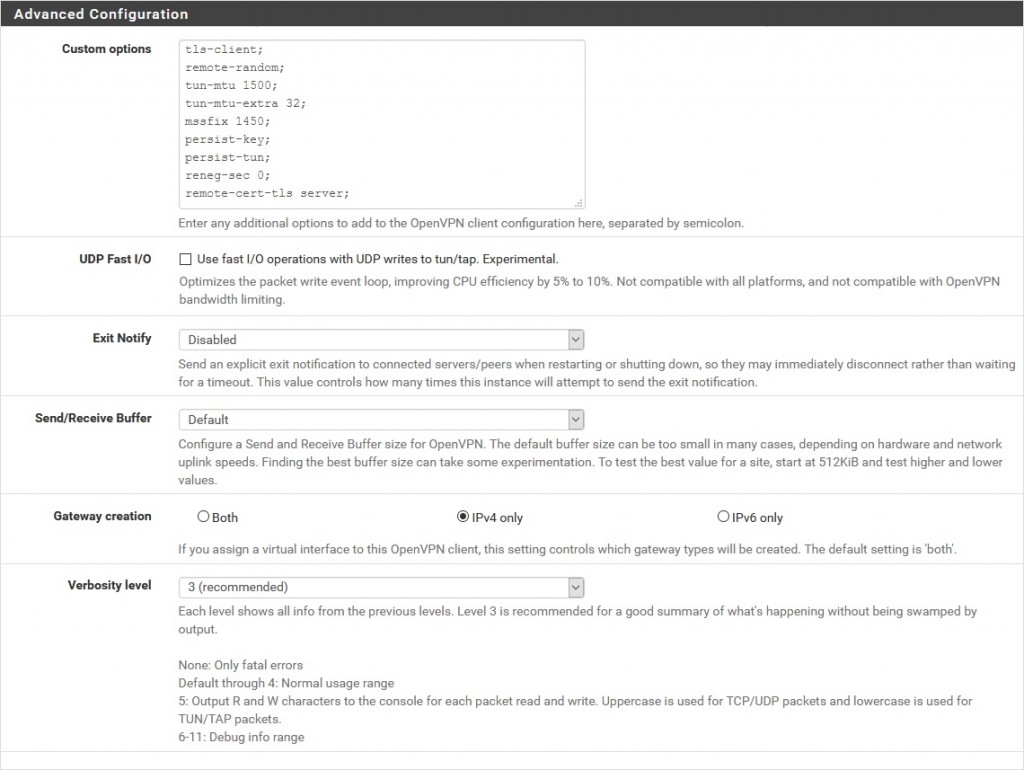
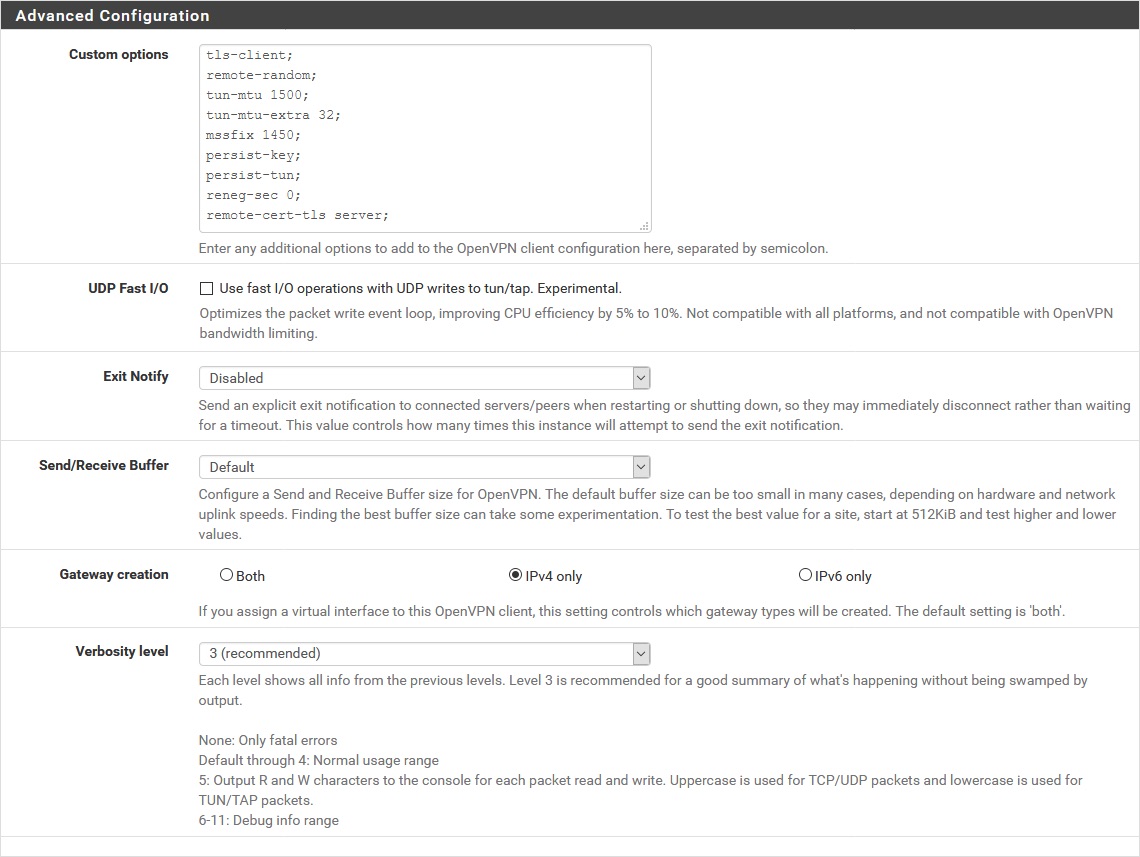
- Custom Options: Paste the following code:
tls-client;
remote-random;
tun-mtu 1500;
tun-mtu-extra 32;
mssfix 1450;
persist-key;
persist-tun;
reneg-sec 0;
remote-cert-tls server;- UDP FAST I/O: Uncheck.
- Exit Notify: Disabled.
- Send/Receive Buffer: Default.
- Gateway creation: IPv4 only.
- Verbosity level: 3 (recommended).


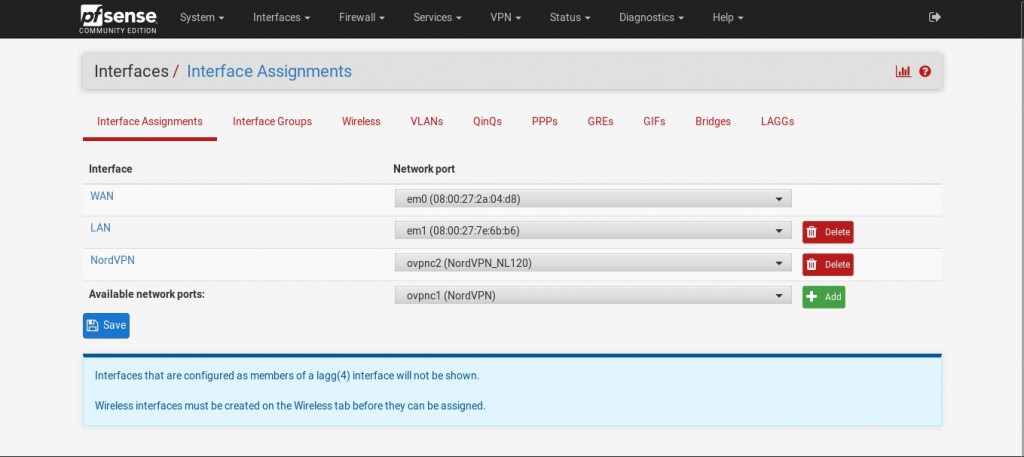
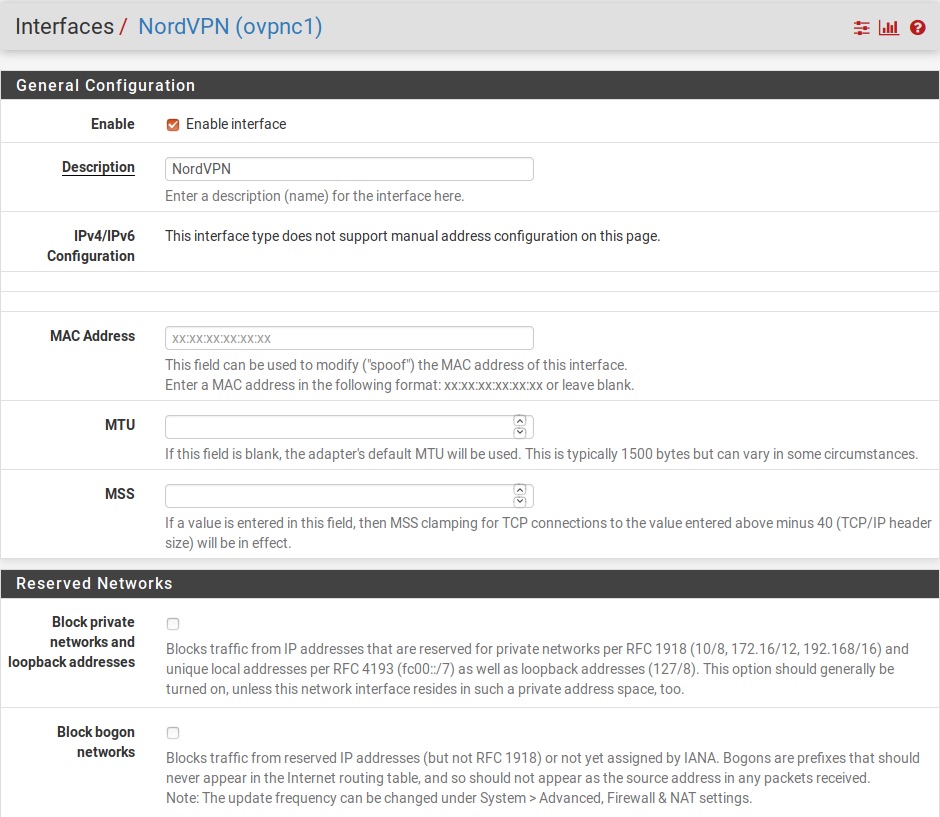
7. Move to 'Interfaces' > 'Interface Assignments' and then click on 'Add.'
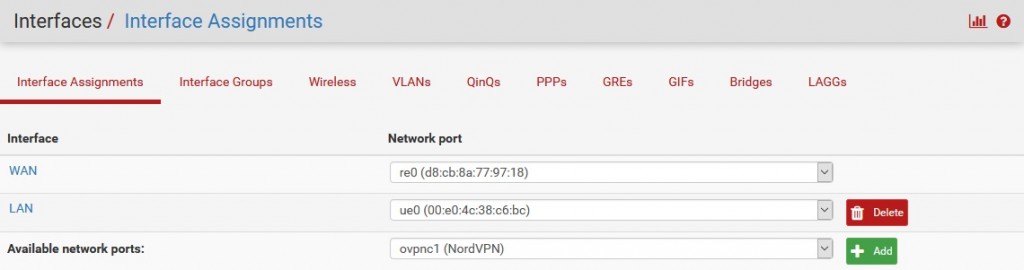
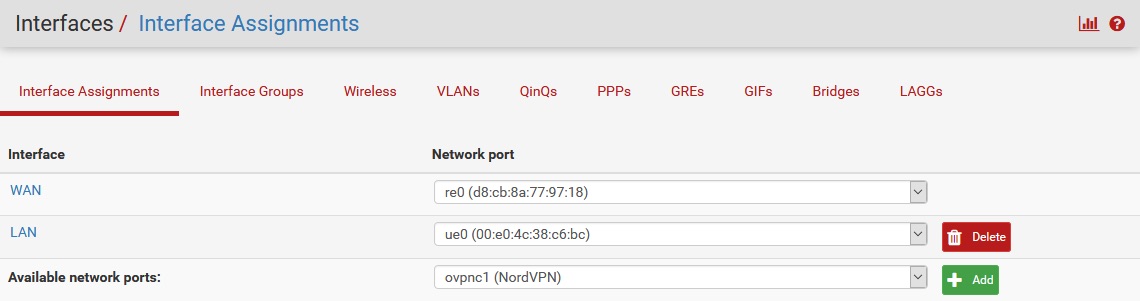
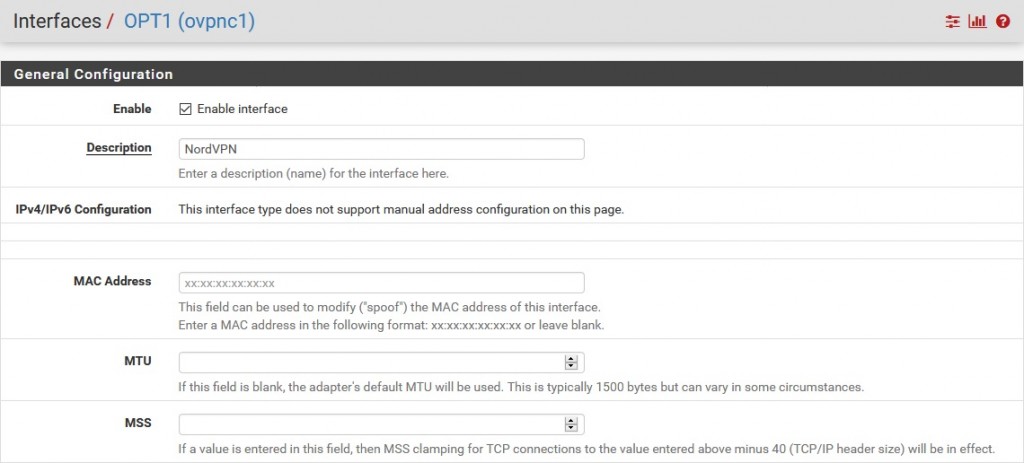
8. Choose the 'OPT1' at the left of your recently assigned interface and enter the below information.
- Enable: Check.
- Description: NordVPN.
- Mac Address: Leave blank.
- MTU: Leave blank.
- MSS: Leave blank.
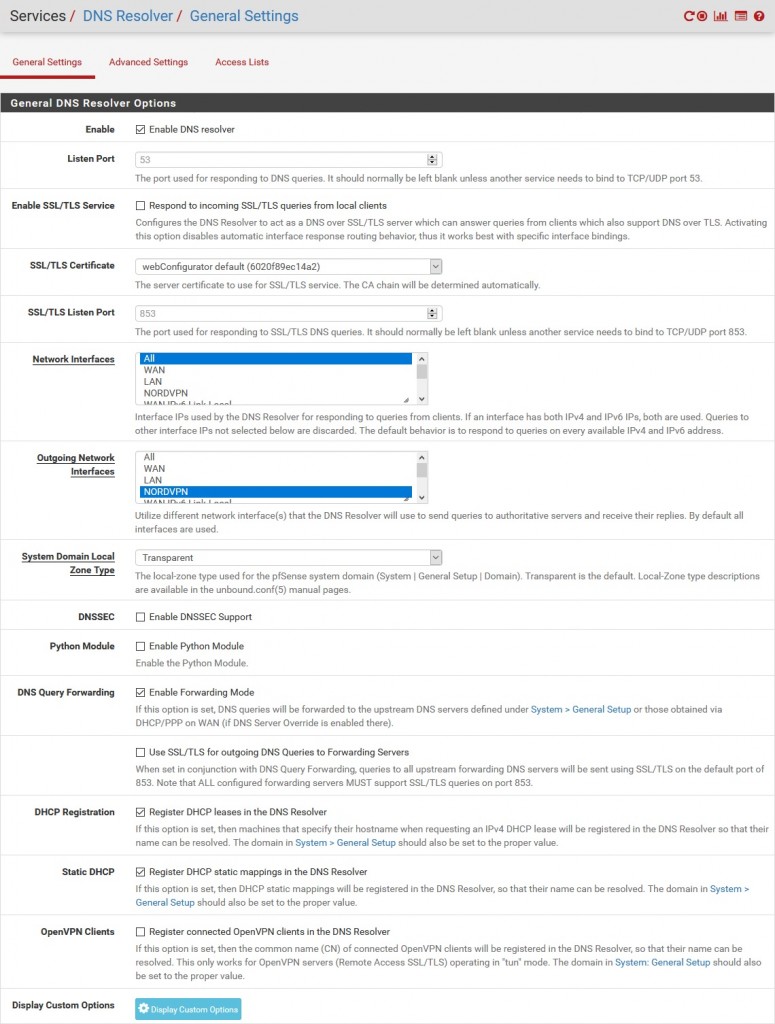
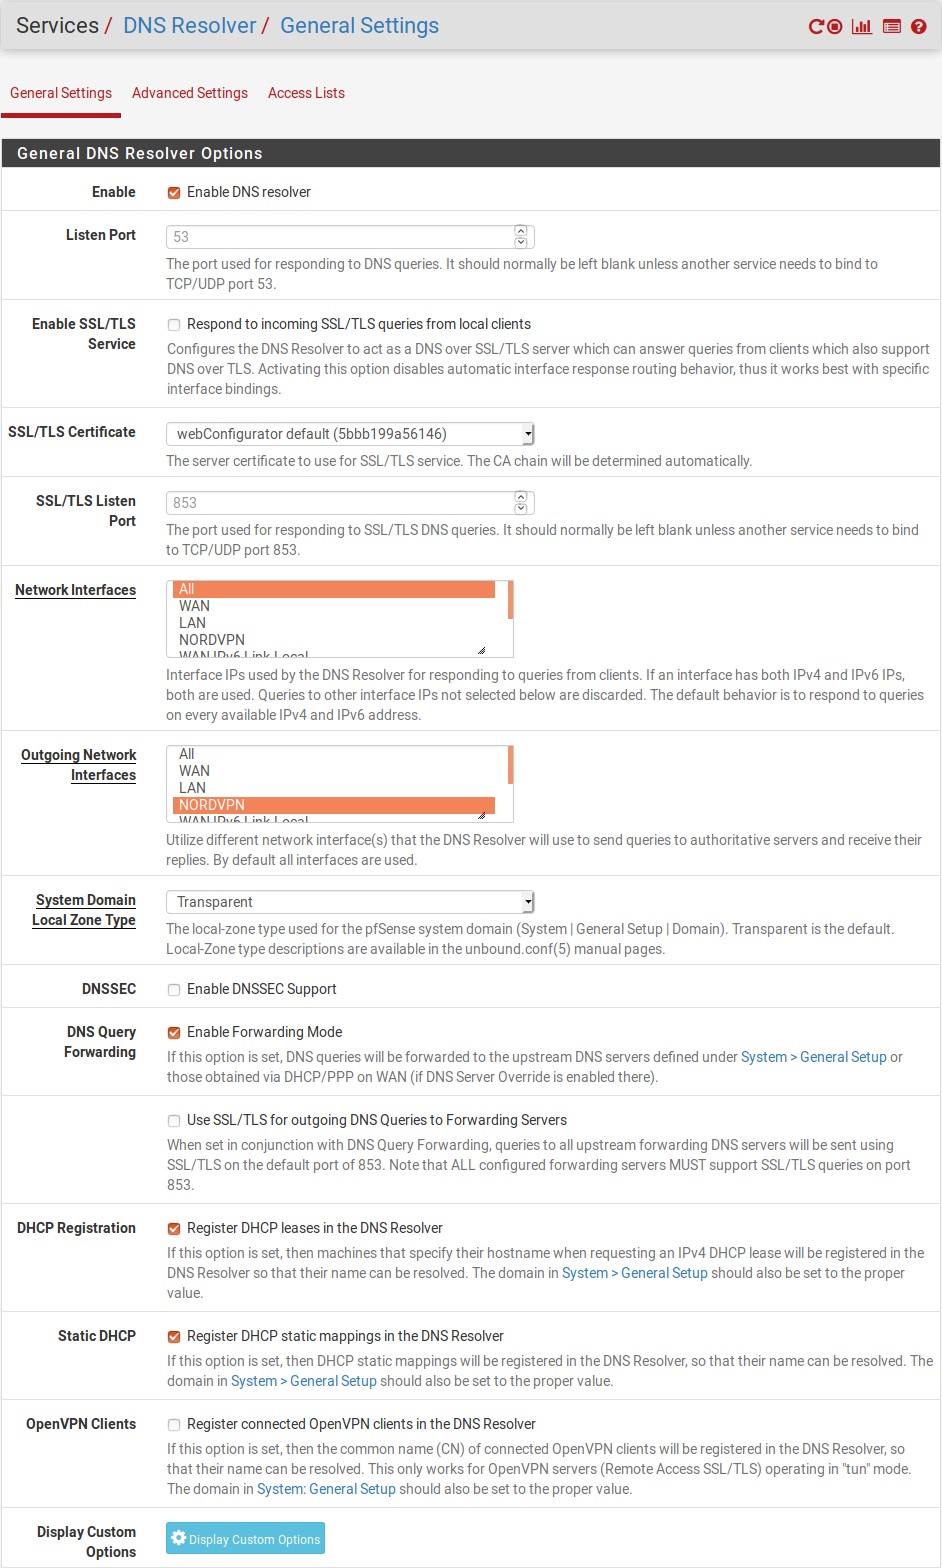
9. Press 'Save' and navigate to 'Services' > 'DNS Resolver' > 'General Settings' and fill these details:
- Enable: Check.
- Listen port: Leave as is.
- Enable SSL/TLS Service: Uncheck.
- SSL/TLS Certificate: webConfigurator default (59f92214095d8) (Server: Yes, In Use).
- SSL/TLS Listen Port: Leave it unchanged.
- Network Interfaces: All.
- Outgoing Network Interfaces: NordVPN.
- System Domains Local Zone Type: Transparent.
- DNSSEC: Uncheck.
- Python Module: Uncheck.
- DNS Query Forwarding: Check the Enable forwarding mode, and Uncheck Use SSL/TLS for outgoing DNS Queries to Forwarding Servers.
- DHCP Registration: Check.
- Static DHCP: Check.
- OpenVPN Clients: Uncheck.


10. Click the 'Save' button next.
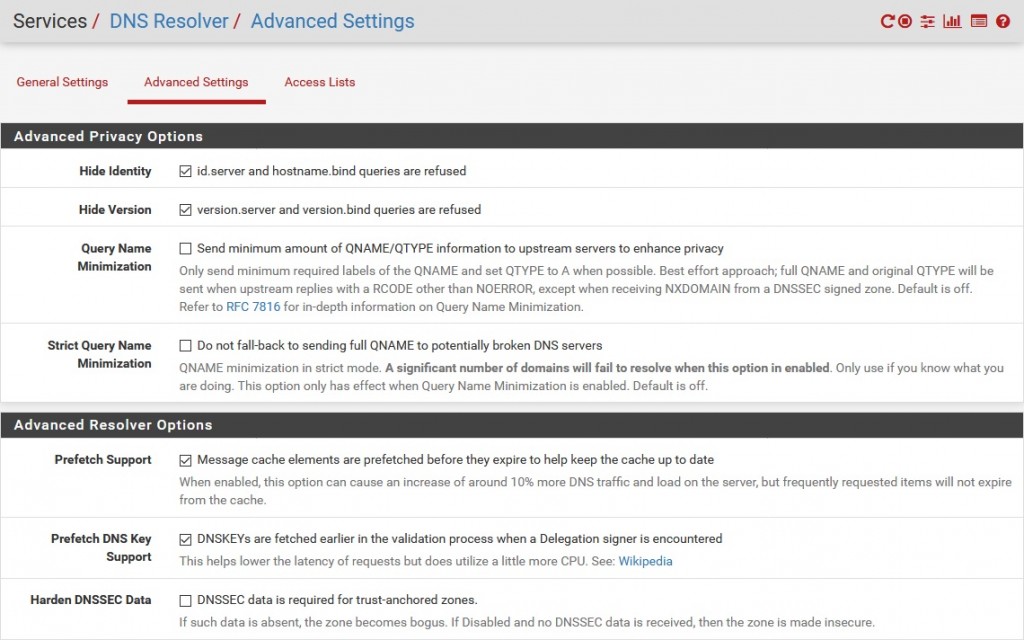
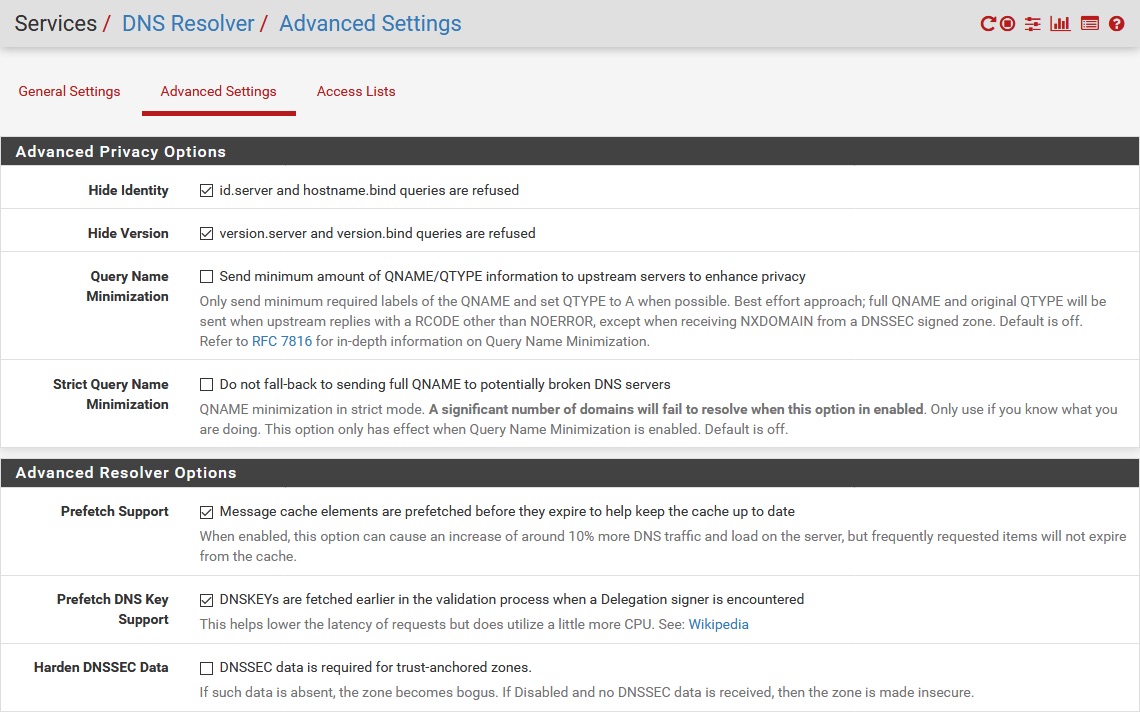
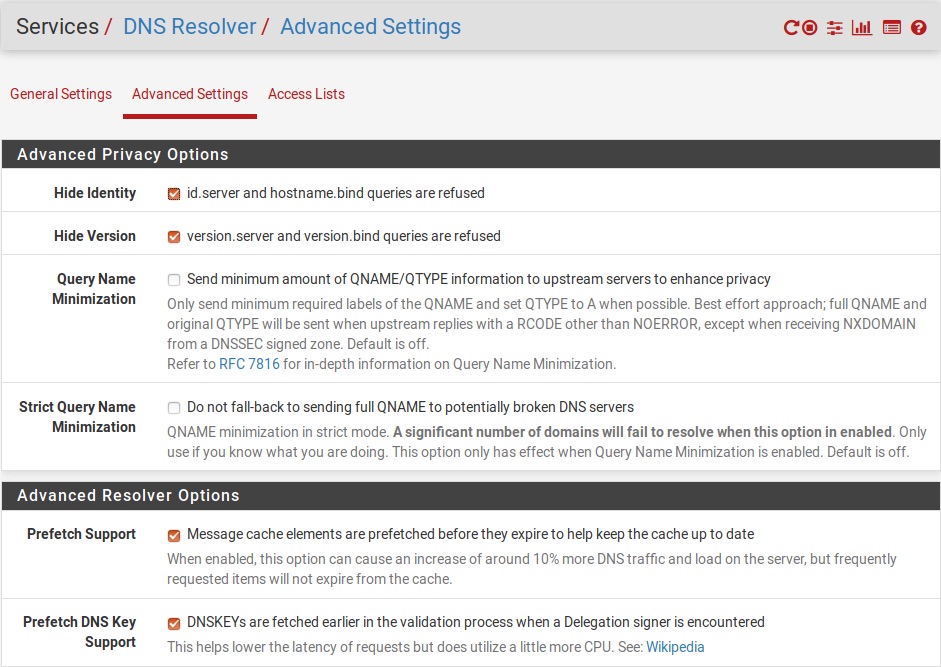
11. Move to 'DNS Resolver' > 'Advanced Settings' and enter the information mentioned below:
Advanced Privacy Options:
- Hide Identity: Check.
- Hide Version: Check.
- Query Name Minimization: Uncheck.
- Strict Query Name Minimization: Uncheck.
Advanced Resolver Options:
- Prefetch Support: Check.
- Prefetch DNS Key Support: Check.
- Harden DNSSEC Data: Uncheck.
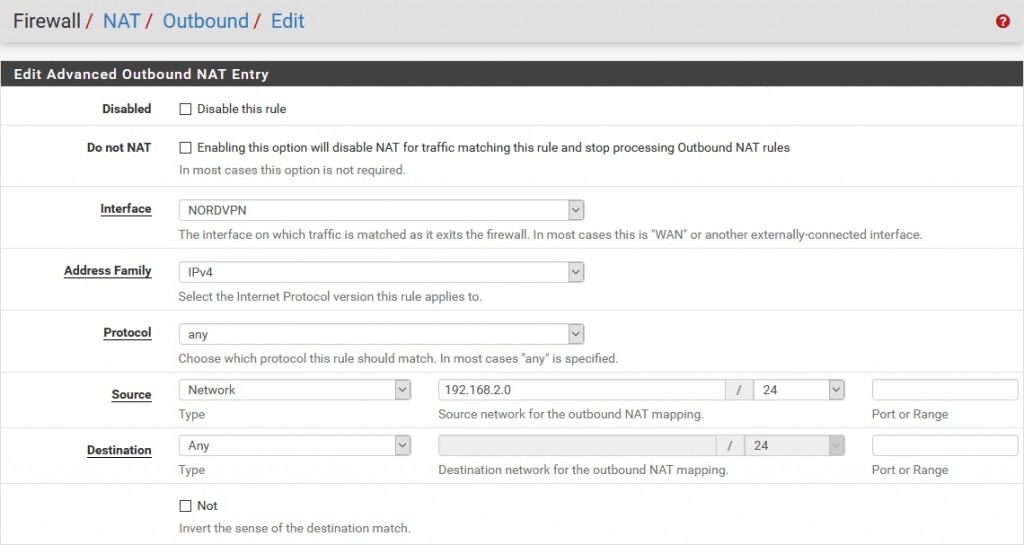
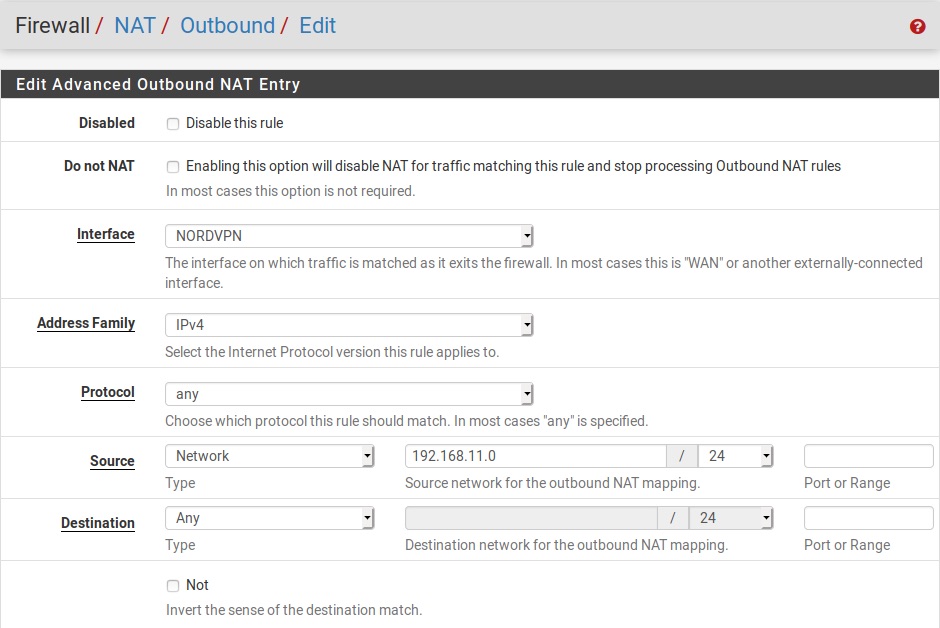
12. Next, click 'Save' and move to 'Firewall' > 'NAT' > 'Outbound.'
13. Choose 'Manual Outbound NAT rule generation' after that and press 'Save.'
14. Now, all six IPv6 rules will appear, delete all of those and add a new one based on these details:
- Set Interface as NordVPN, Address Family as IPv4, and Source as your LAN subnet, e.g., 192.168.2.0/24.
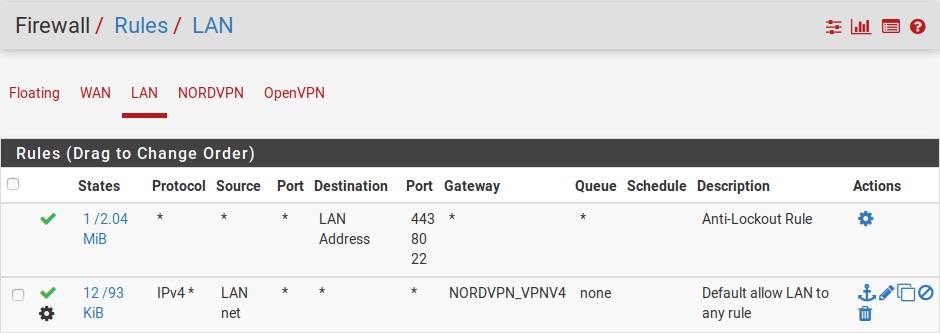
15. Click on 'Save' and move to 'Firewall' > 'Rules' > 'LAN.'
16. Click on 'Display Advanced', change the 'Gateway' > 'NordVPN' an click 'Save.'
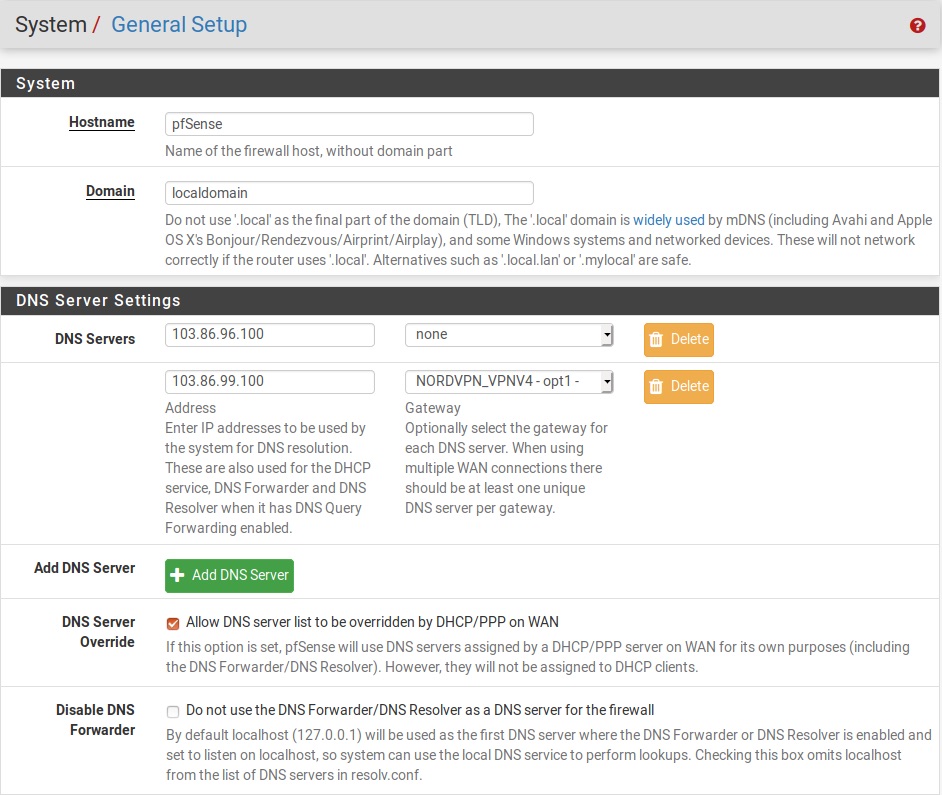
17. Once done, move to 'System' > 'General Setup' and fill in the details as mentioned:
- DNS Server 1: 103.86.96.100; none
- DNS Server 2: 103.86.99.100; NordVPN_VPNV4 - opt1 - ...
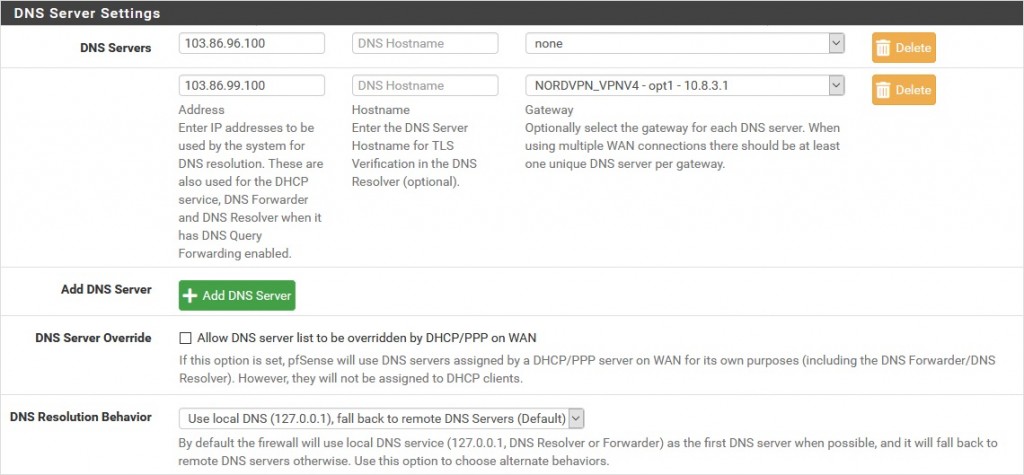

18. Press 'Save' next.
19. Once done, move to 'Status' > 'OpenVPN', and the services should be up.
Option #2: Configure NordVPN on pfSense 2.4.5
To configure NordVPN on pfSense 2.4.5, you need a server hostname (from the VPN's site) that you'll add via your pfSense interface, among other things. Do the following:
1. Subscribe to NordVPN using a Web browser on your computer.
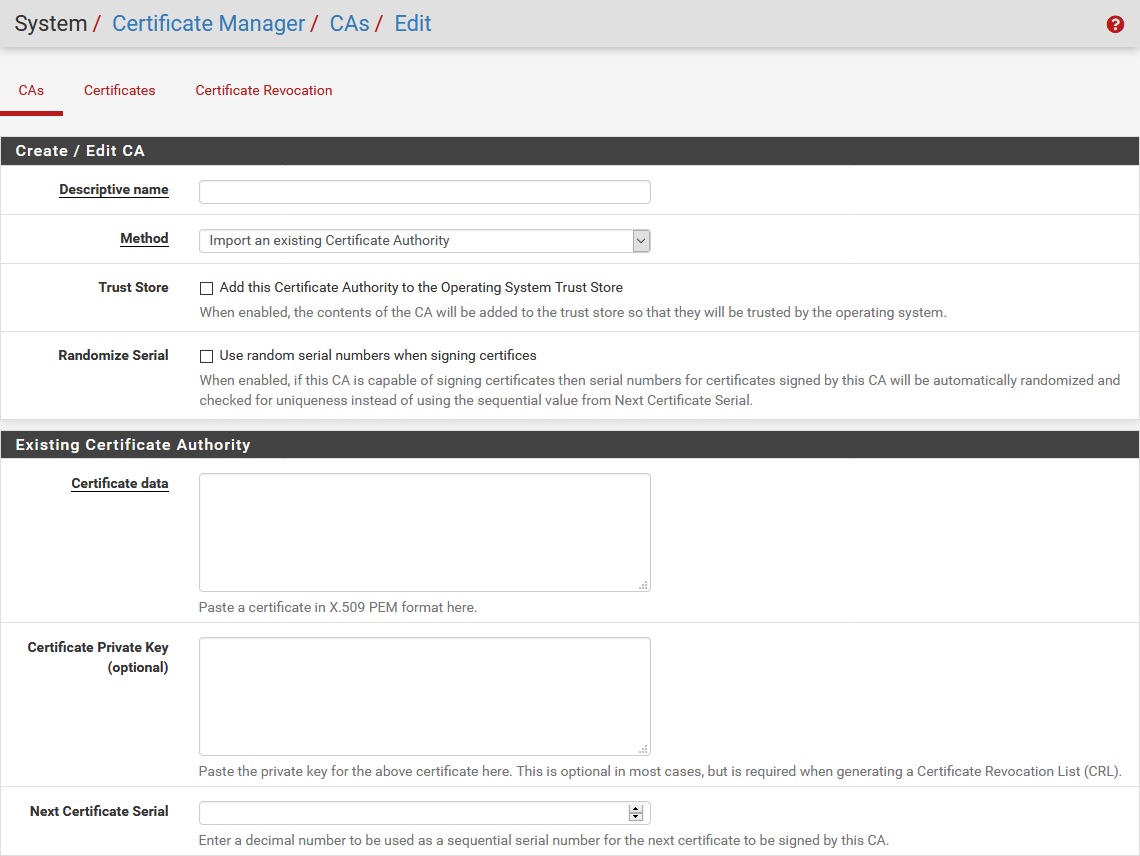
2. Visit your pfSense router's web page, and navigate to 'System' > 'Certificate Manager' > 'CAs.'
3. Click on the '+Add' button.
4. Open NordVPN's server recommendations and note your preferred server's hostname.

5. Next, fill in the details mentioned below:
- Descriptive Name: Any name.
- Method: Import an existing Certificate Authority.
- Certificate data: Paste the following code:
-----BEGIN CERTIFICATE-----
MIIFCjCCAvKgAwIBAgIBATANBgkqhkiG9w0BAQ0FADA5MQswCQYDVQQGEwJQQTEQ
MA4GA1UEChMHTm9yZFZQTjEYMBYGA1UEAxMPTm9yZFZQTiBSb290IENBMB4XDTE2
MDEwMTAwMDAwMFoXDTM1MTIzMTIzNTk1OVowOTELMAkGA1UEBhMCUEExEDAOBgNV
BAoTB05vcmRWUE4xGDAWBgNVBAMTD05vcmRWUE4gUm9vdCBDQTCCAiIwDQYJKoZI
hvcNAQEBBQADggIPADCCAgoCggIBAMkr/BYhyo0F2upsIMXwC6QvkZps3NN2/eQF
kfQIS1gql0aejsKsEnmY0Kaon8uZCTXPsRH1gQNgg5D2gixdd1mJUvV3dE3y9FJr
XMoDkXdCGBodvKJyU6lcfEVF6/UxHcbBguZK9UtRHS9eJYm3rpL/5huQMCppX7kU
eQ8dpCwd3iKITqwd1ZudDqsWaU0vqzC2H55IyaZ/5/TnCk31Q1UP6BksbbuRcwOV
skEDsm6YoWDnn/IIzGOYnFJRzQH5jTz3j1QBvRIuQuBuvUkfhx1FEwhwZigrcxXu
MP+QgM54kezgziJUaZcOM2zF3lvrwMvXDMfNeIoJABv9ljw969xQ8czQCU5lMVmA
37ltv5Ec9U5hZuwk/9QO1Z+d/r6Jx0mlurS8gnCAKJgwa3kyZw6e4FZ8mYL4vpRR
hPdvRTWCMJkeB4yBHyhxUmTRgJHm6YR3D6hcFAc9cQcTEl/I60tMdz33G6m0O42s
Qt/+AR3YCY/RusWVBJB/qNS94EtNtj8iaebCQW1jHAhvGmFILVR9lzD0EzWKHkvy
WEjmUVRgCDd6Ne3eFRNS73gdv/C3l5boYySeu4exkEYVxVRn8DhCxs0MnkMHWFK6
MyzXCCn+JnWFDYPfDKHvpff/kLDobtPBf+Lbch5wQy9quY27xaj0XwLyjOltpiST
LWae/Q4vAgMBAAGjHTAbMAwGA1UdEwQFMAMBAf8wCwYDVR0PBAQDAgEGMA0GCSqG
SIb3DQEBDQUAA4ICAQC9fUL2sZPxIN2mD32VeNySTgZlCEdVmlq471o/bDMP4B8g
nQesFRtXY2ZCjs50Jm73B2LViL9qlREmI6vE5IC8IsRBJSV4ce1WYxyXro5rmVg/
k6a10rlsbK/eg//GHoJxDdXDOokLUSnxt7gk3QKpX6eCdh67p0PuWm/7WUJQxH2S
DxsT9vB/iZriTIEe/ILoOQF0Aqp7AgNCcLcLAmbxXQkXYCCSB35Vp06u+eTWjG0/
pyS5V14stGtw+fA0DJp5ZJV4eqJ5LqxMlYvEZ/qKTEdoCeaXv2QEmN6dVqjDoTAo
k0t5u4YRXzEVCfXAC3ocplNdtCA72wjFJcSbfif4BSC8bDACTXtnPC7nD0VndZLp
+RiNLeiENhk0oTC+UVdSc+n2nJOzkCK0vYu0Ads4JGIB7g8IB3z2t9ICmsWrgnhd
NdcOe15BincrGA8avQ1cWXsfIKEjbrnEuEk9b5jel6NfHtPKoHc9mDpRdNPISeVa
wDBM1mJChneHt59Nh8Gah74+TM1jBsw4fhJPvoc7Atcg740JErb904mZfkIEmojC
VPhBHVQ9LHBAdM8qFI2kRK0IynOmAZhexlP/aT/kpEsEPyaZQlnBn3An1CRz8h0S
PApL8PytggYKeQmRhl499+6jLxcZ2IegLfqq41dzIjwHwTMplg+1pKIOVojpWA==
-----END CERTIFICATE-----
6. Now, click 'Save.'
7. Move to 'VPN' > 'OpenVPN' > 'Clients' > '+Add' and enter the below-mentioned details:
- Disable this client: Uncheck.
- Server mode: Peer to Peer (SSL/TLS).
- Protocol: UDP on IPv4 only (Alternatively, you can use TCP).
- Device mode: tun – Layer 3 Tunnel Mode.
- Interface: WAN.
- Local port: Blank.
- Server host or address: The hostname of your preferred server.
- Server port: 1194 (Select 443 for TCP).
- Proxy host or address: Blank.
- Proxy port: Blank.
- Proxy Authentication: None.
- Description: Any name.


User Authentication Settings
In this step, you need to input your NordVPN service credentials. Here's how you can get them:
- Go to the NordVPN account dashboard and choose 'NordVPN' from the left bar.
- Click on 'Set up NordVPN manually.'
- Enter the verification code received on your NordVPN-associated email.
- Copy your service Username and Password under the 'Service credentials (manual setup)' box.
Under 'User Authentication Settings' on your pfSense page, input the following details:
- Username: Input your NordVPN service username.
- Password: Enter your NordVPN service password in both fields.
- Authentication Retry: Let it stay unchecked.
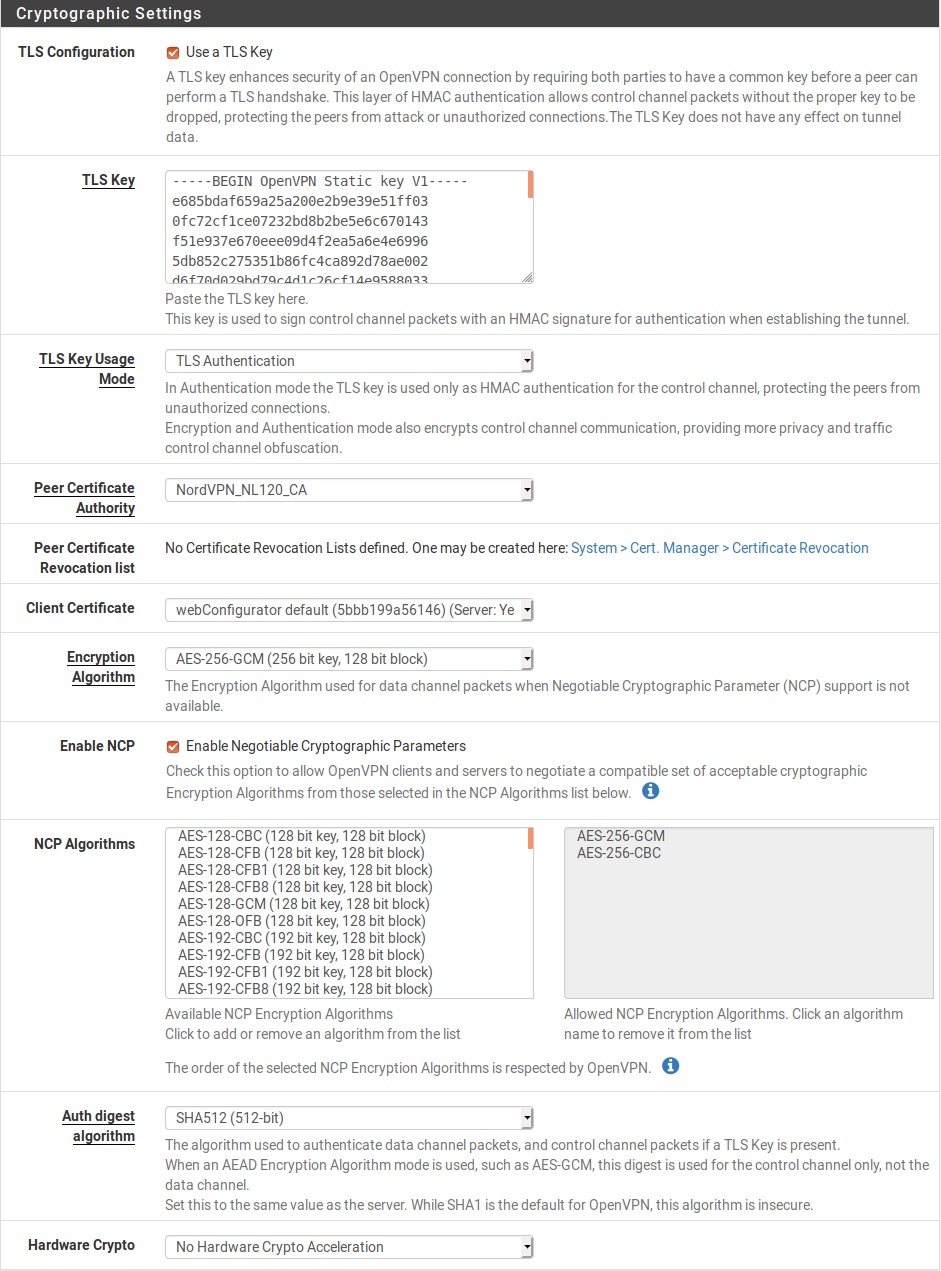
Cryptographic Settings
- TLS Configuration: Check Use a TLS Key; Uncheck Automatically generate a TLS key.
- TLS Key: Paste the following code:
-----BEGIN OpenVPN Static key V1-----
e685bdaf659a25a200e2b9e39e51ff03
0fc72cf1ce07232bd8b2be5e6c670143
f51e937e670eee09d4f2ea5a6e4e6996
5db852c275351b86fc4ca892d78ae002
d6f70d029bd79c4d1c26cf14e9588033
cf639f8a74809f29f72b9d58f9b8f5fe
fc7938eade40e9fed6cb92184abb2cc1
0eb1a296df243b251df0643d53724cdb
5a92a1d6cb817804c4a9319b57d53be5
80815bcfcb2df55018cc83fc43bc7ff8
2d51f9b88364776ee9d12fc85cc7ea5b
9741c4f598c485316db066d52db4540e
212e1518a9bd4828219e24b20d88f598
a196c9de96012090e333519ae18d3509
9427e7b372d348d352dc4c85e18cd4b9
3f8a56ddb2e64eb67adfc9b337157ff4
-----END OpenVPN Static key V1------ TLS Key Usage Mode: TLS Authentication.
- TLS keydir direction: Use default direction.
- Peer certificate authority: NordVPN_CA.
- Peer Certificate Revocation list: No need to define.
- Client certificate: Choose webConfigurator default (59f92214095d8) (Server: Yes, In Use).
- Encryption Algorithm: AES-256-GCM.
- Enable NCP: Check.
- NCP Algorithms: AES-256-GCM and AES-256-CBC.
- Auth digest algorithm: SHA512 (512-bit).
- Hardware Crypto: No Hardware Crypto Acceleration.
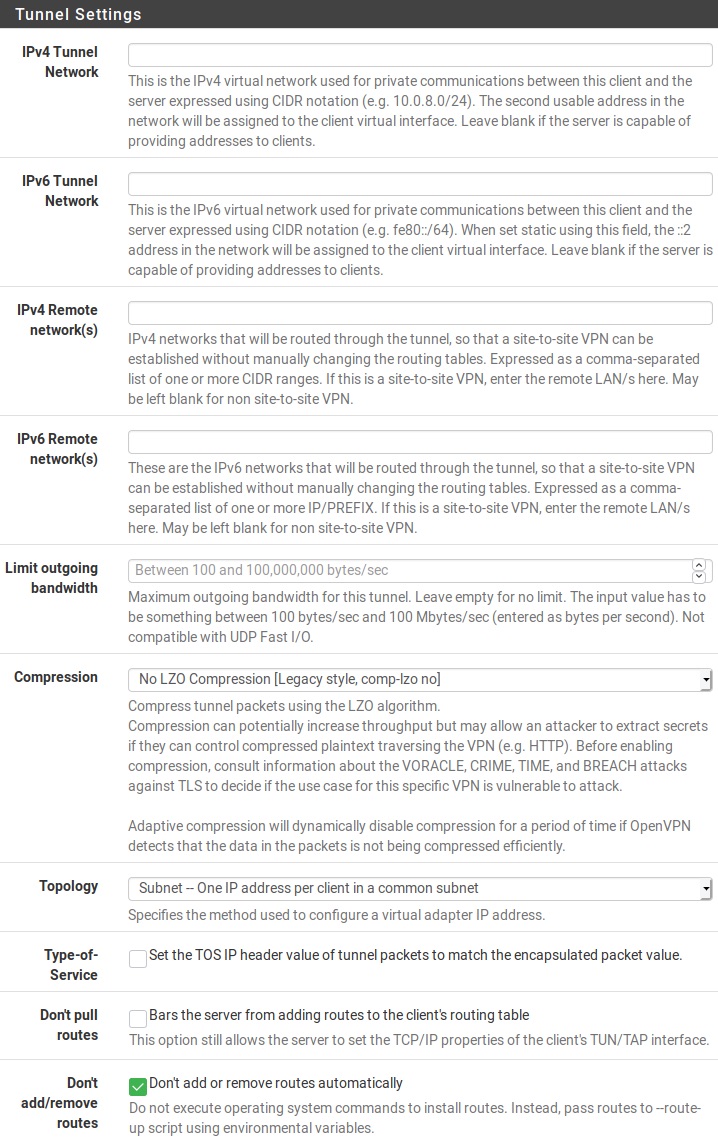
Tunnel Settings
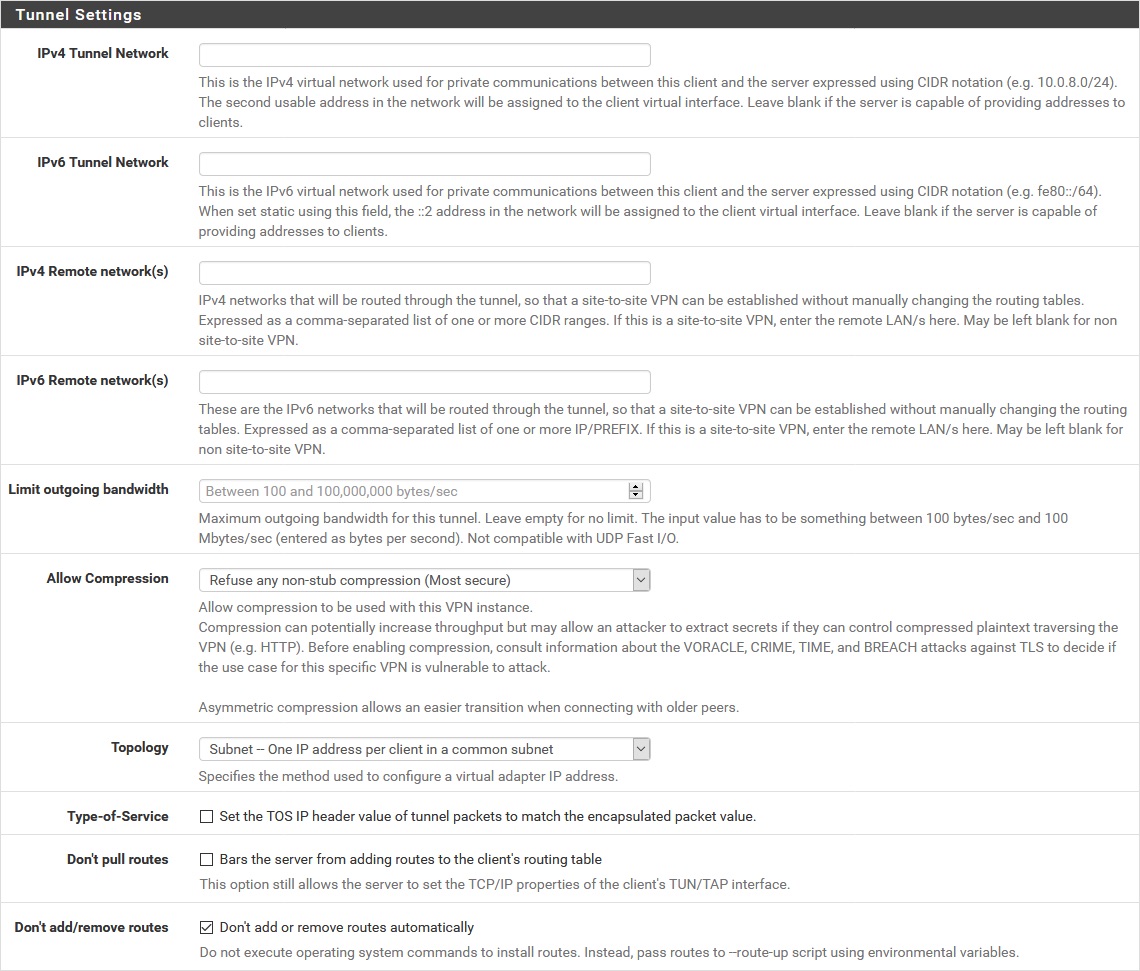
- IPv4 tunnel network: Blank.
- IPv6 tunnel network: Blank.
- IPv4 remote network(s): Blank.
- IPv6 remote network(s): Blank.
- Limit outgoing bandwidth: Blank.
- Compression: No LZO Compression [Legacy style,comp-lzo no].
- Topology: Subnet – One IP address per client in a common subnet.
- Type-of-Service: Uncheck.
- Don’t pull routes: Uncheck.
- Don’t add/remove routes: Check.
Advanced Configuration
- Custom Options: Paste the following code:
tls-client;
remote-random;
tun-mtu 1500;
tun-mtu-extra 32;
mssfix 1450;
persist-key;
persist-tun;
reneg-sec 0;
remote-cert-tls server;- UDP FAST I/O: Uncheck.
- Exit Notify: Disabled.
- Send/Receive Buffer: Default.
- Gateway creation: IPv4 only.
- Verbosity level: 3 (recommended).
8. Next, move on to 'Interfaces' > 'Interface Assignments' and 'Add' the NordVPN interface.
9. After that, click the 'OPT1' option and fill in the below information in the assigned interface:
- Enable: Check.
- Description: NordVPN.
- Mac Address: Blank.
- MTU: Blank.
- MSS: Blank.
10. No need to change anything else; just click 'Save.'
11. Now, locate 'Services' > 'DNS Resolver' > 'General Settings.'
12. Enter the below details now:
- Enable: Check.
- Listen port: Leave unchanged.
- Enable SSL/TLS Service: Uncheck.
- SSL/TLS Certificate: webConfigurator default (59f92214095d8) (Server: Yes, In Use).
- SSL/TLS Listen Port: Leave as is.
- Network Interfaces: All.
- Outgoing Network Interfaces: NORDVPN.
- System Domains Local Zone Type: Transparent.
- DNSSEC: Uncheck.
- Python Module: Uncheck.
- DNS Query Forwarding: Check Enable forwarding mode; Uncheck Use SSL/TLS for outgoing DNS Queries to Forwarding Servers.
- DHCP Registration: Check.
- Static DHCP: Check.
- OpenVPN Clients: Uncheck.

13. Click 'Save' once done.
14. Move to DNS Resolver next and select the 'Advanced Settings' tab. Fill in the below information:
Advanced Privacy Options
- Hide Identity: Check.
- Hide Version: Check.
- Query Name Minimization: Uncheck.
- Strict Query Name Minimization: Uncheck.
Advanced Resolver Options
- Prefetch Support: Check.
- Prefetch DNS Key Support: Check.
- Harden DNSSEC Data: Uncheck.


15. No need to change other options, just press 'Save.'
16. Move to 'Firewall' > 'NAT' > 'Outbound' and choose 'Manual Outbound NAT rule generation.'
17. Click 'Save' now, and all 6 rules of IPv6 will appear.
18. You need to delete all the rules and add a new one with the following details:
- The Interface will be NordVPN, and the Source will be your LAN subnet, i.e., 192.168.2.0/24.
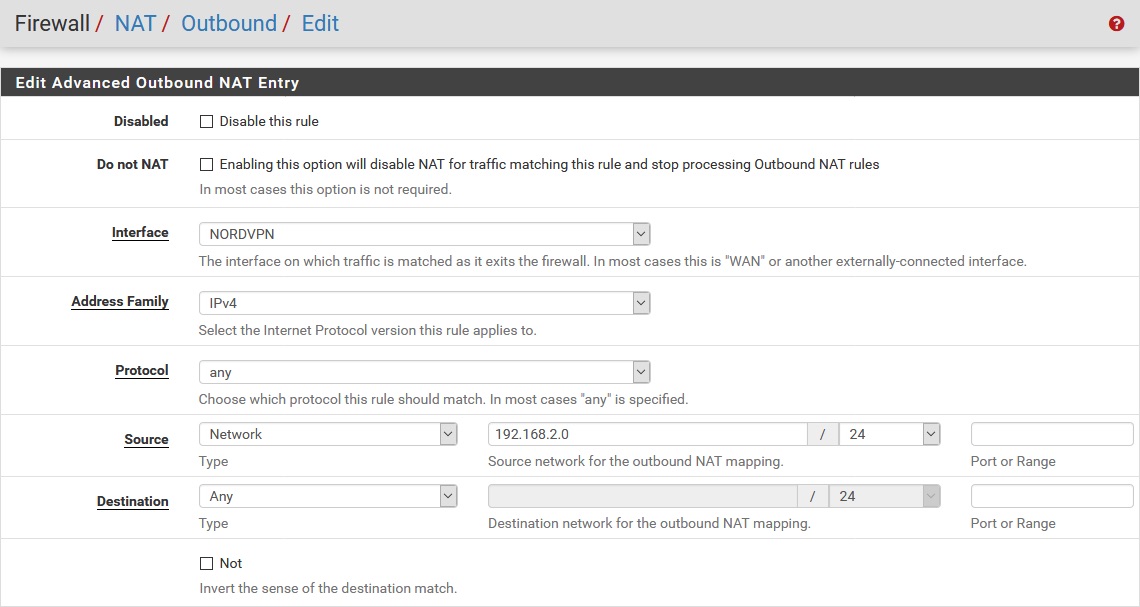
19. Click the 'Save' button now and navigate to 'Firewall' > 'Rules' > 'LAN.'
20. You've to delete the IPv6 rule now and edit the IPv4 rule.
21. To edit that, click 'Show Advanced Options' and change the Gateway to NordVPN.
22. Next, click 'Save' and move to 'System' > 'General Setup.'
23. Now, enter the primary and secondary servers as follows-
- DNS Server 1: 103.86.96.100; none
- DNS Server 2: 103.86.99.100; NordVPN_VPNV4 - opt1 - ...
24. Then, hit the 'Save' button.
25. Finally, move to 'Status'> 'OpenVPN', and the VPN services should be up.
Option #3: Configure NordVPN on pfSense 2.4.4
You can configure NordVPN on pfSense 2.4.4 by picking a suitable server on NordVPN's site and then configuring an OpenVPN connection manually. Here's a step-by-step guide:
1. Sign up for NordVPN using your computer and any Web browser.
2. Access your pfSense from a web browser and choose 'System.'
3. Go to 'Certificate Manager' > 'CAs' and click on the '+Add' button.
4. Go to NordVPN's server recommendation page and note the hostname of your preferred server.

5. Fill in the details on your pfSense CAs page as mentioned below:
- Descriptive Name: Enter a name for your new VPN connection.
- Method: Choose 'Import an existing Certificate Authority.'
- Certificate data: Enter the script below.
-----BEGIN CERTIFICATE-----
MIIFCjCCAvKgAwIBAgIBATANBgkqhkiG9w0BAQ0FADA5MQswCQYDVQQGEwJQQTEQ
MA4GA1UEChMHTm9yZFZQTjEYMBYGA1UEAxMPTm9yZFZQTiBSb290IENBMB4XDTE2
MDEwMTAwMDAwMFoXDTM1MTIzMTIzNTk1OVowOTELMAkGA1UEBhMCUEExEDAOBgNV
BAoTB05vcmRWUE4xGDAWBgNVBAMTD05vcmRWUE4gUm9vdCBDQTCCAiIwDQYJKoZI
hvcNAQEBBQADggIPADCCAgoCggIBAMkr/BYhyo0F2upsIMXwC6QvkZps3NN2/eQF
kfQIS1gql0aejsKsEnmY0Kaon8uZCTXPsRH1gQNgg5D2gixdd1mJUvV3dE3y9FJr
XMoDkXdCGBodvKJyU6lcfEVF6/UxHcbBguZK9UtRHS9eJYm3rpL/5huQMCppX7kU
eQ8dpCwd3iKITqwd1ZudDqsWaU0vqzC2H55IyaZ/5/TnCk31Q1UP6BksbbuRcwOV
skEDsm6YoWDnn/IIzGOYnFJRzQH5jTz3j1QBvRIuQuBuvUkfhx1FEwhwZigrcxXu
MP+QgM54kezgziJUaZcOM2zF3lvrwMvXDMfNeIoJABv9ljw969xQ8czQCU5lMVmA
37ltv5Ec9U5hZuwk/9QO1Z+d/r6Jx0mlurS8gnCAKJgwa3kyZw6e4FZ8mYL4vpRR
hPdvRTWCMJkeB4yBHyhxUmTRgJHm6YR3D6hcFAc9cQcTEl/I60tMdz33G6m0O42s
Qt/+AR3YCY/RusWVBJB/qNS94EtNtj8iaebCQW1jHAhvGmFILVR9lzD0EzWKHkvy
WEjmUVRgCDd6Ne3eFRNS73gdv/C3l5boYySeu4exkEYVxVRn8DhCxs0MnkMHWFK6
MyzXCCn+JnWFDYPfDKHvpff/kLDobtPBf+Lbch5wQy9quY27xaj0XwLyjOltpiST
LWae/Q4vAgMBAAGjHTAbMAwGA1UdEwQFMAMBAf8wCwYDVR0PBAQDAgEGMA0GCSqG
SIb3DQEBDQUAA4ICAQC9fUL2sZPxIN2mD32VeNySTgZlCEdVmlq471o/bDMP4B8g
nQesFRtXY2ZCjs50Jm73B2LViL9qlREmI6vE5IC8IsRBJSV4ce1WYxyXro5rmVg/
k6a10rlsbK/eg//GHoJxDdXDOokLUSnxt7gk3QKpX6eCdh67p0PuWm/7WUJQxH2S
DxsT9vB/iZriTIEe/ILoOQF0Aqp7AgNCcLcLAmbxXQkXYCCSB35Vp06u+eTWjG0/
pyS5V14stGtw+fA0DJp5ZJV4eqJ5LqxMlYvEZ/qKTEdoCeaXv2QEmN6dVqjDoTAo
k0t5u4YRXzEVCfXAC3ocplNdtCA72wjFJcSbfif4BSC8bDACTXtnPC7nD0VndZLp
+RiNLeiENhk0oTC+UVdSc+n2nJOzkCK0vYu0Ads4JGIB7g8IB3z2t9ICmsWrgnhd
NdcOe15BincrGA8avQ1cWXsfIKEjbrnEuEk9b5jel6NfHtPKoHc9mDpRdNPISeVa
wDBM1mJChneHt59Nh8Gah74+TM1jBsw4fhJPvoc7Atcg740JErb904mZfkIEmojC
VPhBHVQ9LHBAdM8qFI2kRK0IynOmAZhexlP/aT/kpEsEPyaZQlnBn3An1CRz8h0S
PApL8PytggYKeQmRhl499+6jLxcZ2IegLfqq41dzIjwHwTMplg+1pKIOVojpWA==
-----END CERTIFICATE-----
6. Hit the 'Save' button and navigate to 'VPN' > 'OpenVPN' > 'Clients.'
7. Click on the '+Add' button.
8. Fill in the details mentioned below:
- Disable this client: Uncheck this field.
- Server mode: Choose 'Peer to Peer (SSL/TLS).'
- Protocol: Select UDP on IPv4 only (you can also use TCP if you're having issues with UDP).
- Device mode: tun – Layer 3 Tunnel Mode.
- Interface: Choose WAN.
- Local port: Leave it blank.
- Server host or address: Enter the NordVPN server's hostname that you noted earlier.
- Server port: Choose 1194 (use 443 in case of TCP).
- Proxy host or address: Let this field be blank.
- Proxy port: Keep it blank.
- Proxy Authentication: None.
- Description: Enter any name for administrative reference (it won't affect your connection).
User Authentication Settings
First, you need to copy your NordVPN service credentials. Here's how you can get them:
- Open your NordVPN account dashboard and click on 'NordVPN' in the left bar.
- Choose 'Set up NordVPN manually.'
- Enter the verification code received on your NordVPN-associated email.
- Copy the Username and Password under the box titled 'Service credentials (manual setup).'
Now, fill in the following fields under 'User Authentication Settings' on your pfSense page.
- Username: This will include your NordVPN service username.
- Password: Both these fields will include your NordVPN service password.
- Authentication Retry: Leave this unchecked.

Cryptographic Settings
- TLS Configuration: Check
- TLS Key: Enter the script below:
-----BEGIN OpenVPN Static key V1-----
e685bdaf659a25a200e2b9e39e51ff03
0fc72cf1ce07232bd8b2be5e6c670143
f51e937e670eee09d4f2ea5a6e4e6996
5db852c275351b86fc4ca892d78ae002
d6f70d029bd79c4d1c26cf14e9588033
cf639f8a74809f29f72b9d58f9b8f5fe
fc7938eade40e9fed6cb92184abb2cc1
0eb1a296df243b251df0643d53724cdb
5a92a1d6cb817804c4a9319b57d53be5
80815bcfcb2df55018cc83fc43bc7ff8
2d51f9b88364776ee9d12fc85cc7ea5b
9741c4f598c485316db066d52db4540e
212e1518a9bd4828219e24b20d88f598
a196c9de96012090e333519ae18d3509
9427e7b372d348d352dc4c85e18cd4b9
3f8a56ddb2e64eb67adfc9b337157ff4
-----END OpenVPN Static key V1------ TLS Key Usage Mode: TLS Authentication.
- Peer certificate authority: NordVPN_NL120_CA.
- Peer Certificate Revocation list: Leave this as it is.
- Client Certificate: Choose webConfigurator default (59f92214095d8) (Server: Yes, In Use).
- Encryption Algorithm: AES-256-GCM.
- Enable NCP: Check this box.
- NCP Algorithms: AES-256-GCM and AES-256-CBC.
- Auth digest algorithm: SHA512 (512-bit).
- Hardware Crypto: Choose 'No Hardware Crypto Acceleration.'
Tunnel Settings
- IPv4 tunnel network: Blank.
- IPv6 tunnel network: Blank.
- IPv4 remote network(s): Blank.
- IPv6 remote network(s): Blank.
- Limit outgoing bandwidth: Blank.
- Compression: Choose 'No LZO Compression [Legacy style,comp-lzo no].'
- Topology: Pick 'Subnet – One IP address per client in a common subnet.'
- Type-of-service: Keep this unchecked.
- Don’t pull routes: Leave this unchecked.
- Don’t add/remove routes: Check this box.
Advanced Configuration
- Custom Options: Enter the below script:
tls-client;
remote-random;
tun-mtu 1500;
tun-mtu-extra 32;
mssfix 1450;
persist-key;
persist-tun;
reneg-sec 0;
remote-cert-tls server;- UDP FAST I/O: Uncheck.
- Send/Receive Buffer: Default.
- Gateway creation: IPv4 only.
- Verbosity level: Select '3 (recommended).'
9. When done, move to 'Interfaces' > 'Interface Assignments' and add the 'NordVPN NL120' interface.

10. Now, hit 'OPT1' and fill in the below details:
- Enable: Check.
- Description: NordVPN.
- Mac Address: Blank.
- MTU: Blank.
- MSS: Blank.
11. No need to change anything else; just scroll down and click 'Save.'
12. Now, move to 'Services' > 'DNS Resolver' > 'General Settings' and enter the below details:
- Enable: Check.
- Listen port: Leave it as it is.
- Enable SSL/TLS Service: Uncheck this.
- SSL/TLS Certificate: webConfigurator default (59f92214095d8).
- SSL/TLS Listen Port: No need to change.
- Network Interfaces: All.
- Outgoing Network Interfaces: NordVPN.
- System Domains Local Zone Type: Transparent.
- DNSSEC: Uncheck this.
- DNS Query Forwarding: Check.
- DHCP Registration: Check.
- Static DHCP: Check.
13. Next, click on 'Save.'

14. In 'DNS Resolver', choose 'Advanced Settings' and fill in the below details:
Advanced Privacy Options:
- Hide Identity: Check.
- Hide Version: Check.
Advanced Resolver Options:
- Prefetch Support: Check.
- Prefetch DNS Key Support: Check.
15. Now, click on 'Save.'
16. Next, go to 'Firewall' > 'NAT' > 'Outbound' and click on 'Manual Outbound NAT rule generation.'
17. Click on the 'Save' button.
18. Four rules will appear now; add a new one:
- Interface: NordVPN.
- Source: LAN subnet.
19. Click on 'Save.'
20. Now, move to 'Firewall' > 'Rules' > 'LAN' to delete the 'IPv6' rule.
21. Edit the IPv4 rule next. For that, click 'Show Advanced Options', change the 'Gateway' > 'NordVPN.'
22. 'Save' your options.
23. Now move to 'System' > 'General Setup' and enter the below details-
- DNS Server 1: 103.86.96.100; none
- DNS Server 2: 103.86.99.100; NordVPN_VPNV4-…
24. Click 'Save.'
25. After that, move to 'Status' > 'OpenVPN,' and the services should be up.
Final Thoughts
NordVPN supports a range of pfSense firmware versions, such as 2.4.4, 2.4.5, 2.5, and up to 2.7, and they all share the same installation instructions - with some degree of separation, of course. That said, the end goal is always the same - you'll end up with a VPN connection on your pfSense router, so you'll protect your entire household's devices at once.
Setting up a VPN on pfSense is a tricky procedure, as it involves many steps. Therefore, in case you get stuck at any point, it's good to know that NordVPN's live chat support should be able to pinpoint and help you resolve technical issues. That's what makes NordVPN the best VPN for pfSense, even though you'll find some pretty capable alternatives as well.
Nonetheless, you can also count on NordVPN's standalone applications for devices not connected to your pfSense router. Our guide on how to set up NordVPN should be your next destination, as it covers dozens of different that you can simultaneously connect to NordVPN.
This is where we wrap up our guide. If you have further queries, drop us a comment through the button below. Thanks for reading!
Related