When you purchase through links on our site, we may earn an affiliate commission. Here’s how it works.
Kodi Not Working? How to Fix Common Problems
Last updated November 16, 2024

Are you having trouble installing or launching Kodi? Or perhaps Kodi buffers video files for too long? Well, you're probably reading this article because you've encountered a technical issue, causing Kodi to crash, misbehave, or lag. Regardless of the technical issue you are experiencing, you’ve come to the right place because we can help!
You should know that our editorial team has been using Kodi daily for several years. Considering that we like to dive deep into this application and test its limits, we’ve encountered a fair share of problems. In other words, you can be sure we know how to fix issues with Kodi.
In this guide, we present troubleshooting steps you can take to fix various problems with Kodi, optimize its performance, and ensure it's running smoothly. If you stick with us until the end, you'll also find a series of helpful FAQs.
Why You Should Always Use a VPN With Kodi
We recommend you use a reliable VPN to deal with Kodi’s severe privacy and security issues and avoid trouble with law enforcement. A seasoned Kodi user will tell you that there are thousands of addons, as highlighted in our beginner's guide to Kodi, but only a handful are officially supported. And since these addons have access to your whole system, they are arguably the weakest point.
Using unofficial Kodi addons often leads to copyright infringement, which is punishable by law in most countries. Check your own country laws before using it. A VPN helps in encrypting your Internet traffic, making it impossible for your ISP to see what you do/stream online. Aside from that, a VPN is used for bypassing geo-blocks and opening up your access to new movies, TV shows, and more on your Kodi.
Of course, not every VPN is the same, making it crucial to pick one with features aligned with Kodi and streaming. Based on our experience of testing 50+ VPN providers, NordVPN is our top recommendation, offering servers in 110+ countries with ultra-fast performance, high-end privacy, and optimized streaming.
Disclaimer: TechNadu doesn’t claim any responsibility for how our readers decide to utilize the following software. Kodi is a open-source software and its legal almost everywhere. Please note that we don’t condone sharing pirated content and copyright infringement. That means its your responsibility to respect the copyright law and use it properly.
Common Kodi Problems and How to Fix Them
Whether your Kodi crashes on startup, buffers while streaming, can't search media files, or returns dependency-related errors when installing addons, you'll find a series of actionable tips below.
1. Kodi Fails to Start (Crashes on Startup)
We’ve prepared two solutions to this problem, which luckily doesn’t happen too often. Here’s what to do when Kodi crashes on startup and refuses to launch.
Fix #1: Download the Latest Visual C++ Redistributable
If you’ve bought a new PC recently or installed a fresh copy of Windows, Kodi can sometimes fail to launch. The application crashes on startup without showing you an exact error message in most cases. However, there's an easy fix for this problem, and the same applies when Kodi is stuck on the loading screen.
In many cases, installing the latest Visual C++ redistributable resolves this issue. It’s interesting to note that Kodi should check for any missing files on your system during the installation - but this doesn’t always happen. So, go to Microsoft’s website and download the latest C++ update.
Fix #2: Update Kodi to The Latest Available Version
With each new update, Kodi receives plenty of bug fixes, meaning there’s always a chance that the bug you’re encountering has been fixed in the meantime. That said, we highly recommend keeping Kodi up-to-date at all times, but make sure to download the latest updates from Kodi's website only.
So, here’s how to update Kodi to the latest available version.
- Visit the download section on Kodi’s website.
- Select your operating system.
- Pick the ‘Recommended’ tab and download Kodi’s installation file.
- You can also try via the ‘Pre Release’ tab, where you can download a beta Kodi version.
- Now, reinstall Kodi on your device. Remember that you shouldn’t remove the existing Kodi installation to keep your media library intact. Reinstall Kodi and it will automatically patch any applicable files.
Updating Kodi requires you to reinstall the application. It means that you need to repeat the same steps you took when installing the application. To see our detailed installation guides for all kinds of platforms, we have a dedicated article on how to update Kodi.
2. Kodi Is Freezing, Pausing, or Crashing Frequently
There are several possible reasons why Kodi might be misbehaving. So, here’s what to do when Kodi stops working - by freezing when launched or if the application crashes.
Fix #1: Clear Kodi’s Cache Files
Kodi’s cached data can include everything from files, scripts, images, and other media stored on your device. These are typically the files you access frequently, which helps the application improve its performance. However, if there’s a problem with the cache, Kodi will crash.
What you need to do in this case is clear Kodi’s cache files. Click on the provided link to learn how that’s done using a third-party addon called Indigo. Alternatively, you can also use EZ Maintenance+, which is a handy third-party addon for optimizing Kodi's performance.
Fix #2: Disable Hardware Acceleration
This problem is more present on Android devices, which is why we recommend you disable hardware acceleration if you have any kind of Android-based device, including a range of TV set-top boxes. So, make sure to go through the following steps.

- Launch Kodi on your device.
- Go to Settings by clicking on the cogwheel-shaped icon (top-left corner).
- Click on the ‘Player’ button on the left side of the screen. If you have an older Kodi version, this option should be named ‘Player Settings.’
- Click on the gear icon (bottom-left corner) until it says ‘Expert.’ On the right side of the screen, you’ll see an option that says: ‘Allow Hardware Acceleration.’
- Make sure to disable hardware acceleration by clicking on the ON/OFF switch on the right. To apply this change, you’ll need to restart Kodi.
Fix #3: Reset Kodi to Factory Settings
Restoring Kodi to factory settings is done via an addon called EZ Maintenance+. This is a maintenance addon that you can use to resolve all kinds of Kodi-related issues. That said, remember that resetting Kodi to its factory settings will delete any custom content you have - including videos, photos, and music. In other words, you will need to import your media library once again.
Here’s how to reset Kodi to its factory settings:
- First, make sure to install EZ Maintenance+ from the Peno64 repository.
- On the home screen, you’ll see an option named ‘Fresh Start.’ Click on it.
- You’ll be asked whether you want to perform this operation, so go ahead with ‘Yes.’
- Once everything’s done, restart Kodi and import your media library once again.
Fix #4: Update the 'URL Resolver' Addon
In many cases, faulty addons cause Kodi to not work properly. We suggest you disconnect from the Internet first. Then, open Kodi and delete any recently installed addons. You can also try to update Internet scrapers (while being online, of course), and here’s how that is done:
- Launch Kodi and go to Settings. Then, click on the ‘System’ button.
- Scroll down to the ‘Add-ons’ tab and click ‘Manage Dependencies.’
- You will see an entry named ‘URL Resolver.’ Select it and then select ‘Update.’
- Make sure to restart Kodi.
3. Kodi Shows the 'Failed to Install a Dependency' Error
Kodi addons rely on different types of dependencies to work. For example, we have Web scrapers searching the Internet for media streaming links. If the scraper doesn’t work, the addon won’t work either.
Now, let’s talk about how to resolve this. You’ll find all you need to know in our article on resolving Kodi’s dependency-related issues. More precisely, we’ve decided to show you the three most effective solutions to this error, so make sure to click on the provided link.
4. Kodi Shows the ‘Unable to Create Application’ Error
Sometimes, updating your Kodi to the latest version can cause specific issues, like seeing the ‘Unable to Create Application’ error, which can happen on Windows. To resolve this issue, you need to remove a certain file from Kodi's installation directory, like so:
- Go to My Computer on your PC.
- Make sure that you can see hidden files. This is done by clicking on the ‘View’ tab and selecting ‘Hidden Items.’
- Go to C: > Users > Your Username > App Data > Roaming.
- Next, go to Kodi > Userdata.
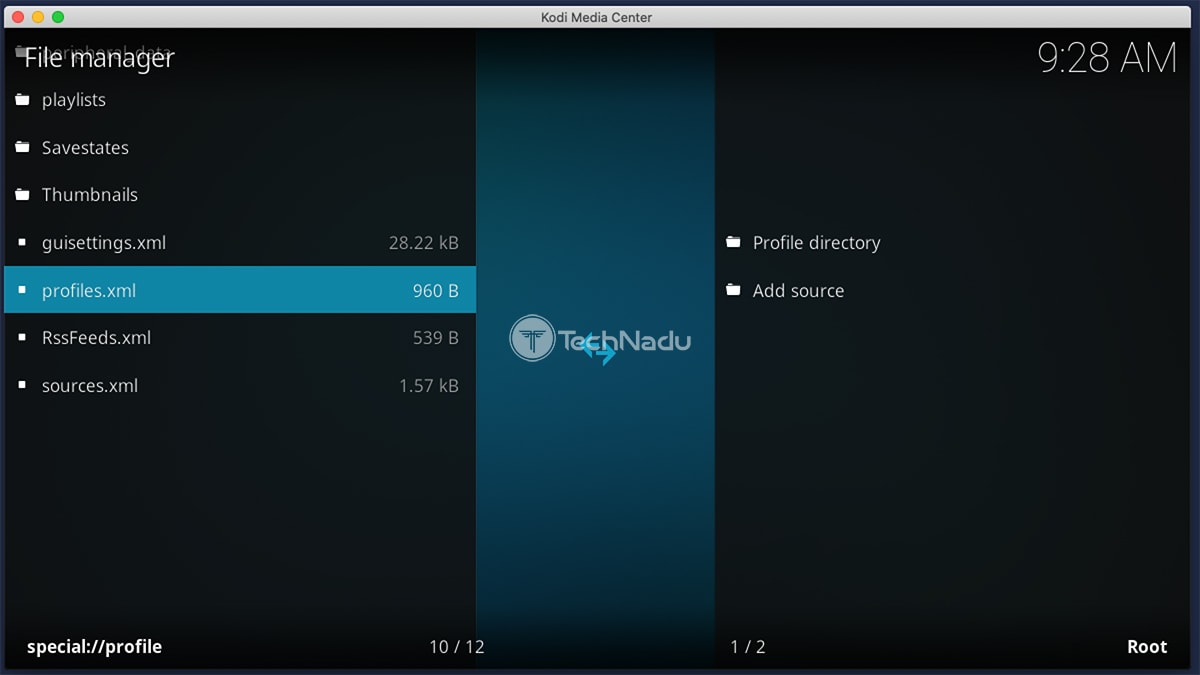
- This is where you’ll find a file named profiles.xml. Delete the file.
- Now, restart your PC and launch Kodi. The application will create a new ‘profiles.xml’ file, and it should start successfully.
You can also access the ‘profiles.xml’ via Kodi by going to Settings > File Manager > Profile Directory. Right-click on the file and delete it from there.
5. Kodi Fails to Connect to a Source
Every time you want to add an external source (when trying to install an addon, for example), you will need to add a URL. If Kodi fails to open/find that URL, you will see a notification saying that it can’t connect to the source. So, here’s what to fix this Kodi problem.
- First, make sure that you’ve entered the URL correctly.
- Check if the URL you’re trying to use begins with ‘HTTP’ or ‘HTTPS’ and check for any uppercase or lowercase letters.
- If you’re 100% sure you’ve entered the URL correctly, the repository might be offline. In that case, try installing some other addon from a different source.
6. Kodi Addons Fail to Play (Stream) a Video
In case you can’t access video streams after installing an addon, we suggest 2 options. First, update your addon to the latest version. If that doesn’t help, try using a VPN.
Fix #1: Update Your Kodi Addons
Keeping your Kodi addons updated is essential. This is even more important for unstable or newly released addons, which typically require a few updates to eliminate issues. Taking a backup of your data will help you restore it later for normal functioning even if the new version doesn't allow you to load Kodi properly.
With that said, here’s how to manually update Kodi addons.
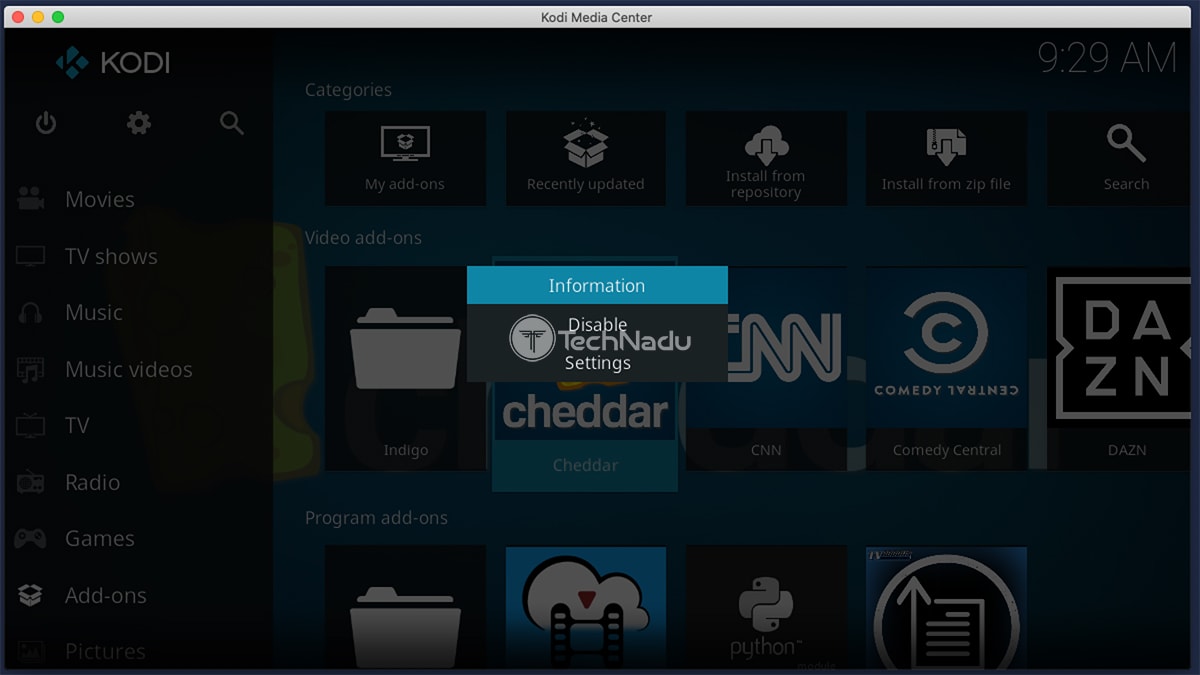
- Open Kodi and navigate to the Add-ons section.
- Now go to Video Add-ons, where you’ll find the addon you are looking for.
- Once you find it, right-click its icon and pick ‘Information.’
- Finally, click the ‘Update’ button to manually check for a newer version.
Don’t forget to remove any addons you no longer use. In some cases, they can cause certain technical problems with Kodi, especially if they get automatically updated. Here’s how to uninstall Kodi addons or stop Kodi from auto-updating.
Fix #2: Use a VPN to Unblock Geo-Restricted Content
In many cases, fixes for Kodi-related problems might be out of your reach. That’s because Kodi is often associated with piracy, which forces certain ISPs to block or throttle Kodi-related traffic. This usually produces problems with buffering, which makes streaming video files nearly impossible.
The most reliable way to fix this issue is by using a VPN application. These are quite technical yet easy-to-use solutions that encrypt your Web traffic. By being encrypted, your traffic can’t be throttled by anyone, including your ISP. Also, you’ll get to use Kodi addons unavailable in your country due to geo-restrictions.
If you’ve never used a VPN before, it’s advisable to learn about the basics of this type of software. Therefore, read more about VPN applications. Once you’re ready to take your pick and start using it, you’ll want to check our guide on how to install a VPN for Kodi.
Since VPNs are subscription-based, you need to do your research before deciding on which one to use. A good place to start is our in-depth overview of the best VPN for Kodi. That’s where you’ll see that we strongly recommend subscribing to NordVPN - which is truly the best VPN right now, suitable for the majority of Kodi users.
7. Kodi Addons Fail to Return Any Search Results
Kodi won’t be able to search for files if the date and time of the application/device aren’t set correctly. This causes issues with individual addons, especially those that list entries based on dates.
Therefore, to resolve this problem, you need to check your device. This can be a computer, a media streaming device, or a TV set-top box. Double-check if the date and time are correctly set.
If you’ve just upgraded to a major new Kodi version, there might be a chance that you’re using not-yet-updated Kodi addons. It might take a few months until developers update their addons and make them compatible with (major) new Kodi versions. Read this guide if you see this error message "The Add-on Is Not Compatible With This Version of Kodi."
8. Kodi Fails/Refuses to Uninstall an Addon
In some cases, Kodi will present a series of errors that prevent you from uninstalling individual addons. So, here’s what you need to do.
Fix #1: Delete Kodi Addons - The Right Way!
Faulty addons can sometimes force your Kodi to crash. When that happens, you need to remove recently installed addons. There are different ways to do this, the easiest one being from Kodi’s interface.
For more information on how to do this procedure properly, make sure to check our article on how to delete Kodi addons.
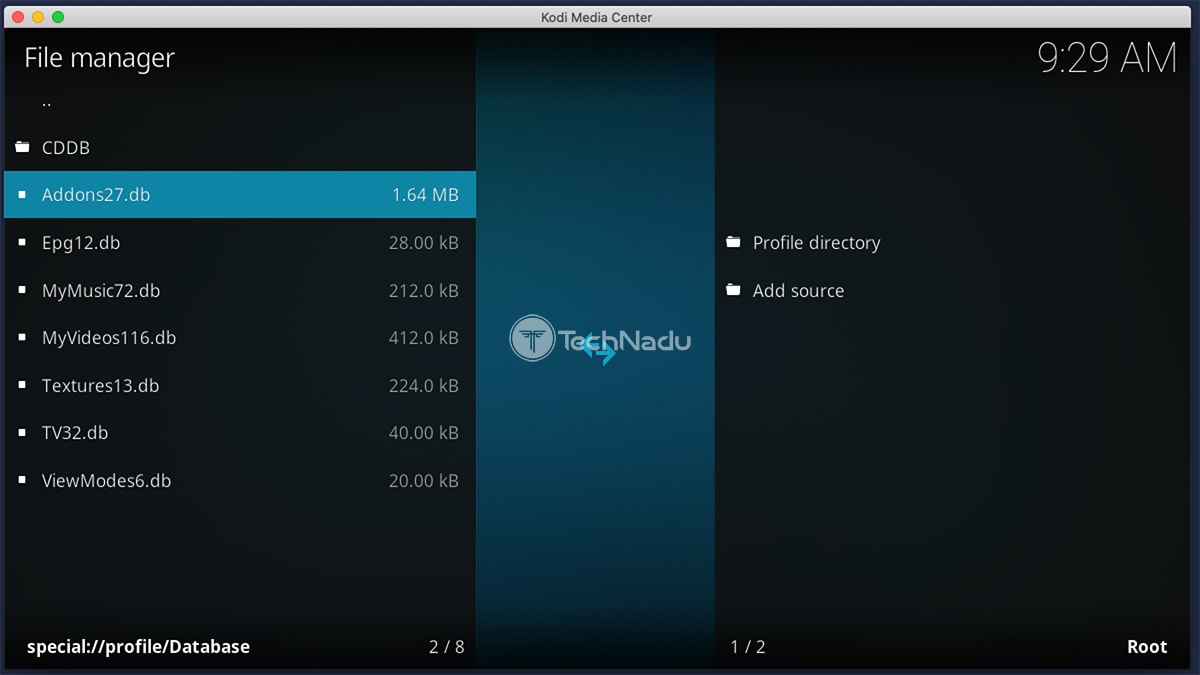
Fix #2: Delete Kodi's 'Addons27.db' Database File
If you’re experiencing problems related to Kodi’s black screen or blank screen issues - you can resolve these by deleting a file named ‘Addons27.db.’ It’s also important to note that this issue usually happens when Kodi is updated to a major new version.
The solution is to delete a file called ‘Addons27.db,’ which contains cached data about your installed addons. You won’t remove any addons this way, as the file will be automatically generated the next time you launch Kodi.
So, here’s how to find and delete this file.
- Windows: Paste the following path to your Windows Explorer’s navigation path: %AppData%KodiuserdataDatabase.
- MacOS: Go to Users > Your Username > Library > Application Support > Kodi > Userdata > Database.
- Linux: Go to ~ > Kodi > Userdata > Database.
- Android: Navigate using a File Manager to Android > data > orgkodi > files > kodi > userdata > Database.
- iOS: Go to private > var > mobile > Library > Preferences > Kodi > Userdata > Database.
- OpenElec/LibreElec: Navigate to storage > kodi > userdata > Database.
Once you open the ‘Database’ folder, delete the ‘Addons27.db’ file. There’s no need to restart your device; just open Kodi. The file will be created from scratch, potentially resolving Kodi-related blank screen issues.
9. Kodi Repository Not Working
You need to know that Kodi addons rely on remote servers. Even though they’re installed locally, they need an Internet connection to work. If something happens to those servers, the addon will stop working.
In general, Kodi addons can be quite unreliable, especially unofficial ones. They depend on their developers, who spend quite a lot of time maintaining their addons.
So, when you find a non-working addon or repository, we suggest you simply move to a new one. There are hundreds of addons on the Web, and we’re sure you’ll find an alternative. Related to that, here are the best Kodi addons right now.
10. Kodi Video Files Take Too Long to Buffer
Here’s what to do if you’re experiencing playback issues with your Kodi. We’ve prepared several handy solutions for you.
Fix #1: Fine-Tune Kodi’s ‘AdvancedSettings’ File
Even though Kodi is a lightweight application, you can allocate more resources to make it run even better. This is done via an XML file you must create and place within your 'User Data' folder. We’ll tell you how to create that file, where to put it, and how to make Kodi more powerful.
Here’s how to locate Kodi’s ‘User Data’ folder on different operating systems:
- Windows: Open the Run command by pressing the Windows Key + R. Paste the following code: ‘%APPDATA%roamingkodiuserdata.’ Press Enter, and you’ll see the corresponding directory. You can also use the provided navigation path by launching the Start menu in Windows 10 and pasting it.
- Mac: Go to /Users/<your_user_name>/Library/Application Support/Kodi/userdata/.
- Linux: Navigate to ~/.kodi/userdata/.
- Android: Use a File Manager and go to this directory: Android/data/org.xbmc.kodi/files/.kodi/userdata/.
- iOS: Use a File Manager and open the following directory: /private/var/mobile/Library/Preferences/Kodi/userdata/.
Once you’ve found the directory, create a new file and name it ‘advancedsettings.xml.’ This is done by creating a new text file and making sure you are using the XML extension.

Using the image placed above, you can see the final look of the Advanced Settings file. Please note that the blue-colored text must be placed as seen in the image.
The white text presents variations you can use, depending on your device’s specifications. The green-colored text refers to explanations for what each of the available commands can do.
To help you understand what each of the commands is used for, we’ll take a closer look at every one of them:
- <memorysize> is a command used to tell Kodi how many bytes to use. In general, you can use up to one-third of your free RAM and dedicate it to Kodi. However, make sure to calculate that number in bytes. You can use this Online Converter to convert units.
- <buffermode> is a setting that defines the types of content that are allowed to be buffered. For example, you can instruct Kodi only to buffer locally stored content or to buffer any kind of file. ‘0’ is used to buffer all internet streams, ‘1’ is used to buffer anything compatible with Kodi, while ‘2’ is used to buffer Internet-based filesystems.
- <readfactor> is how Kodi tries to read a video file. If you have a powerful processor, you can take advantage of that. The default value is 4.0. You can double it if you have a CPU that is above mid-range.
Once you’ve entered the new values, save your file. Once again, make sure the file has the XML extension. That’s all you need to know. Kodi will do the rest.
Lastly, make sure that every symbol is properly entered. Take a close look at the image above and ensure that every command has its start and end. For example: <memorysize> and </memorysize>. You will see that every command needs to be closed for Kodi to recognize this file. In case you mess something up, you can delete this file, and Kodi will return to its original state.
Fix #2: Take Advantage of Real-Debrid
The truth is that Kodi’s addons act as repositories of links to media files. For example, when you start streaming a movie, it isn’t served from a particular addon’s server. Instead, that addon is using a link found on the Web to help you stream the content.
Real-Debrid solves this issue by letting you download and stream media files as fast as your Internet connection allows. Even if a download is interrupted, you can resume downloading the file later.
11. Kodi Can’t Play 4K or HD Video Files
Playing 4K files requires you to have a capable machine running Kodi. This is why we recommend you check whether your device is capable of playing 4K files.
You should also know that Kodi comes preloaded on several custom-made Android TV boxes. We’re talking about Kodi boxes here, which are usually quite affordable.
In general, all of those can play HD files (720p or 1080p). However, you’ll see that only a limited selection of Kodi boxes can play/stream 4K titles.
12. Black Screen When Playing Videos in Kodi
We’ve received reports of Kodi users experiencing a black screen when trying to play videos. Upon further investigation, our team has discovered three possible solutions to this problem.
Interestingly enough, we already wrote about those solutions - found in this article. We first recommend removing the ‘Addons27’ file. Then, you can clear Kodi’s cache. And finally, try updating Kodi to the latest version.
Final Thoughts
In our experience, troubleshooting Kodi is easier than troubleshooting other media player applications. In fact, the most common Kodi issues can be rectified in a minute by reinstalling a fresh copy of the app or clearing its data. Sometimes, even rebooting the device works as a shot in the dark. Server problems, however, are out of an individual's control and can only be waited out.
In the end, we'll remind you that most issues with Kodi are related to unofficial addons, which can cause technical and legal issues. Therefore, we highly recommend sticking to Kodi's official repository, which is filled with safe-to-use addons that offer tons of content without any risk.
We’ve reached the end of our ‘Kodi Not Working’ guide, and we hope you’ve found a solution that works. If you have any questions, don’t hesitate to comment below. Thanks for reading!
Related


Get expert insights on threats, breaches, scams, and security trends — delivered every Monday.
Most Popular