
When you purchase through links on our site, we may earn an affiliate commission. Here’s how it works.
How to Share Your VPN Connection

Most VPNs limit how many devices you can connect, usually between 3 and 10, sometimes unlimited. To stay protected without hitting that limit, the smart move is to share your VPN connection.
By doing this, you only use one device slot, but you can cover all your home devices. It's a one-time setup and lets you still use the VPN on-the-go. In this article, we've prepared a series of quick-jump links, so you can easily visit the segment of our article that you're interested in reading.
1. Sharing Your VPN Through a Router
In case you want to keep all your Web-connected devices secure, the easiest way is to install a VPN on your router. This way, every device you connect to your home router will be covered by your VPN. The most interesting thing about this is that your router counts as one device towards your subscription limit.
So, here are the requirements you need to meet to install a VPN on a router, and then here’s how to set up VPN sharing with other devices in your home.
- You need a VPN-compatible router. Not every router can be used to install a VPN. Instead, you need a special type that comes with its own processor, RAM, and internal storage. To help you with this, here’s our list of the best VPN routers.
- Next, you need to be aware of certain technical terms. You can buy a DD-WRT router instead of ordering one directly from a VPN provider. These routers support a custom version of firmware called DD-WRT that is used to install a VPN. First, learn more about DD-WRT. Then, take a look at our overview of the best cheap DD-WRT routers and the best overall DD-WRT routers.
- The final piece of the puzzle is installing a VPN on your router. Before you do this, you need to be using a VPN based on the OpenVPN protocol – since this means that you can install it on a router. In addition, OpenVPN is considered to be the safest VPN protocol right now.
Steps to Set Up VPN on a Router:
- Get Your VPN’s Router Configuration: Log in to your VPN provider’s website and find the manual configuration files (usually OpenVPN or WireGuard).
- Access Your Router Settings: Type your router’s IP address (commonly
192.168.1.1) into a web browser, then log in. - Install the VPN Configuration: Upload the VPN config file or enter the required settings manually, depending on your router’s firmware.
- Connect & Test: Save the settings and connect. Test your connection by visiting a site like whatismyip.com to confirm the VPN is working.
2. Setting Up VPN Sharing on Windows
In case you've already installed a VPN on your Windows PC, there's an easy way to share that Web connection with other devices in your home. More precisely, you can share your VPN connection in two different ways - by using your computer's Ethernet port or you can share your connection wirelessly.
2.1 Through Ethernet
You will be happy to know that sharing a VPN connection from your computer is quite easy. Here’s what you need to know.
- Launch your VPN and make sure to connect to a remote server.
- Now, connect your other device to your PC via an Ethernet cable. This needs to be a ‘crossover’ Ethernet cable, like this one on Amazon.
- Now, open the Control Panel on your computer.
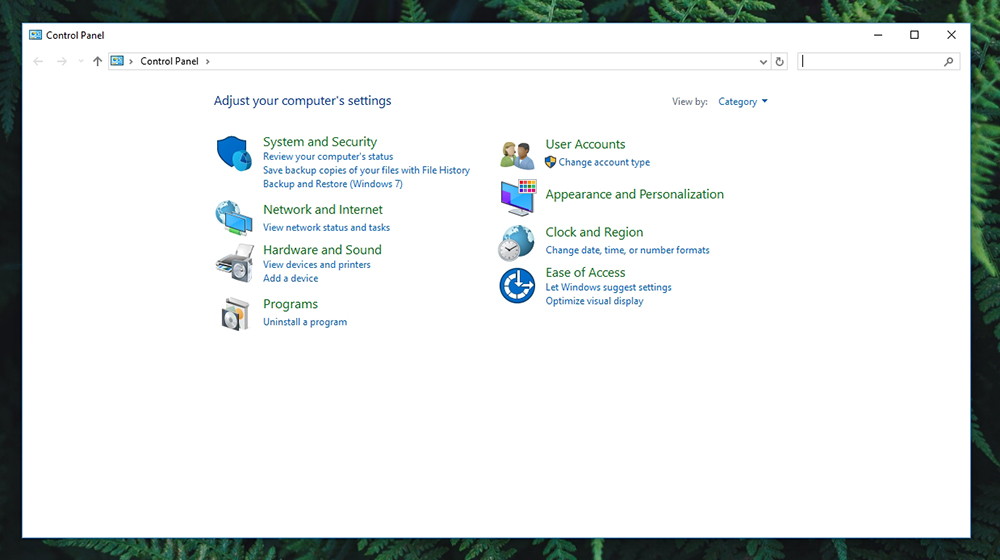
- Navigate to Network & Internet > Network & Sharing Center;
- On the left side of the window, click on ‘Change Adapter Settings’;
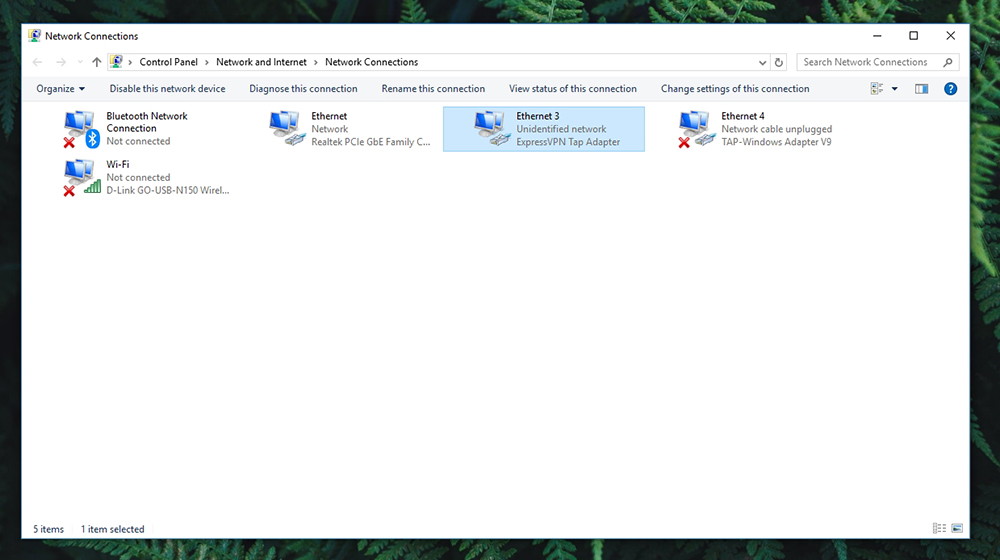
- You need to find your VPN connection. OpenVPN connections are not clearly labeled, so you need to be careful when finding your VPN connection. In general, it should be labeled as ‘Local Area Connection’ followed by ‘TAP-Win32 Adapter’. Once you find it, right-click and select ‘Properties’;
- Open the ‘Sharing’ tab and make sure the first option is checked – the one that allows other devices to connect;

- Then, click on the drop-down menu and select the network that you just identified, the one with your VPN active. Click ‘OK’ once done.
That’s it. Your Windows PC will now share your VPN connection with the device connected via Ethernet. That device should automatically connect to the Web through your computer and it will use the remote server that you previously selected.
2.2 Wirelessly
Thanks to an old but still quite reliable application called MyPublicWiFi, you can turn your computer into a hotspot. This means that you don’t need an Ethernet cable in this case.
- Download MyPublicWiFi and install it on your computer;
- Don’t launch the application just yet. First, open your VPN application, make sure you’re using the OpenVPN protocol and connect to a remote server;
- Now, open MyPublicWifi – but make sure to do this using admin privileges. Right-click on the application’s icon and select ‘Run as Administrator’.
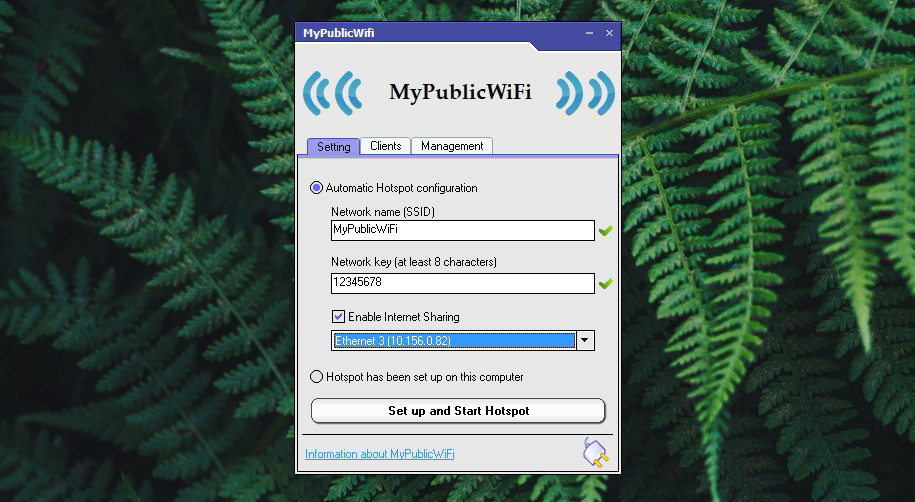
- Make sure that ‘Automatic Hotspot Configuration’ is selected;
- You can change the name of the network if you want. Also, you can enter a network key which will act as a secure Wi-Fi password;
- Also, make sure to click on ‘Enable Internet Sharing’. You also need to select your VPN connection from the drop-down list;
- Finally, click on the ‘Set up and Start Hotspot’ and wait for a few moments until the application gets started;
- Now, you can use any other device to search for Wi-Fi networks. You’ll see your newly created network, so click on it. Type in the password and you’re ready to go.
3. Using macOS to Provide VPN Access
The best way to share your VPN connection from your MacOS is by creating a custom VPN and sharing it. However, this needs to be a PPTP or IKEv2 VPN. The majority of the most popular VPNs should work but still pay attention to VPN protocols offered by your provider. If you need a quick recommendation, check out NordVPN. This is TechNadu’s highest-ranked VPN and the primary choice of our editorial team.
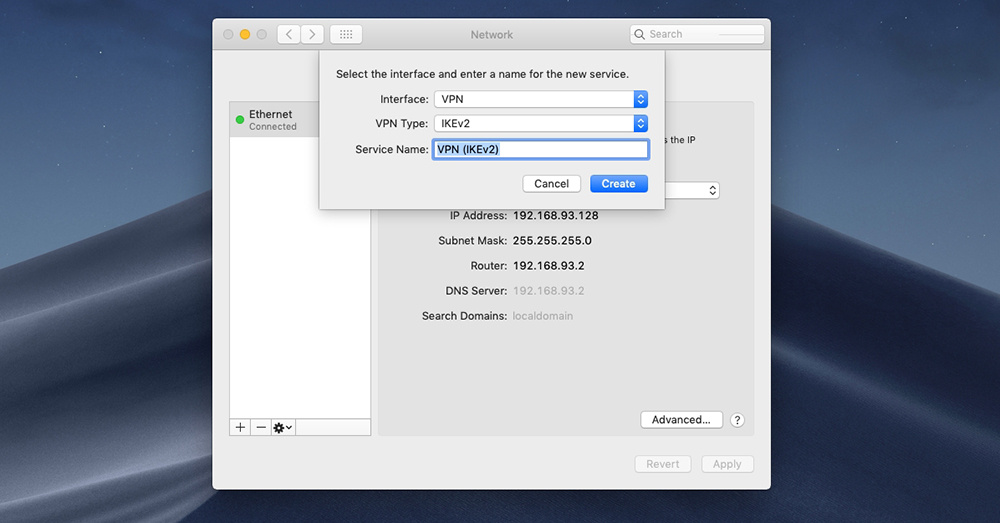
- Click on the Apple logo in the top-left corner of the screen and then select System Preferences. Then, select 'Network'.
- Take a look at the bottom-left part of the window, and click on the ‘+’ button. This will open a small pop-up window where you can create your new VPN connection, manually. So, make sure to select these fields: Interface > VPN, VPN Type > PPTP or IKEv2, Service Name > Enter anything you want. Finally, click on ‘Create’.
- Next, you’ll need to configure your PPTV VPN. This requires you to sign-in to your account on your VPN provider’s website. When it comes to NordVPN, once you sign-in on the website, click on ‘Set Up NordVPN’ and then select ‘Manual Config’ on the left side of the screen. This is where you’ll see your username and password, depending on if you've chosen IKEv2 or PPTP.

- Now, minimize your Web browser to reveal System Preferences. You will see three fields: Server Adress, Remote ID, and Local ID. You'll find the required information for these fields on your VPN's official website (once you log-in to your account, that is).
- Click on ‘Authentication Settings’. A new window will appear asking for your password. In the field ‘Password’, enter the password you received from your VPN’s website. Click ‘OK’ to confirm your decision.

So far, we have created a new VPN connection on your Mac. The final piece of the puzzle is sharing that VPN connection so that other devices can connect to it.
- Open System Preferences on your computer and then click on ‘Sharing’.
- Make sure that ‘Internet Sharing’ is enabled, on the left side of the window. Then, select your newly created VPN connection. Click on the drop-down menu next to ‘Share your connection from’.
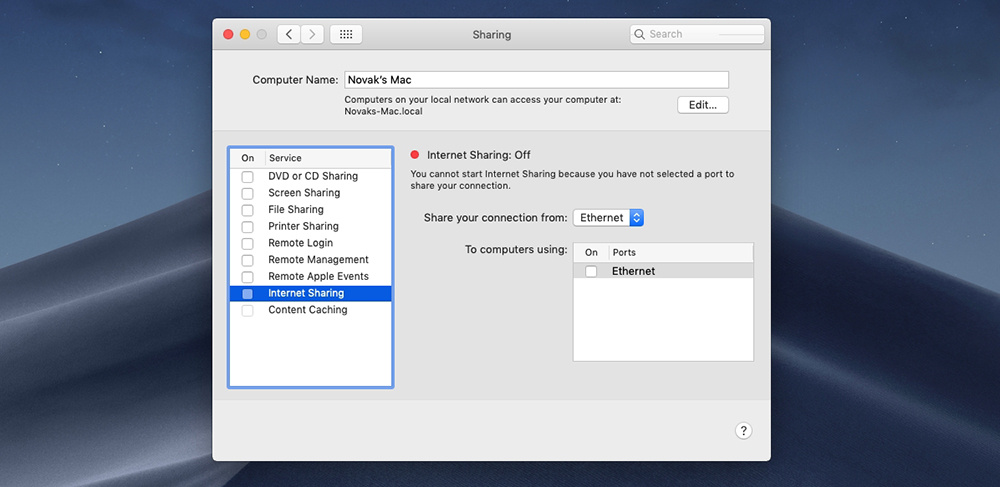
- You also need to specify how you’d like to share your connection. So, select ‘Wi-Fi’ in the bottom-right placed field. That’s it!
4. Why VPN Hotspot Sharing on Android Is Tricky
Turning your Android device into a Wi-Fi hotspot is something most users find easy to do. However, sharing a VPN connection through your Android hotspot is much more complicated. This is because Android doesn’t allow VPN sharing by default. To enable this feature, you would need to “root” your device.
Rooting means unlocking your phone’s system to allow deeper access and control. While rooting can give you extra capabilities, it also comes with serious risks. Rooting voids your warranty, and if done incorrectly, it can cause your phone to malfunction or even become completely unusable. Because of these risks, rooting is generally not recommended for most users, especially those without technical experience.
Due to these limitations, the simplest and safest way is to get the subscription to the best Android VPN and then installing a native VPN app directly on your device. Most major VPN providers offer dedicated Android apps that are easy to install and use. These apps protect your internet connection on the phone itself, without the need for complicated setups or rooting. Additionally, you will also be able to share your VPN connection without rooting. In fact, if you would want to share your VPN connection to a PC, then also this is the best way to do it.
While sharing a VPN connection from Android to other devices isn’t straightforward, you can still share your Android internet connection via a normal hotspot. This means that the other devices connected to your hotspot won’t use the VPN connection from your phone but will have regular internet access. If you want VPN protection on those devices, it’s best to install VPN apps on them individually or share the VPN from a computer or router instead.
In summary, sharing a VPN connection through an Android hotspot is not practical unless you root your device, which comes with many risks. The best approach is to use a trusted VPN app on your Android phone to stay secure and, if needed, share your internet connection normally or use other devices with VPN installed. This keeps your data safe without risking your device’s warranty or stability.
5. Safe Ways to Get VPN Protection on iPhone & iPad
You probably know that Apple’s iOS is quite restrictive. So, if you can’t share your VPN connection on Android phones, you certainly can’t share it on iOS either. Still, you should know that some successful attempts have been made in the past but those require you to turn to ‘jailbreaking’. Similar to rooting on Android, jailbreaking on iOS voids your warranty and can have severe consequences. Therefore, we recommend you to stay clear of those attempts.
Then what should you do? Well, in ideal scenario, you should use a native VPN for iPhone and iPad. This is the best way to protect your data, even while on the go (when you’re using mobile data).
If you want to protect multiple devices in your home, the better solution is to share your VPN connection via your router or a Mac or Windows computer, where sharing is easier and safer. By doing this, you only use one VPN slot but protect all devices connected to your home network, including your iOS devices.
Final Thoughts
Sharing your VPN connection is a smart way to maximize your subscription and protect all your devices without hitting the device limit imposed by most VPN providers. Whether you choose to share your VPN via a router, Windows or macOS computer, or other supported platforms, this one-time setup can secure your entire home network while still allowing you to use the VPN on mobile devices separately. Each method has its advantages and challenges, but overall, sharing through a router or a desktop system offers the most reliable and wide-reaching protection for all your connected gadgets.
On the other hand, mobile devices like iOS and Android have more restrictions that make sharing VPN connections complicated or risky due to jailbreaking or rooting. The easiest way to safeguard your data on these devices without voiding warranties or putting your devices at risk for security breaches is to utilize native VPN software.
The best way to have wide coverage and peace of mind across all your devices is to combine native apps with shared VPN connections on your home network.
Some Additional Guides that Can Help You:
- Best VPN Services – Explore the top-rated VPN providers based on speed, privacy, and reliability.
- VPN Protocols Explained – Learn the differences between OpenVPN, WireGuard, IKEv2, and more.
- How to Set Up a VPN on Any Device – Follow simple steps to install and configure a VPN on all major platforms.
- How Much Does a VPN Cost? – Compare VPN pricing and find the best value for your budget.
- Best Countries to Connect to Using a VPN – Discover which server locations are best for privacy, speed, and content access.
- VPN Not Working? Here's How to Fix It – Troubleshoot common VPN issues like failed connections or blocked access.
- Best VPNs for Multiple Devices - Find top VPN providers that allow the most simultaneous connections without slowing you down.
- Share Your Connection on Android without Root - Learn safe methods to extend VPN protection from your Android device without risky modifications.
- Share VPN Connection from Android to PC - Step-by-step guide to linking your Android’s VPN to your computer for secure browsing.
Dear readers, this is where we conclude our article on how to sare your VPN connection. If you made it this far, why not share this article online? Also, you can follow our website on Facebook and Twitter. Thanks!
Related