
MacXvideo Review – Everything You Always Wanted for 4K Video Processing
Published on June 29, 2018


From cameras to TVs, games consoles to laptops, it's clear that the age of 4K has arrived. We're now watching 4K films on TVs, streaming 4K video from YouTube, and capturing 4K video on our digital cameras and smartphones. This shift to 4K is exciting as it makes everything clearer and crisper, but it also brings its share of challenges.
Challenges of Recording/Editing 4K Video
4K video files are enormous. One minute of H.264 4K video at 30fps from an iPhone camera will eat up to 350 MB of space. An hour of 4K video at 60fps hogs up approximately 23.4 GB of disk space. Meanwhile, most of us get their 4K videos from shooting 4K footage with diverse devices like camcorders, camera, mobiles, drones, and GoPro. These devices output a variety of formats and codecs for 4K UHD videos, meaning that many of the 4K video recordings can't be uploaded to the Web or played on portable devices directly. Not to mention that sometimes you'd like to edit and customize your 4K video to make it a masterpiece. And what if you want to take 4K video and play it on a device that isn't 4K capable, upload 4K recordings to YouTube, or customize your 4K footage to make it unique?


The answer comes to a 4K video processing tool that edit, shrink, resize and encode 4K videos. This process can take 4K files designed to play at one resolution and upscale or downscale without losing quality, transcoding files from a format that isn't Web-friendly to one that is, or editing 4K video to make it shorter and more attractive. That's why we'd like to introduce macXvideo - an absolutely free tool to transcode, compress and edit 4K videos. Keep on reading to learn more.
The Main Features of macXvideo
You probably think that video editing requires a lot of time and effort. However, all you need to have is a capable yet simple-to-use video editor. Let's take a look at the most prominent features that you'll find in macXvideo.
- Intuitive & Easy-To-Use: Revolutionary Mac-style interface with intuitive options and drag-and-drop, so that you're able to quickly access every feature you need.
- Various Video Sources Supported: Accessible for every type of footage as input, be it MP4, MOV, MKV formats, HEVC, AVC, ProRes codecs, or SD, HD, 4K resolutions.
- Edit Videos for Social Media: Edit videos (cut, crop, rotate, merge, add subtitle, add effects) to be perfectly fitted for YouTube, Vimeo, Facebook and other social media sites.
- Smart Compression of Video Sizes: Ensure maximum 4K video compression by up to 98% with no quality loss, thanks to the advanced compress engine.
- Transcode Video to Any Codec & Format: Encode/decode video to any general-purpose formats and codecs, including MP4, HEVC, H.264, AVI, MKV, MOV, WMV etc.
- Full Compatibility With 4K HEVC: Completely compatible with 4K HEVC videos, including 4K at 60fps, 10-bit color depth, HDR, and even HEVC 8K UHD videos.
- Incredible Performance & Speed: Deliver the world's fastest speed to process 4K UHD videos, as it's powered by unique level-3 hardware acceleration (Intel/Nvidia/AMD) and multi-core CPU utility.
Better yet, macXvideo is totally free, so you don't have to pay a penny for your video processing. Moreover, unlike other cumbersome 4K video processing programs, macXvideo is a lightweight software that will not take up too much RAM. You can easily learn how to edit 4K videos without re-encoding, transcode 4K content for sharing, playback, storage, and compress 4K footage by up to 90% smaller size without loss. It's available on Mac OS X 10.6 or later. Now, let's launch the program and get it started.
Tutorial: How to Edit, Transcode, Compress 4K UHD Videos with macXvideo
We're going to briefly explain how to use macXvideo to optimize your 4K videos. As you're about to see, this software is among the most user-friendly video editing apps.
Step 1: Input Source 4K Video
Click on "+ Video" button in the top-right panel to add your target 4K source video. You can add several at a time for batch processing. It shouldn't take more than a few seconds for your videos to be added. And this is when the real magic starts to happen.
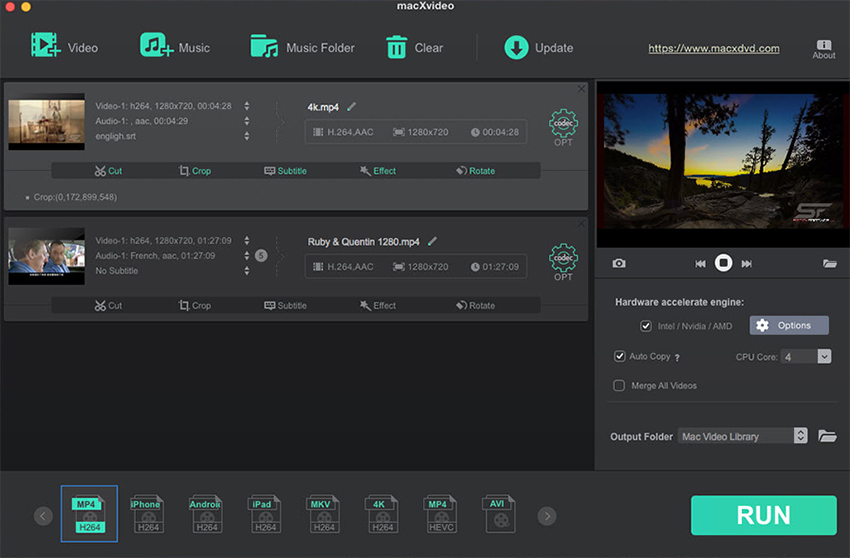
Step 2: Choose Output Format
Once your 4K videos are loaded, you can see preset profiles, including the most common general-purpose formats. There are also preloaded device-specific profiles including iOS and Android devices. All you have to do is to pick your preferred format. For best compatibility, you can choose H.264 MP4. Of course, if you'd like to process video without re-encoding, you can skip this step.
Step 3: Adjust Parameters to Compress 4K Video
Click on the gear-shaped codec button and you're able to adjust video quality, as well audio and video codec parameters to shrink video size. For example, change the frame rate from 60fps to 30fps, downgrade 4K resolution to 1080p/720p, lower the bitrate, change video aspect ratio or decrease the audio sample rate and bit rate. After you've set, click on 'Done' to apply all the changes you've made.
Step 4: Edit Videos & Make Them Unique
Back to the main interface, you can see a series of video editing options. Options like Cut, Crop, Subtitle, Effect, Rotate are displayed under the video information. Tap on the corresponding button according to your needs.
- Cut: Tap on the Cut button, and move the start and end knob on the timeline. You can also click the Cut icon next to the slider to trim the video.
- Crop: Click Crop icon > Enable Crop, and drag or zoom the vectors of the rectangle box, or type in the left and top position and resize the image.
- Subtitle: Click on the Subtitle button, then tap 'Add SRT File...' to import your external subtitle.

- Effect: Click on the Effects button, and choose target video effect for your 4K video. You can also adjust its brightness, contrast, hue, saturation etc.
- Rotate: Click on the Rotate button, and you can choose to rotate video left or right at 90, 180, 270 degrees, and flip video vertical or horizontal.
- Merge: Tick on the box of Merge All Videos, you can combine multiple video clips into one.
Besides, trimming the video length and cropping the video dimension are also effective means to resize and make your 4K videos smaller.
Step 5: Transcode, Compress and Edit 4K Video in One Click!
Tap on the 'RUN' button to start processing your 4K videos and the process will be done under a few minutes. And if your Mac computer configuration is high enough for hardware acceleration, tick the box next to Intel/Nvidia/AMD (usually it's ticked on automatically) to boost the speed up to 5 times.
Final Thoughts
In case you need a highly reliable, fast and easy-to-use 4K UHD video processing tool, look no elsewhere. We're more than sure that macXvideo will meet every need, and beyond that. Actually, there is nothing not to like about this program, especially since it's free. We highly recommend you to try it out.
Related


Get expert insights on threats, breaches, scams, and security trends — delivered every Monday.
Most Popular


Get expert insights on threats, breaches, scams, and security trends — delivered every Monday.
Most Popular