
When you purchase through links on our site, we may earn an affiliate commission. Here’s how it works.
The Complete Guide Testing VPN Leaks (What They Are & How to Detect and Stop Them)

Using a VPN is meant to keep your online activity private around the clock, but that protection only holds if there are no leaks. Unfortunately, VPN leaks can and do happen, especially with less reliable services. For instance, about 25% of free Android VPN apps have been found to leak data. Even popular VPN browser extensions were caught exposing user information back in 2018.
While VPN leaks aren’t an everyday threat, they’re serious enough not to ignore. That’s why we created this guide to explain what VPN leaks are, how to test for them, and how to stay protected.
KeyTakeaways
- VPN Leaks Defined: A VPN leak occurs when your private data, like your real IP address or DNS requests, escapes the encrypted tunnel, exposing your identity and activity online.
- Types of Leaks: VPN leaks come in various forms, including IPv4, IPv6, DNS, WebRTC, and traffic leaks. Each stems from specific technical flaws or misconfigurations, and each requires different fixes that we have discussed below.
- Prevention Matters: Disabling IPv6, blocking WebRTC, using encrypted DNS, enabling kill switches, and choosing VPNs with built-in leak protection are all essential steps. Advanced users can go further with OS-level firewalls, multi-hop VPNs, and router-based VPN setups.
- Not All VPNs Are Equal: Many free or poorly configured VPNs leak by default. Reliable services like NordVPN, ExpressVPN, or CyberGhost are engineered with strong protections. However, our best bet is NordVPN as it protects you against all known leak types, making it a safer choice for anyone serious about privacy.
What Are VPN Leaks?
A VPN is like a secret encryption tunnel for your internet activity; it hides what you’re doing and where you are. But sometimes, that tunnel has tiny holes. These are called VPN leaks.
So, instead of being private and safe, you're exposed, just like you’re not using a VPN at all. Also, you'll no longer be able to bypass geo-blocks since websites will see your real geo-location. Firewalls will be a problem, too, since you'll still have your original IP address with the same traffic restrictions applied to it.
In fact, if you are caught with this in a country that bans VPNs, then it might lead to some other major concerns. Hence, it is crucial that you use a VPN that has no leaks whatsoever. In order to establish a completely safe digital environment, we first need to understand different kinds of data leaks. So, let's get started.
The 5 Types of VPN Leaks
Here are the many ways a VPN can leak your data if things go wrong:
1. IPv4 Leaks
This is the rarest one. Why? Because IPv4 (Internet Protocol version 4) is the standard IP address format - x.x.x.x (so 12.13.14.15. for example). If a VPN leaks IPv4 addresses, it just means the service isn't working at all.
These kinds of leaks will usually happen if the VPN service is poorly configured. Basically, it causes communication errors between your device and the server, resulting in the VPN leaking IPv4 addresses.
2. IPv6 Leaks
IPv6 (Internet Protocol version 6) is the successor to IPv4. It's a whole new address format that allows way more potential combinations, which is actually necessary since we ran out of IPv4 addresses.
It's great we have a solution for that, but here's the problem - only a little over 25% of web-connected networks have IPv6 support.
So the deployment rate is still pretty low. Yes, even for VPN services, since not many providers support IPv6 traffic. But if your ISP supports it, you'll have an IPv6 leak on your hands.
Basically, if you have both an IPv4 and an IPv6 address, the VPN will only route your IPv4 data through the encrypted tunnel if it doesn't support or block IPv6 traffic.
3. DNS Leaks
These happen when your DNS queries leak outside the VPN tunnel. If you don't know what those are, they're the connection requests you send to websites when you want to browse them.
Usually, when you use a VPN, your DNS queries should go through the VPN provider's DNS server. When a DNS leak happens, they go through your ISP's DNS server instead. That pretty much means your ISP can see what websites you browse even if you use a VPN.
VPN leaking DNS data can happen for a lot of reasons:
- For starters, IPv6 leaks can cause DNS leaks since your IPv6 DNS queries won't go through the tunnel.
- Bad network configurations (like DHCP settings not getting an update) can force you to automatically use your ISP's DNS server.
- The VPN provider doesn't run its own DNS server. That's usually a huge red flag that the service isn't reliable or is a scam.
- Your ISP uses a transparent DNS proxy. Basically, that's a server that intercepts your DNS traffic when you try to use a different DNS server. Once it does that, it forcibly routes it to your ISP's DNS server, bypassing the VPN provider's server.
- If you're a Windows user, Teredo can get in the way. It's a tunneling protocol that provides IPv4 and IPv6 compatibility, which can also take precedence over the VPN tunnel, resulting in DNS leaks.
- Also, on Windows, SMHNR (Smart Multi-Homed Name Resolution) is a feature that forces your computer to accept responses from the fastest DNS server to speed up web browsing. Unfortunately, that's usually not the VPN's server, but your ISP's server.
- And on very rare occasions, a DNS leak can take place because hackers took over your router and are forcing your queries through a malicious DNS server.
4. WebRTC Leaks
If you're not familiar with WebRTC, it's an open-source project that offers browsers and applications RTC (Real Time Communication) functionality - basically, support for voice and video calling.
It's definitely useful, but also risky since it contributes to VPN leaks. Long story short, WebRTC functionality can actually bypass the VPN tunnel sometimes, resulting in IP leaks.
If you want the full details about how WebRTC leaks happen, check out our article.
5. Traffic Leaks
These leaks happen when the VPN connection suddenly goes down. Since the VPN tunnel is disconnected while you're still using the Internet, all your traffic leaks out of it. So anyone can spy on it.
VPN disconnections can happen for various reasons - like the server being too far away or you using a protocol that's too resource-intensive for your device. And the really scary thing is that these VPN leaks can happen even if you use a very reliable VPN with connections that are typically stable.
How Do You Test and Detect VPN Leaks?
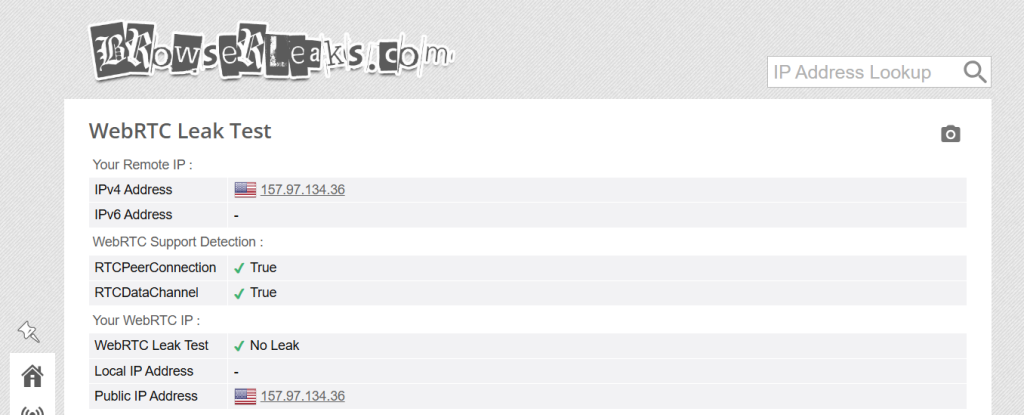
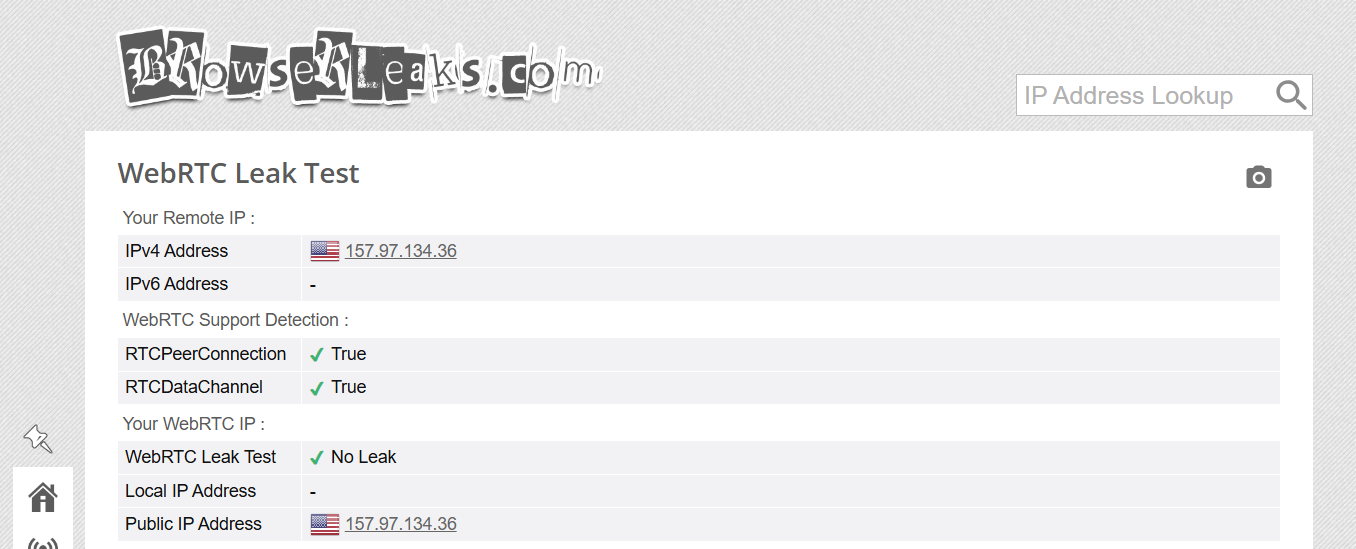
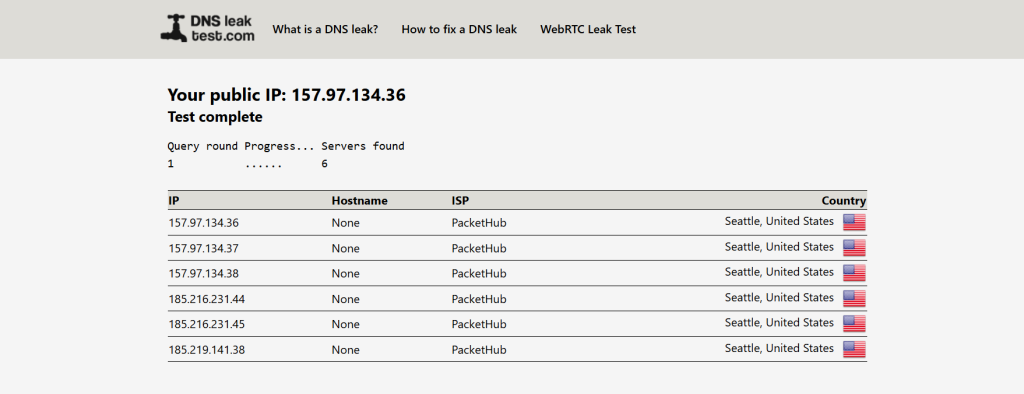
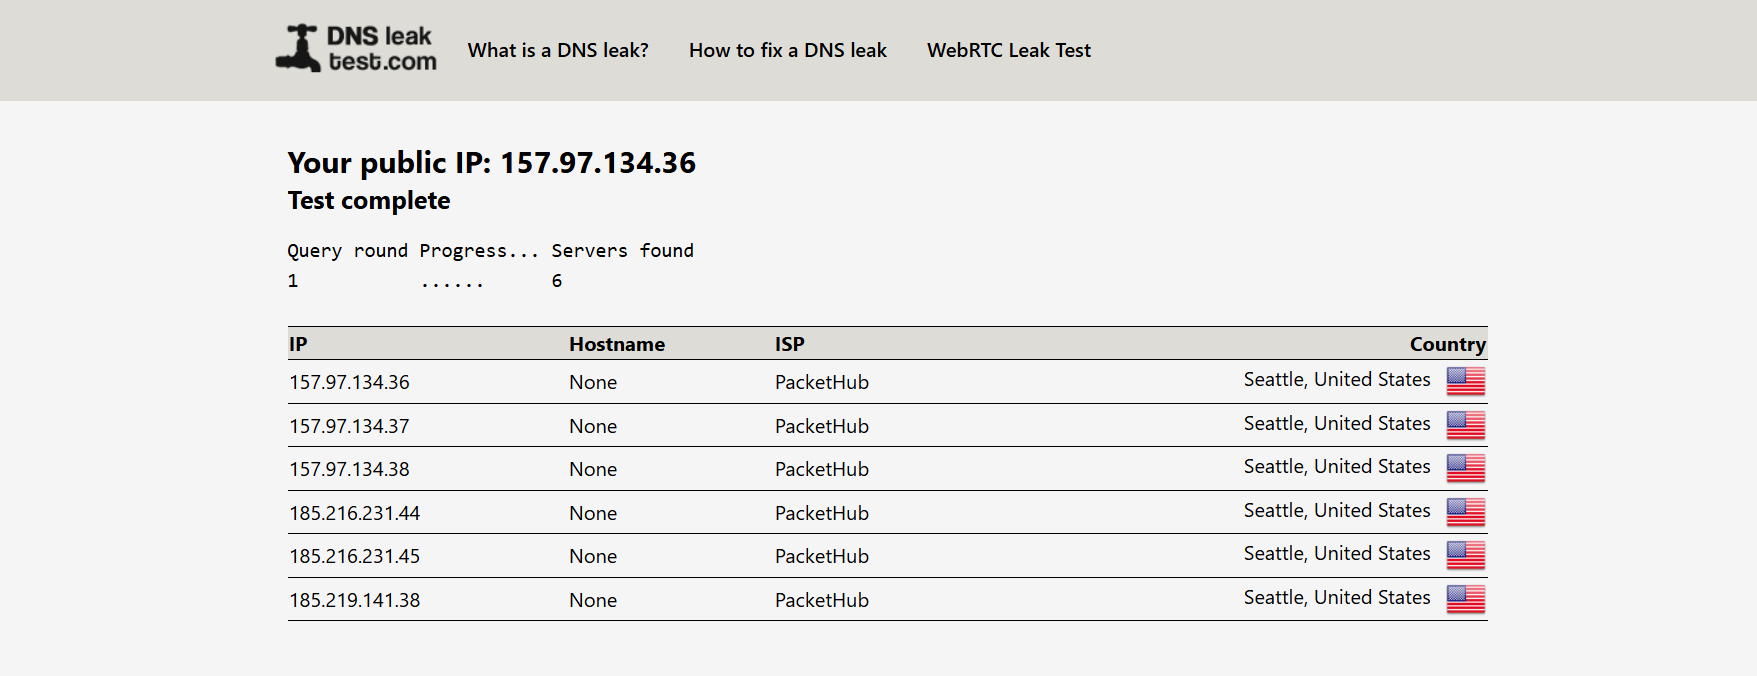
The easiest way to do this is to use a VPN leak test. ipleak.net from AirVPN is the most convenient one (at least in our opinion). It checks for everything - IPv4/IPv6, DNS, and WebRTC leaks.
Just follow the link, take a screenshot for reference, run a VPN connection, and reaccess the link. If the results are the same (you still see your original IP and ISP DNS addresses), you're dealing with a leak.
For this test, we used a US VPN server from NordVPN. The tester's real location is Romania. Here is how a leak-proof VPN connection should look like:
The IPv6 test is red because we disabled IPv6 on our end. Plus, CyberGhost clients prevent IPv6 leaks.
Also, no IP address shows up for WebRTC because CyberGhost offers WebRTC leak protection. We are also using uBlock Origin to block WebRTC leaks.
Don't just take our word for it, though - the next screenshots will prove everything is working well.
Now, if you want to test for specific VPN leaks, here are some services you can use:


If you're very tech-savvy, you can also do some advanced testing. ExpressVPN made their testing suite open-source and free, and you can get it right here. They actually use it to leak-proof their apps. Here's the guide that can help you get started.
What About Traffic Leaks?
As far as we know, no tool can help you test for VPN traffic leaks - maybe if you use network monitoring software, though most tools are business solutions, so they don't come cheap.
To be honest, you won't really need a leak detection tool in this case. Most VPN clients will generally alert you when your VPN connection goes down.
How to Prevent VPN Leaks
Now that we know how to test whether or not you have VPN leaks, the next step is to either prevent them or stop them. In this section, we'll take a look at how to handle each type of issue individually:
1. Fix IP Leaks (IPv4 & IPv6)
There's nothing you can do to fix IPv4 leaks since the issue is on the VPN provider's end. Maybe pick a VPN with a free trial and test its connection during that period to make sure there are no problems.
IPv6 leaks, on the other hand, can be prevented. The first thing you should do is disable IPv6 on your device:
1.1 Windows 7
1. Go to Control Panel
2. Select Network and Internet
3. Open Network and Sharing Center
4. Click Local Area Connection5. Click Properties
6. Uncheck "Internet Protocol Version 6 (TCP/IPv6)"
1.2 Windows 8
1. Open Start Menu and go to Desktop
2. Right-click the Networks icon
3. Open Network and Sharing Center
4. Click Local Area Connection
5. Click Properties
6. Uncheck "Internet Protocol Version 6 (TCP/IPv6)"
1.3 Windows 10
1. Right-click the Network icon on the desktop
2. Choose Open Network and Sharing Center
3. Click Change adapter settings (right side)
4. Right-click your main connection, select Properties
5. Uncheck "Internet Protocol Version 6 (TCP/IPv6)"
1.4 Mac OSX
1. Go to System Preferences
2. Open Network
3. Select the first connection
4. Click Advanced
5. Under Configure IPv6, choose Off or Link-local only
1.5 Android
1. Go to Settings
2. Tap Connections > Mobile networks > Access Point Names
3. Select your mobile operator
4. Find "APN protocol", tap it
5. Select IPv4(Note: To disable IPv6 on Wi-Fi, the phone needs to be rooted)
1.6 Ubuntu
The process is a bit long, so here's a helpful guide.
Unfortunately, you won't be able to disable IPv6 at a system-level on iOS devices.
Also, if you use Windows and know your way around the OS, you can use this fix from Microsoft to completely disable IPv6.
Other than that, consider using a service with VPN leak protection for IPv6. That just means the service blocks IPv6 traffic to prevent leaks. Here are some decent options: NordVPN, Surfshark, ExpressVPN, and CyberGhost.
Alternatively, you could also use a VPN that actually supports IPv6 traffic like Perfect Privacy and HIDE.me. That way, you'll continue having access to IPv6-only websites.
2. Fix DNS Leaks
There's quite a list of things you need to do to fully prevent DNS leaks:
- First, disable IPv6.
- Next, if you run Windows, you'll need to get rid of Teredo and SMHNR. Here's a guide showing you how to disable Teredo. As for SMHNR, follow these step-by-step tutorials to stop it from interfering with your VPN connections. And in case you use the OpenVPN app, try out this patch.
- If your network configurations are acting up, you'll have to force the DNS address switch. See if the VPN client has an option for forcing the VPN to only use the VPN provider's DNS server. Alternatively, manually change the DNS addresses to OpenDNS (208.67.222.222 and 208.67.220.220) or Google Public DNS (8.8.8.8 and 8.8.4.4).
- If you suspect your ISP uses a transparent DNS, enable the option that forces the VPN to only use the VPN provider's DNS server. If that's not available, you'll need to use the OpenVPN app. Once that's done, find the .conf or .ovpn files for the VPN servers, open them with a text editor, and add this command: block-outside-dns.
- Lastly, change the default login credentials for your router with stronger ones. That will stop hackers from finding them online in PDF manuals, and using them to break into your router. Alternatively, get a secure router. You can also try getting ExpressVPN's Aircove router. In addition to an ExpressVPN subscription, you can get complete protection.
3. Fix WebRTC Leaks
We already offered some tips on how to protect yourself from these VPN leaks in our WebRTC article (here's the link again).
But here's more information to help you out:
- If you don't know how to disable WebRTC on your browser, check out this guide.
- Use uBlock Origin on your browser. It's a script blocker that can prevent WebRTC leaks.
- Use a VPN with WebRTC leak protection. NordVPN blocks WebRTC leaks, and they even have a browser extension that does the same thing. ExpressVPN and Perfect Privacy have built-in protection in their clients, and they use firewall rules to offer extra protection too.
- If you use Opera or Chrome, consider using WebRTC Leak Prevent (for Chrome).
4. Fix Traffic Leaks
You can do things like using a VPN server that's closer to you, making sure the firewall doesn't interfere with the VPN connection or using a more lightweight protocol (IKEv2, SoftEther, WireGuard, L2TP/IPSec).
However, the easiest prevention method is to use a VPN with a Kill Switch. Basically, it's a feature that shuts down your web access when your VPN connection goes down. You can only use the internet again when the VPN is up and running.
Some Additional and Advanced Leak Protection Tips
Even if you’re using a reputable VPN and have basic protections like DNS leak prevention and a kill switch enabled, you’re not completely invulnerable. Advanced users and privacy-conscious individuals often go further to ensure airtight security, especially when dealing with sensitive tasks, censorship, or surveillance-heavy environments. Let's have a close look at some of them:
Final Thoughts
Using a VPN is one of the first steps to safeguarding your digital safety. But if your VPN has leaks, it’s like leaving a window wide open without realizing it. DNS requests, real IP addresses, or even sudden traffic drops can quietly expose your data, putting your privacy and security at risk, even when you think you're protected.
The key is not just to use a VPN, but to use the right one and to take the right steps. If you have tested and spotted a VPN leak, then disabling IPv6, enabling kill switches, blocking WebRTC, and setting up custom firewall rules are great starts. For power users, tools like split tunneling, Tor over VPN, or multi-hop configurations can add even more armor. The bottom line? Privacy isn’t passive, it’s something you actively maintain and upgrade.
If you want to skip the hassle and go straight to a reliable solution, NordVPN is one of the best choices out there. It has airtight DNS, IPv6, and WebRTC leak protection, a built-in kill switch, and even supports advanced features like Double VPN, secure protocols such as Nordlynx and Onion Over VPN. With NordVPN, you can browse, stream, and download with confidence, knowing your data isn’t slipping through the cracks.
So this was all about our guide on VPN Leak Tests and Protection. We recommend you follow these steps, along with additional tips, to set up a leak-proof digital environment. If you have additional queries, please feel free to drop your comments.
Related