When you purchase through links on our site, we may earn an affiliate commission. Here’s how it works.
How to Enable & Disable NordVPN’s Obfuscated Servers – Covering Windows, Mac, Linux, iOS & Android!
Last updated January 15, 2025


Obfuscation is a handy tool if you need an "extra push" to unblock websites and hide your VPN traffic. That's because obfuscation uses smaller data packets than regular servers, which makes it harder for anti-VPN systems to block your traffic. As such, obfuscation is crucial if you connect from a country with heavy Internet censorship and restrictions.
NordVPN offers obfuscation servers across all its supported platforms. A certain portion of its network is obfuscated, with specifically targeted locations. Accessing and using those servers is quite easy, and we're here to guide you through every step of the way.
In this guide, we'll show you how to enable and disable NordVPN's obfuscated servers, explain what they are and how they work, discuss who should use obfuscation, tell you where NordVPN offers such servers, and provide some troubleshooting steps.
What Are Obfuscated Servers?
Obfuscated servers are a special type of server with additional obfuscation or data scrambling. They are used to bypass more rigorous Internet blocks and restrictions.
In case you didn’t know, your ISP can see that you’re using a VPN – even though it can’t see the contents of your secure VPN tunnel, which means that your privacy is guaranteed, nonetheless. However, that is precisely where VPN obfuscation comes into play, as they change how your Internet traffic is rerouted.
In other words, obfuscated servers change your data packets. In turn, your ISP won’t have a way of knowing whether you use a VPN in the first place. Thanks to this double encryption, any VPN metadata will be hidden and concealed. As such, these servers are great for unblocking the Web in countries with firewall-based restrictions, as your Internet traffic will look like regular HTTPS traffic.
Why Should You Use Obfuscated Servers?
There are several reasons to use obfuscated servers - to bypass VPN blocks, reach more restrictive geo-blocked services, protect yourself online, and avoid bandwidth throttling. Here's more info:
- Fight Back Against VPN Blocks: Certain networks and even whole countries might ban VPN usage, making regular VPN data difficult to travel. Obfuscation is your best shot at bypassing those blocks, especially if they're based on DPI (deep packet inspection).
- Access Restrictive Geo-Blocked Services: Some digital services (like streaming services, for example) utilize advanced methods of blocking VPN traffic. Since you'll hide your VPN traffic altogether, obfuscation will help you unblock various sites and apps.
- Secure Your Online Privacy: If you're a journalist or activist, you probably deal with sensitive information, and you're concerned about your online privacy. In this case, you'll benefit from the double encryption that obfuscation brings to the table.
- Avoid Bandwidth Throttling: If your Internet traffic throttles your traffic, it does so by inspecting your Web traffic. Even though a regular VPN connection can help with throttling, obfuscation is perhaps the most effective way to bypass ISP-induced throttling.
How to Enable & Disable NordVPN Obfuscated Servers
This VPN's obfuscated servers are available across all its supported platforms, as long as you use the OpenVPN protocol. That means you can access them on Windows, macOS, Linux, iOS, and Android. We don't want to leave anyone out, so we'll cover all those platforms as follows.
Windows 7 and 8.1
On Windows 7 and 8.1, you need to enable NordVPN's obfuscated servers using the app settings. These are the steps you need to take:
- Open NordVPN and visit the settings menu (gear icon in the top-right corner).
- Click 'Advanced' using the left-placed sidebar.
- On the right, flip the switch next to 'Obfuscated Servers (OpenVPN).'


- Return to NordVPN's home screen and pick any obfuscated server.
Windows 10 and 11
Modern versions of Windows support newer NordVPN app versions, and they come with a unique way to enable obfuscated servers. This is what you need to do:
- Launch NordVPN and click 'More Connection Options.'
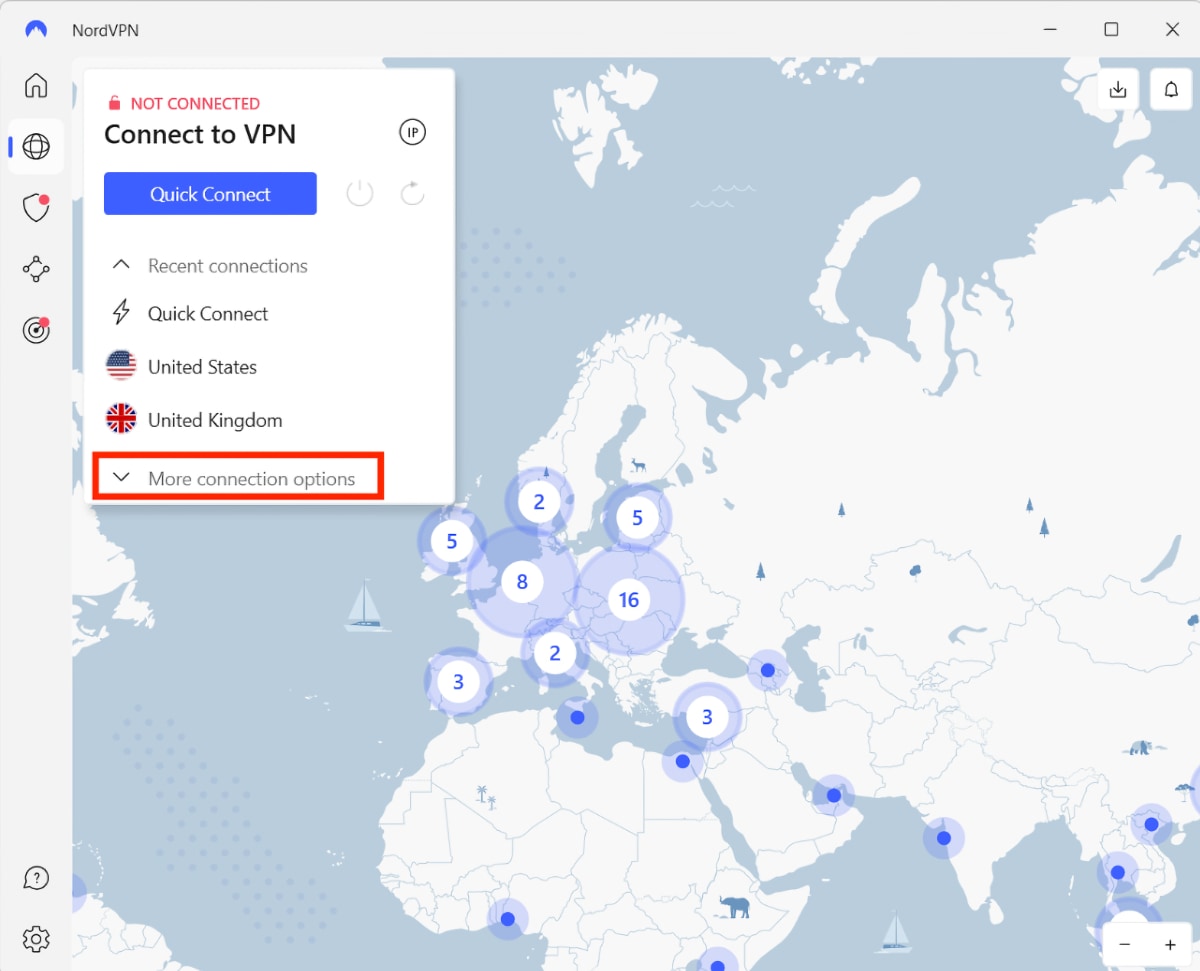

- Select 'Obfuscated Servers,' and a pop-up should appear on your screen.

- When asked to use a different protocol, click 'Connect.'
- You can now start using obfuscated and other specialty servers.
macOS
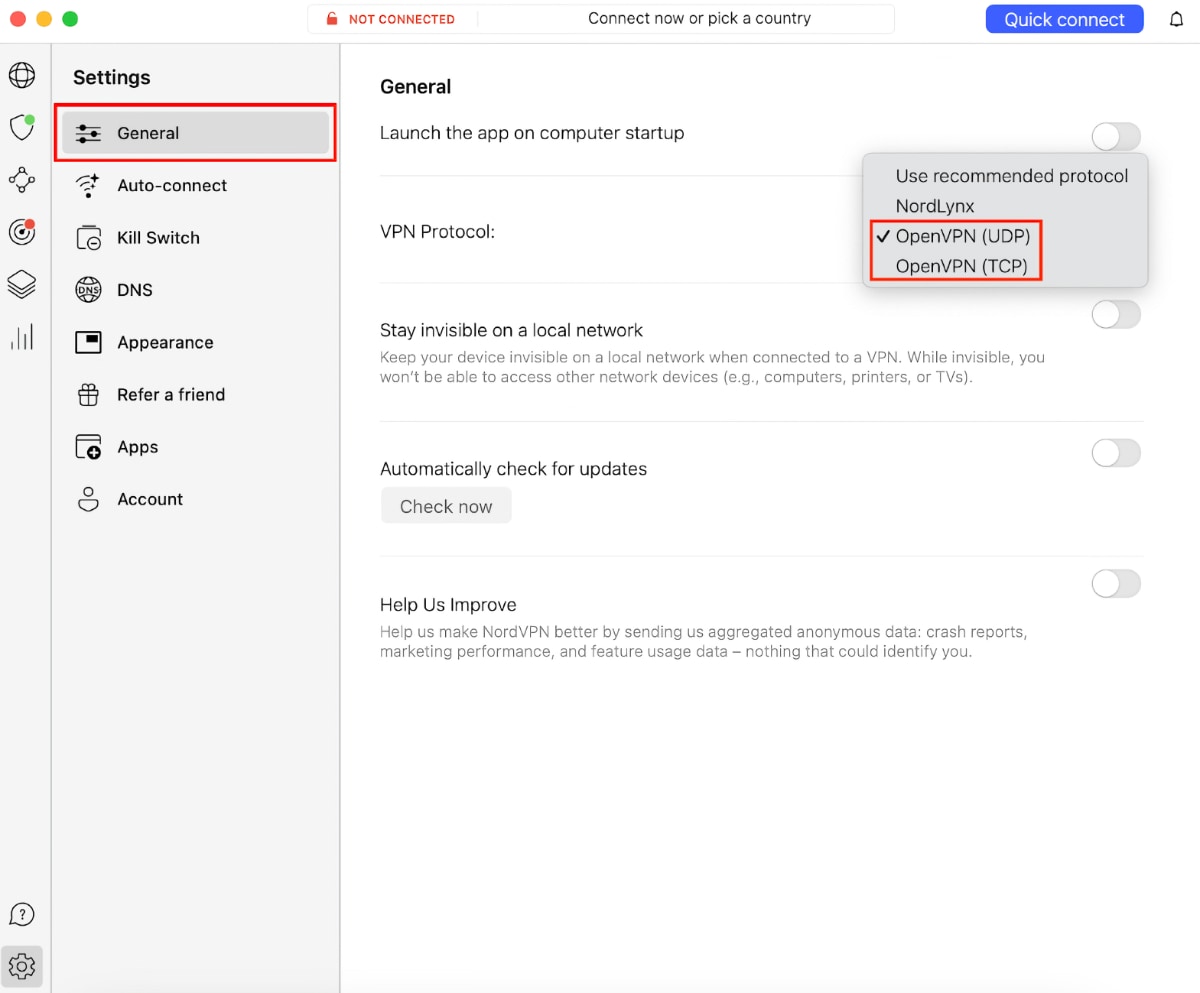
You’ve most probably downloaded NordVPN from the Mac App Store. This version comes with IKEv2 set by default, and we need to change that to OpenVPN to enable obfuscated servers. Do the following:
- Open NordVPN and use the gear icon to visit its settings (bottom left corner).
- Click 'General' and find the 'VPN Protocol' item on the right.
- Switch to the OpenVPN UDP or TCP protocol.

- Return to NordVPN's home screen and check the left-placed sidebar.
- Scroll until you see 'Obfuscated Servers' and connect.
Linux
When it comes to Linux, there’s an easy way to enable or disable obfuscated servers in NordVPN. As you can already guess, this is done using a series of commands, as explained below.
- First, use the 'nordvpn set technology openvpn' command.
- Switch to OpenVPN using 'nordvpn set protocol tcp' or 'nordvpn set protocol udp.'
- To enable obfuscated servers, use the 'nordvpn set obfuscate on' command.
- When ready to connect, use the 'nordvpn connect' command.
iOS
To enable NordVPN’s obfuscated servers on iOS, switch to the OpenVPN protocol (this VPN app uses its proprietary protocol by default). Follow these steps:
- Open the NordVPN app and tap the 'Profile' icon in the bottom-right corner.
- Access the app settings by tapping the gear icon (top-right corner).
- Pick 'Protocol' and switch to OpenVPN UDP or TCP.


- Return to NordVPN's home screen and navigate to 'Specialty Servers.'
- Tap 'Obfuscated Servers' and pick a location.
Android
Let’s not forget our readers who are using NordVPN on Android. Here are the steps to enable or disable obfuscated servers in NordVPN on that mobile platform.
- Open NordVPN and tap on 'Profile.'
- Navigate to Settings > VPN Protocol.
- Tap 'OpenVPN (UDP)' or 'OpenVPN (TCP).'


- Return to NordVPN's home screen and tap 'Specialty Servers.'
- Choose 'Obfuscated' and start your VPN session.
NordVPN Obfuscated Servers List
Out of the 7,100+ servers NordVPN has in total, 106 are obfuscated and scattered across the world. Here are the locations of NordVPN's obfuscated servers:
What to Do If NordVPN Obfuscated Servers Are Not Working?
Like other types of VPN servers, obfuscated servers can encounter temporary issues. So, if you have a hard time connecting to an obfuscated server, here are some tips and actions to try:
- Try Using Another Obfuscated Server: Perhaps you're trying to connect to a server under a heavy load, or maybe it's going through maintenance. Try another server location.
- Restart Your Router, Computer, and VPN: Restart your router by keeping it unplugged for around 30 seconds. Also, restart your computer, which will also restart your VPN software.
- Fine-Tune Your Antivirus and Firewall: Lower your cyber-sec application's security level, and see if you can add NordVPN to the list of exceptions in your antivirus or firewall app.
- Reinstall Your VPN Software: Perhaps there's an issue with NordVPN's installation, which you can resolve by downloading the latest version of the VPN application for your system.
- Ask NordVPN for Assistance: If nothing else works, launch your web browser and visit NordVPN's website, where you can initialize a live chat session.
Final Thoughts
Thanks to NordVPN's obfuscated servers, you can rest assured that no one will see your VPN traffic. In other words, this feature will help you bypass even the most rigorous censorship measures, unblock new sites, and even bypass ISP throttling. The best thing is that NordVPN has obfuscated servers across many locations, and these servers work on any device.
As mentioned above, you need to use the OpenVPN protocol for obfuscated servers to appear in NordVPN's interface. This applies to all its supported operating systems. Once you make the switch, all 100+ of these servers will become available to use.
Lastly, regarding data security and protection, no other VPN can match NordVPN. Aside from obfuscation, you'll find a privacy-protecting kill switch, antimalware components, and anti-tracking tools that help you hide your VPN data.
That's all we've prepared for this guide. If you have any questions for us, make sure to leave a comment below. Thanks for reading!
Related