
When you purchase through links on our site, we may earn an affiliate commission. Here’s how it works.
How to Set Up a VPN on Raspberry Pi in 2025
Last updated June 28, 2022


If you're a Raspberry Pi fan, you're surely not afraid to dive deep into your computer's hardware and software. That's a good thing, especially since we'll teach you how to set up a VPN on a Raspberry Pi device, which isn't the fastest process, but it's a highly rewarding one.
Before we start, we have a few valuable pointers that you should keep in mind. First of all, VPNs have different installation methods when it comes to their Raspberry Pi support. We recommend using a VPN with a command line or GUI app for Raspberry Pi. Even better - you can pick a VPN that offers a combination of the two, which is the case with the VPN you'll find recommended throughout this guide.
Also, we've made sure to explain everything from scratch. That means we've provided some basic info on assembling your Raspberry Pi computer. And, of course, we explained how to set up a VPN on your Raspberry Pi.
Ready to get started? If you are - let's jump right in!
How to Set Up a VPN on Raspberry Pi
If you're starting from scratch, you'll want some information on the requirements regarding your Raspberry Pi device. So, here are all the steps to take to set up a VPN on your Raspberry Pi:
- Step #1: Check the Required Equipment (If You're Starting from Scratch)
- Step #2: Set Up a VPN on Raspberry Pi
- Step #3: Learn to Interact With VPN Servers
- Step #4: Learn to Control Your VPN Connection
- Step #5 (Optional): Use ExpressVPN via a Graphical User Interface (GUI)
Step #1: Check the Required Equipment (If You're Starting from Scratch)
Many of you have probably assembled your Raspberry Pi device. However, if you're starting from scratch, you'll want to know what kind of equipment you need. So, let's go over everything you need to assemble your Raspberry Pi computer and prepare it to act as a VPN client.
#1: Raspberry Pi Board
These days, you'll find a vast selection of Raspberry Pi boards. However, if you want the latest one available, we recommend getting the Raspberry Pi 4 Model B (you can choose from 1GB, 2GB, or 4GB of RAM). With this model, you get Bluetooth, Wi-Fi, and USB.
In addition, the Raspberry Pi 3 Model B+ will do the job of running a VPN service without a hitch. Even older models should work just fine. The one we're recommending here comes with 1GB of RAM. It also includes Bluetooth and Ethernet-based connectivity.
Make sure to think your decision through. Also, be aware of what you'll get from your chosen Raspberry Pi board and see if you can mitigate any downsides. For example, if Wi-Fi is not included by default, you can always get a Wi-Fi dongle for your Raspberry Pi.
#2: Raspberry Pi Case
Not just any case will do the job of allowing your Raspberry Pi to run optimally, especially if you plan on putting your Raspberry Pi under a lot of pressure.
If you choose a Raspberry Pi 4, cases and housings made by Flirc and iUniker stand out. If you plan on going with a Raspberry Pi 3, check out the official Raspberry Pi case on Amazon.
#3: Keyboard & Mouse
When it comes to input devices for Raspberry Pi computers, you have plenty of options in front of you. Newer boards come with Bluetooth integrated, but they also come with USB ports.
If you want to cut the costs of building a new Raspberry Pi computer, this AmazonBasics Keyboard + Mouse combo should do the job just fine. Of course, going with wireless input devices is also a possibility.
#4: MicroSD Card
Your Raspberry Pi computer needs some memory, of course. This is where MicroSD cards come into play, allowing you to add gigabytes of storage. However, remember that some memory cards are optimized for Raspberry Pi boards by coming with Raspbian already installed.
This speeds up the process of assembling your computer while also allowing you to change your OS in the future. A good option is a memory card sold by STEADYGAMER.
#5: Power Adapter
Make sure to use a proper power adapter for your board. It means that you need to know which Raspberry Pi you plan on buying, and you need to know what kind of power adapter that specific board requires.
For example, here's a USB-C power supply for Raspberry Pi 4 boards, and here's a Micro-USB power supply for Raspberry Pi 3 boards.
#6: ExpressVPN Subscription
Finally, you'll need an active VPN subscription. Based on our experience, the best VPN for Raspberry Pi right now is ExpressVPN.
ExpressVPN comes with the simplest installation method possible, you get to control it via easy-to-remember commands, and it's capable of encrypting your data safely and securely.
Step #2: Set up a VPN on Raspberry Pi
Before installing a VPN on your Raspberry Pi device, it's crucial to pick a VPN optimized for that specific platform. That said, we've chosen to use ExpressVPN as an example in this guide.
ExpressVPN is the best option you have right now, catering to beginners and advanced users alike. So, get your ExpressVPN subscription before you do anything else.
1. Prepare ExpressVPN's Installation File
First, you need to download ExpressVPN's installation file on your Raspberry Pi device. Here's how you can do just that:
1. If you haven't done so already, go ahead and subscribe to ExpressVPN. (You can try it risk-free for 30 days.)
2. Navigate to ExpressVPN's website and select "My Account" using the main menu.

3. Provide your credentials (email and password) and click "Sign In."
4. You might need to provide a verification code. So, check your email inbox.
5. At this moment, you should be looking at your ExpressVPN online dashboard.

6. Using the top-placed banner, click "Set Up Other Devices."
7. On the left, select "Linux."
8. Select "Raspberry Pi OS" and use the "Download" button on the right.


9. Leave that page open, as you'll need your activation code soon.
2. Install ExpressVPN on Raspberry Pi
Don't worry; we're nearly done. All there's left is to run ExpressVPN's installation file and proceed to activate the application. So, continue as per the following steps.
1. Open Linux's Terminal and run the following command:
cd ~/Downloads/2. Now, install the VPN by running the "sudo dpkg" command, as you can see below:
sudo dpkg -i [installer filename]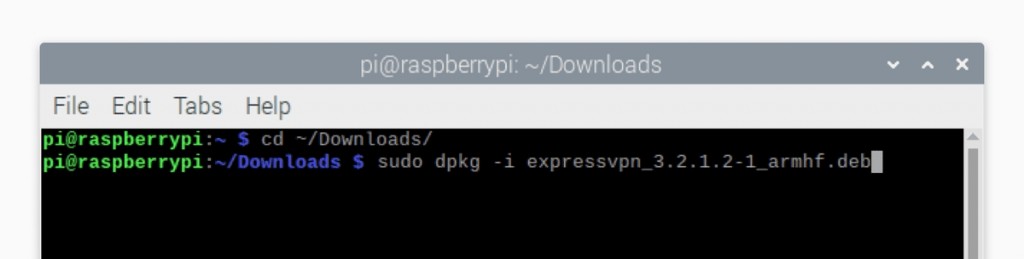

3. ExpressVPN will now install on your device. Wait until you see a confirmation.
4. If you see the "Cannot connect to expressvpn daemon" error, use the following command:
sudo service expressvpn restart5. Once you install ExpressVPN, you need to activate it using the "activate" command:
expressvpn activate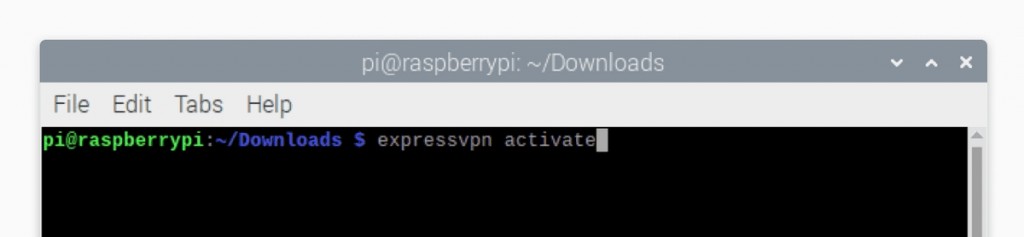

6. If asked for an activation code, copy it from your ExpressVPN online dashboard.
7. When asked to send anonymous data to ExpressVPN, respond by pressing Y or N.
8. You can also opt-out of anonymous data logging using the following command:
expressvpn preferences set send_diagnostics falseThat's it! You've now set up ExpressVPN on your Raspberry Pi. Considering that ExpressVPN brings a command-line interface on Linux, you'll need to learn how to use it. So, keep reading!
Step #3: Learn to Interact With VPN Servers
In this segment, we will show you how to interact with ExpressVPN. More precisely, we will show you how to connect to the closest server, list all ExpressVPN servers, and shut down your VPN session. So, let's get started.
How to Connect to an ExpressVPN Server
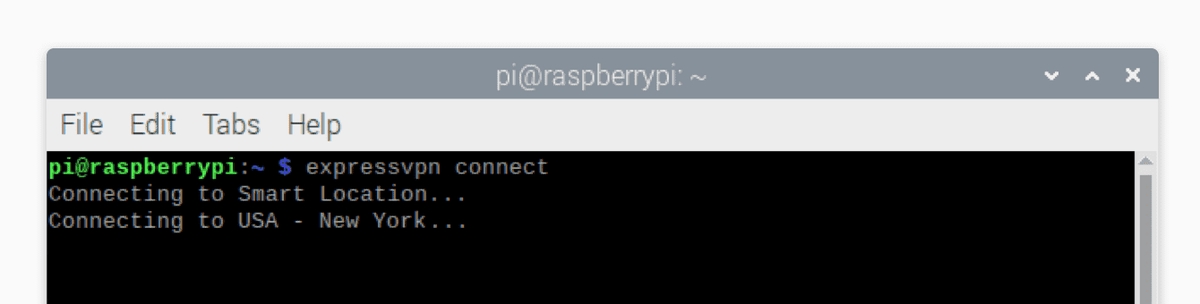
ExpressVPN has a "Smart Location" feature, which selects the best VPN server based on your location and your connection's parameters.
To use the feature, go with the "expressvpn connect" command. However, if you have used the VPN before, that command will automatically connect you to the last used server.
expressvpn connect
To force ExpressVPN to use its "Smart Location" feature, you need to use the "expressvpn connect smart" command. That command will override your previously chosen server.
expressvpn connect smartHow to Connect to a Specific ExpressVPN Server
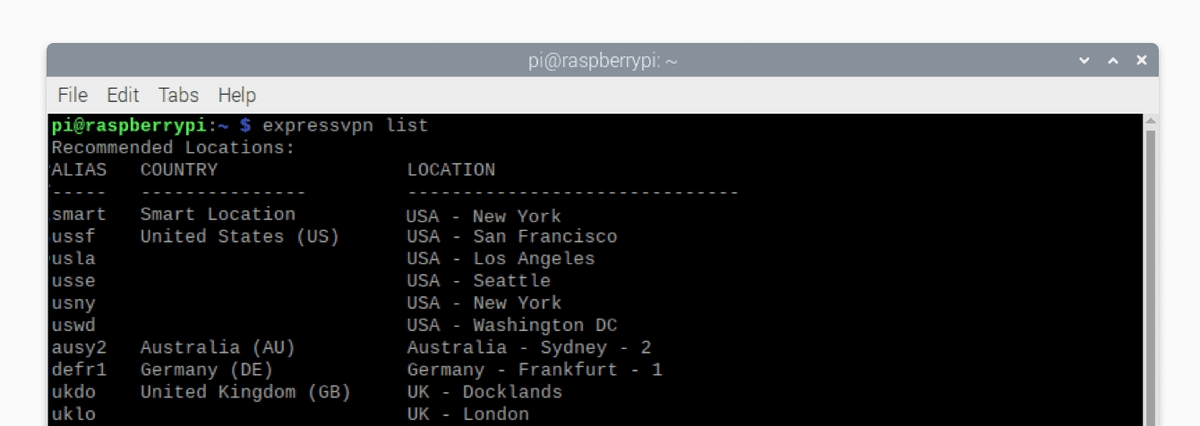
ExpressVPN offers more than 3,000 servers in more than 90 locations. To check the available servers, you can use the "expressvpn list" command. That'll bring up a vast list of servers, so let's see what the information found here means.
expressvpn listFirst, on the left side, you'll see an alias of each server (usala3, usde, ussj, hk1, and plenty more). Then, you'll see the country and the location of each server. On the right, ExpressVPN provides a personalized recommendation about whether it's suitable to connect to a specific server from your physical location.

To connect to a specific server, use the "expressvpn connect [LOCATION]" or "expressvpn connection [ALIAS]" command.
expressvpn connect “[LOCATION]”For example, if you want to connect to a Los Angeles server, you'll use the "expressvpn connection usala" command or the - expressvpn connect "USA - Los Angeles."
expressvpn connect "USA - Los Angeles"You can also connect to a specific country, allowing ExpressVPN to pick the most suitable server associated with that country. The code you need to use would be "expressvpn connect [COUNTRY]" - as in "expressvpn connect Germany."
expressvpn connect [COUNTRY]expressvpn connect GermanyHow to Disconnect From an ExpressVPN Server
You can disconnect from the currently used server when you no longer need your VPN session to be active. For this purpose, the "expressvpn disconnect" command should be used.
expressvpn disconnect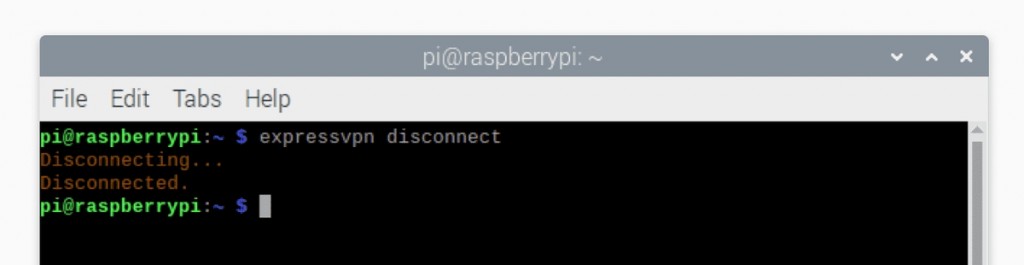
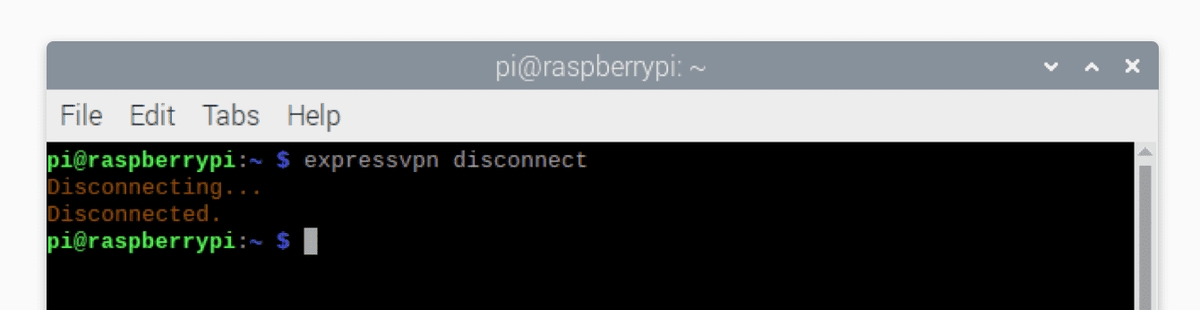
The VPN will display a message saying you're disconnected, and you'll automatically return to your regular IP address. That means your data will no longer be encrypted.
Step #4: Learn to Control Your VPN Connection
By now, you've installed ExpressVPN on your Raspberry Pi and know how to connect and disconnect from servers. Considering that ExpressVPN brings a command-line interface, you'll want to know additional commands to control your VPN connection.
Use a Different VPN Protocol
VPN services bring all kinds of VPN protocols in charge of encrypting your Web data and keeping it in a secure tunnel. When it comes to ExpressVPN, you can switch between different versions of Lightway and OpenVPN.
Lightway comes in two variations, TCP and UDP. You're free to switch between those at any moment, use one of the following commands:
expressvpn protocol lightway_tcpexpressvpn protocol lightway_udpThe same applies to OpenVPN, which means you can switch between TCP and UDP. To make that happen, use the following commands:
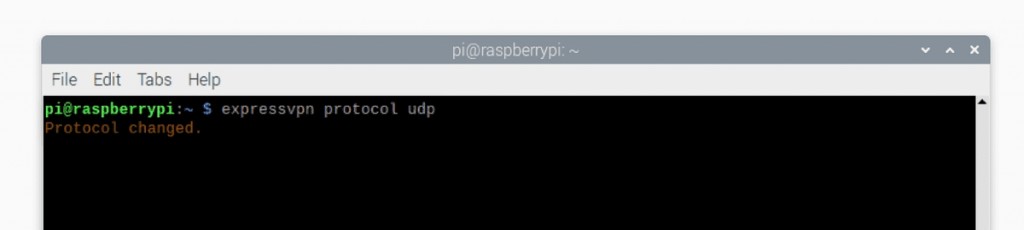

expressvpn protocol tcpexpressvpn protocol udpLastly, ExpressVPN allows you to automate your VPN protection. So, if you wish the VPN to decide which protocol to use, use the command found below:
expressvpn protocol autoUtilize the Autocomplete Feature
ExpressVPN requires you to remember a whole series of commands. In your day-to-day use of this VPN, you'll probably only use a couple of commands, so it's not that hard to remember them. Still, let's not forget about power users who want to dig into this application.
This is where the autocomplete feature comes into play. It allows you to get a list of functions by pressing the "Tab" key - while typing a specific command.
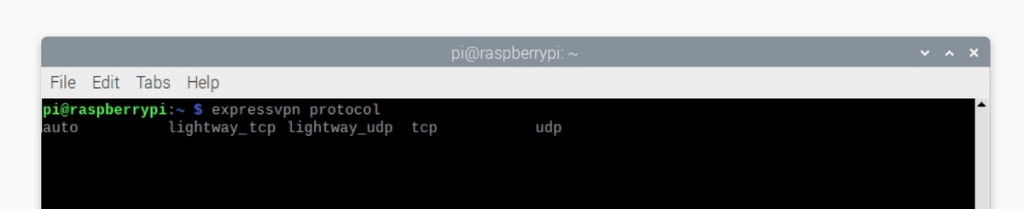

Let's say that you want to switch to a different protocol. You can use the "expressvpn protocol" command and press the "Tab" key twice to see which protocols are available.
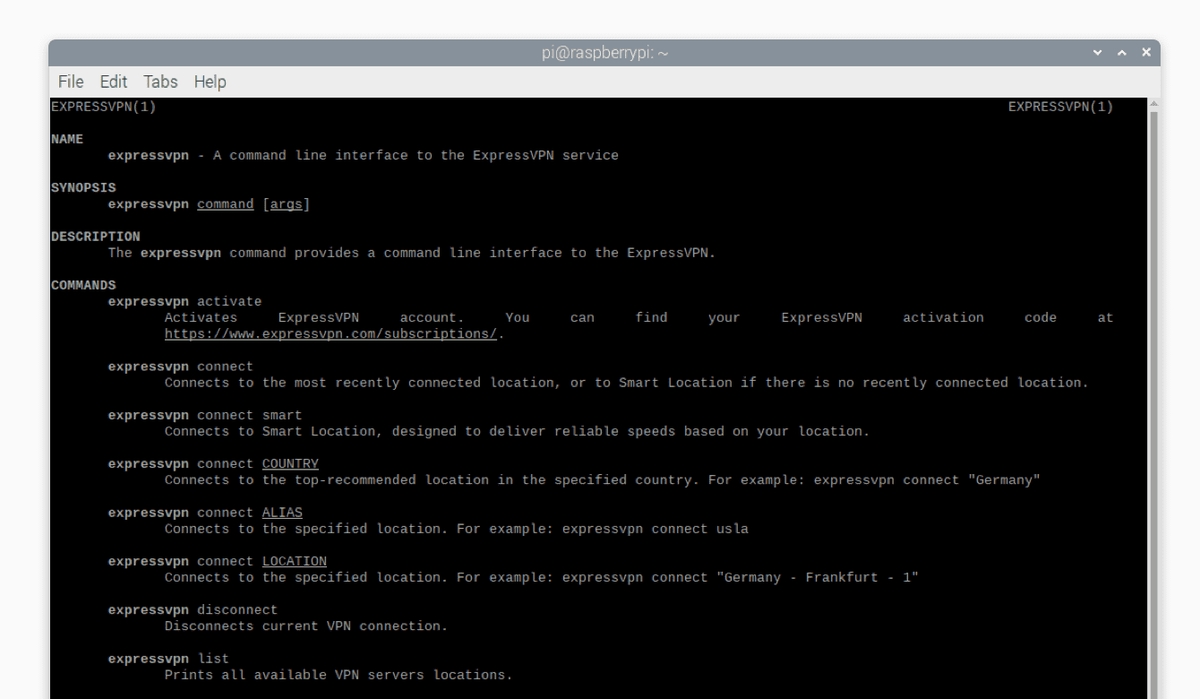
Open ExpressVPN's Manual
If you'd like to check everything ExpressVPN offers on your Raspberry Pi computer, go with the "man expressvpn" command. This will open the application's manual, featuring a series of commands and descriptions, allowing you to get the most out of this VPN.
man expressvpn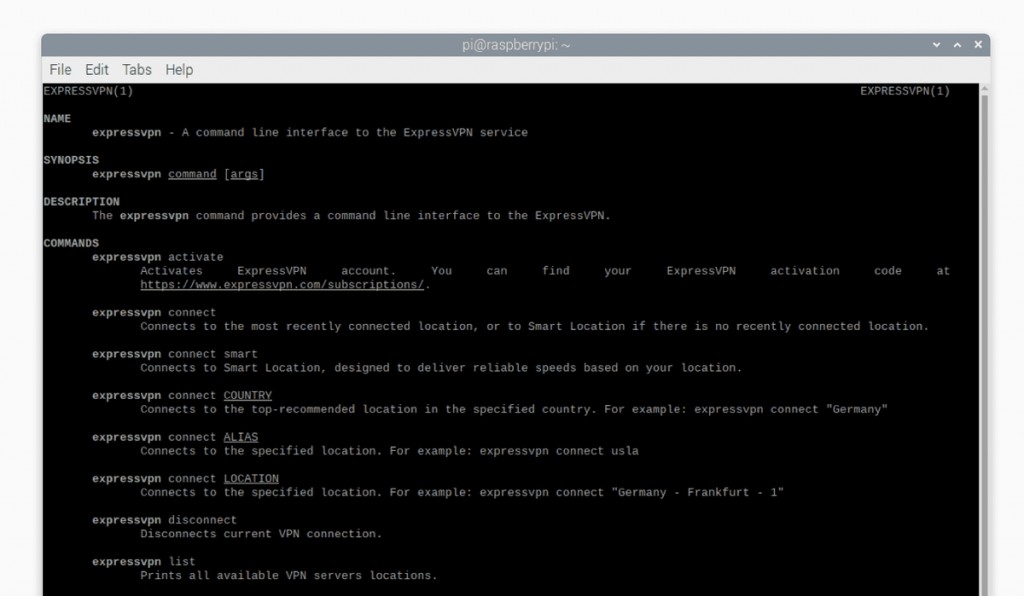
Step #5 (Optional) : Use ExpressVPN via a Graphical User Interface (GUI)
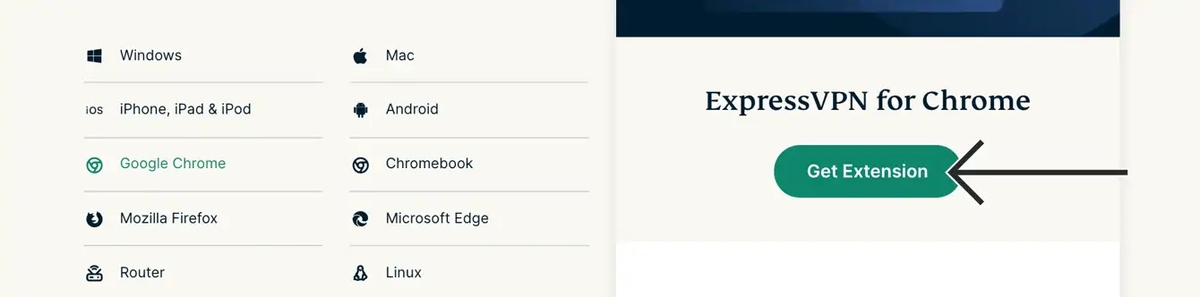
As you've seen already, ExpressVPN is available as a command-line app for your Raspberry Pi device. However, you can combine it with its extension to get a graphical user interface, available on browsers such as Google Chrome and Mozilla Firefox.
To get ExpressVPN's extension for your Web browser, use any of the following commands based on the browser you currently use:
expressvpn install-chrome-extensionexpressvpn install-firefox-extensionCommand found above will open the ExpressVPN website. That means you'll need to install the extension manually by clicking on "Get Extension." Also, remember that you first need to install ExpressVPN's app on your Raspberry Pi, as the extension won't work otherwise.

Differently said, ExpessVPN's extension doesn't work on its own. Instead, it acts as a gateway to the ExpressVPN app, which means you'll get the highest level of encryption possible, thousands of servers, and more.
Final Thoughts
Setting up a VPN on a Raspberry Pi device can be a relatively simple procedure - but only if you pick a VPN that supports that platform natively. That's why we recommend ExpressVPN, which truly deserves its place among the best VPNs for Raspberry Pi (you can try ExpressVPN risk-free for 30 days).
Finally, we recommend checking out our central guide on setting up a VPN, which covers more than 60 devices. So, make sure to learn how to protect your data on any device you might own.
That's all for our guide on setting up a VPN on a Raspberry Pi device. If you have any questions on your mind, share them via the comments section below. Thank you for reading!
Related