How to Check If My VPN Is Working?
Last updated October 15, 2021

VPN services don't really offer any feedback once you connect to a server (except for saying 'Connected' in most cases). Of course, you shouldn’t trust anyone with the privacy of your sensitive data. So, the question is – how to check if my VPN is working?
There's a very simple answer to that question. To check if your VPN works the way it should, you need to put it through a series of tests. And no, you don't have to be an IT expert to dive into those tests, as they've become widely available and easy to do.
With that said, there are five steps to take to ensure that your VPN works, as explained just below. So, let’s get started, shall we?
Step #1: Check Your "Real" IP Address
You already know that VPNs hide your IP address. Therefore, the first step would be to check if that actually happens in your case. So, you need to start by checking your "real" IP address without having a VPN session active in the background (your VPN should be OFF).
Surprisingly enough, Google can help you with that. So, use any Web browser to visit Google’s home page. Then, type in: "My IP" and press Enter. Take a look just below Google's search bar, and you should see a string of numbers next to "Your Public IP Address."
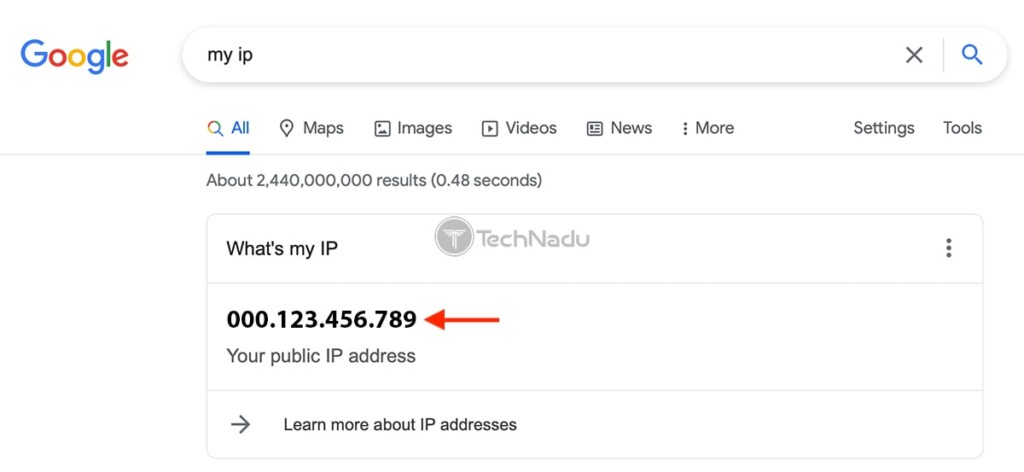

Make sure to take note of your public IP address – as this is a crucial piece of information before you start testing your VPN. Once you do so, proceed to the next step.
Step #2: Connect to Your VPN Service
Check out our list of the best VPNs if you’re not sure which provider is worth your time. Then, feel free to connect to your VPN. In other words, use its interface and pick any server. To get easier-to-understand results, we recommend connecting to a VPN server not located in your country.
Ensure that your VPN session is active. Your VPN app should show you a message that reads "Connected" or "Connection Active," or its interface could turn green. Once that happens, you're set to check if your VPN is working correctly. So, let's proceed.
Step #3: Check for IP Address Leaks
Many tools exist on the Web that let you check for data leaks. However, our team likes to rely on IPLeak.net, offering several different VPN leak tests. First, let's use it to check for any IP address leaks, ensuring that your VPN tunnel is intact.
So, proceed to visit IPLeak.net using any Web browser. After a few moments, the website will check your IP address and you'll see it at the top (along with the name of the country associated with your IP address).
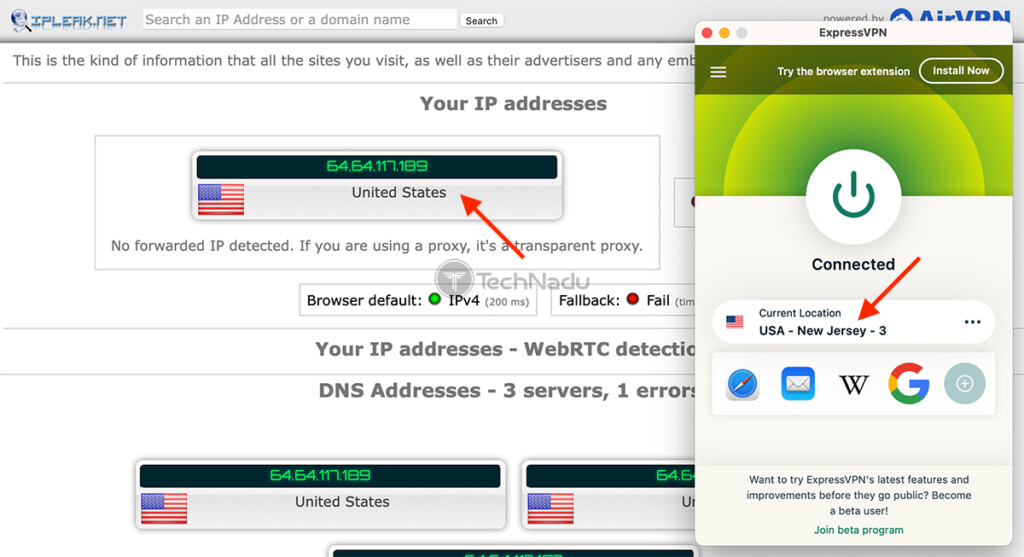

The information you see there should not correspond to your "real" IP address (the one you identified in the first step of this guide). If you see a different IP (that matches the country you've picked via your VPN's interface), that means that your VPN tunnel is set up properly.
Step #4: Check for DNS Leaks
Next, you'll want to check for DNS leaks. In some instances, even though your VPN can create a secure VPN tunnel, it can still fail to protect your device's DNS queries. If you detect a DNS leak, that means that your ISP can still see what you do online.
Once again, you can proceed to visit IPLeak.net. Then, after a few moments, find the heading titled 'DNS Addresses.' You should see several IP addresses there, along with the names of their associated countries. None of those DNS addresses should point to the country where you currently reside (unless you're using a VPN server in your country).


Alternatively, you can also use BrowserLeaks.com/dns, which is a well-known tool for testing DNS leaks. As soon as you visit that website, it will check your IP address and your DNS servers, providing the results in a user-friendly way.
Step #5: Check for WebRTC Leaks
WebRTC (Web Real-Time Communication) is a relatively new technology that allows Web browsers to "talk" to each other without an intermediate server. If your VPN connection leaks your WebRTC data, a third-party website can track your online whereabouts.
To check for WebRTC leaks, we recommend going with BrowserLeaks.com/webrtc. That website will do an in-depth check of your Web browser, letting you know if your IP address is visible (as well as other bits or WebRTC-related data).
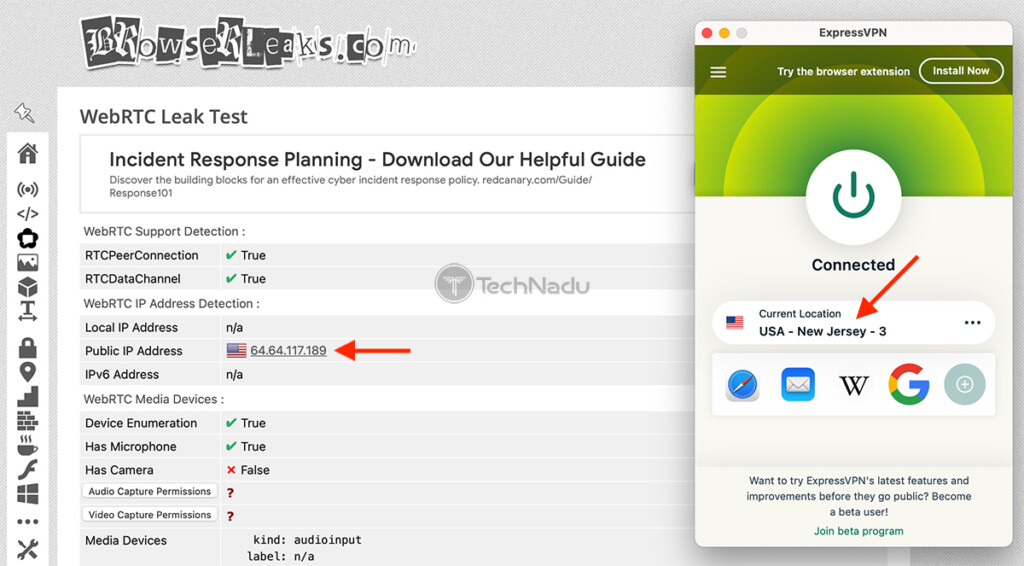

Keep in mind that nothing you see in the results of your test should point to your "real" IP addresses. And in case you see "True" next to "RTC Data Channel" (just like in the screenshot above), you can decide to take steps to disable WebRTC in your browser.
In case you need more information on WebRTC leaks and how to prevent them, make sure to click on the provided link. You'll be taken to our comprehensive guide explaining how to use a VPN to end this type of online tracking.
So, those would be the 5 steps to take and check if your VPN is working. If you have any questions, make sure to post your comment below. And lastly, thanks for reading!
Related