When you purchase through links on our site, we may earn an affiliate commission. Here’s how it works.
How to Set Up and Use NordVPN on Nintendo Switch
Last updated May 15, 2024

You may want to use NordVPN with your Nintendo Switch to stream content, prevent DDoS attacks, and reduce lagging. While there's no option to install NordVPN directly on a Nintendo Switch console, there are 3 workarounds that you can use. The easiest option is to set up NordVPN's SmartDNS on your Switch, which routes your traffic through a remote server and unblocks streaming apps.
To enjoy complete gaming-related VPN benefits (lower ping, lower latency, and bot lobbies), you can set up NordVPN on a router. That'll make NordVPN work with all the devices in your home connected to the router. Also, you can share NordVPN from your PC by turning it into a virtual router.
In this article, we will teach you how to set up NordVPN on your Nintendo Switch with the help of step-by-step instructions for all three methods.
How to Set Up NordVPN on Nintendo Switch
To set up NordVPN on a Nintendo Switch, you need to first think about what you intend to do with it - whether you want to unblock streaming apps or optimize your gameplay experience. Based on that, you can choose from these available options.
Method #1: Set Up NordVPN SmartDNS on Switch
By using SmartDNS, you'll instruct your Switch to re-route your traffic and unblock US-based streaming apps on your console. Here are the steps you need to take:
1. Subscribe to NordVPN from your computer's or phone's Web browser.
2. Connect your Nintendo Switch to your home Wi-Fi network.
3. Access your Nord Account dashboard.
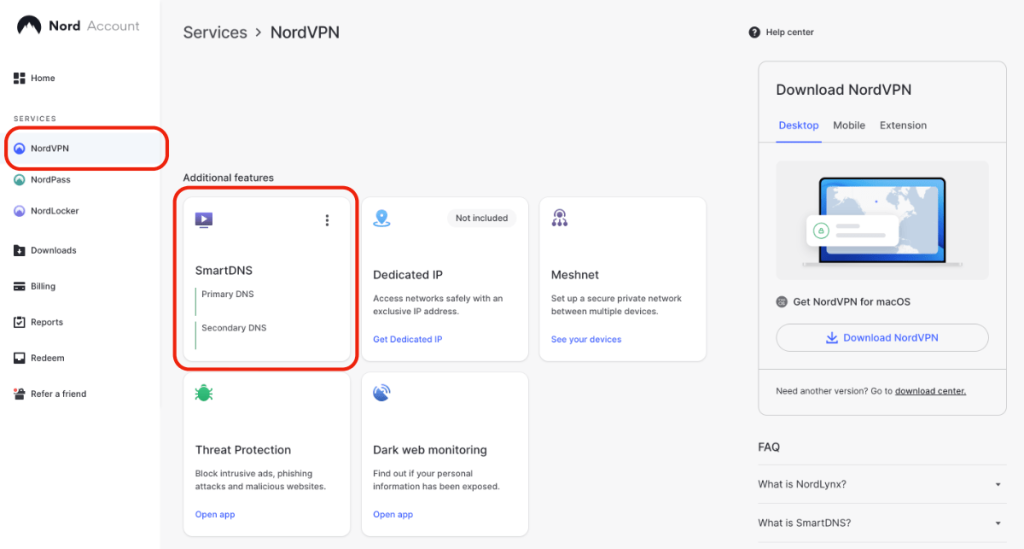
4. From the left sidebar, pick 'NordVPN' and click 'Enable' inside the SmartDNS box.

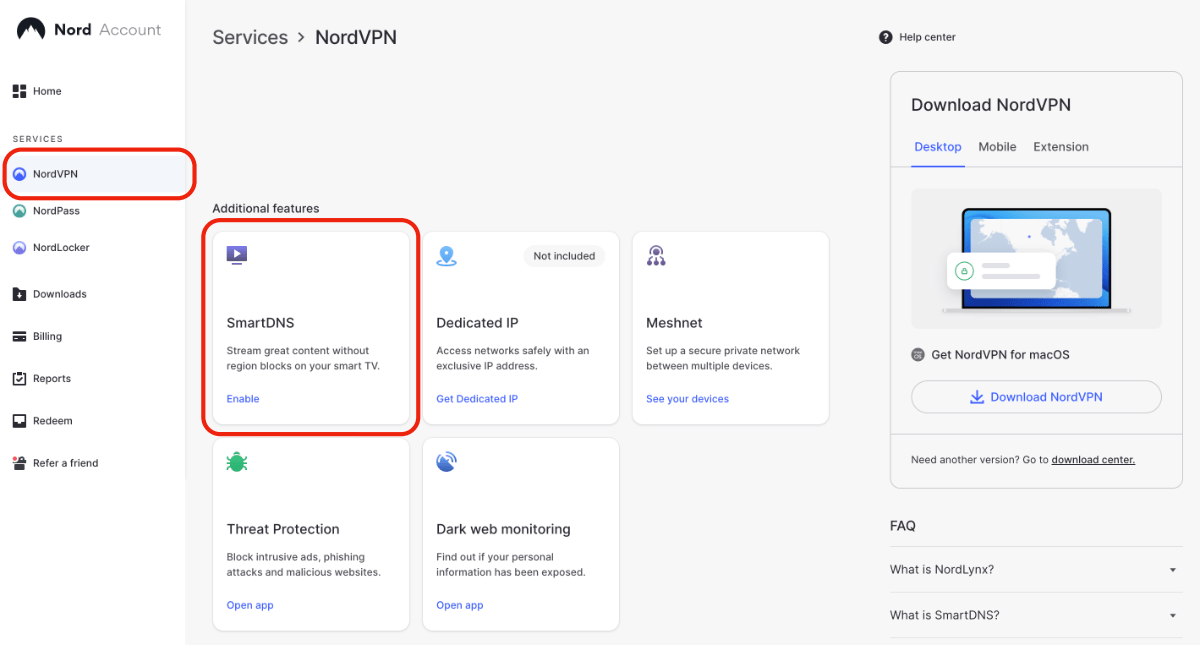
5. Your primary and secondary DNS addresses will get updated in a few minutes.

6. On your Nintendo Switch, go to 'System Settings' > 'Internet' > 'Internet Settings.'
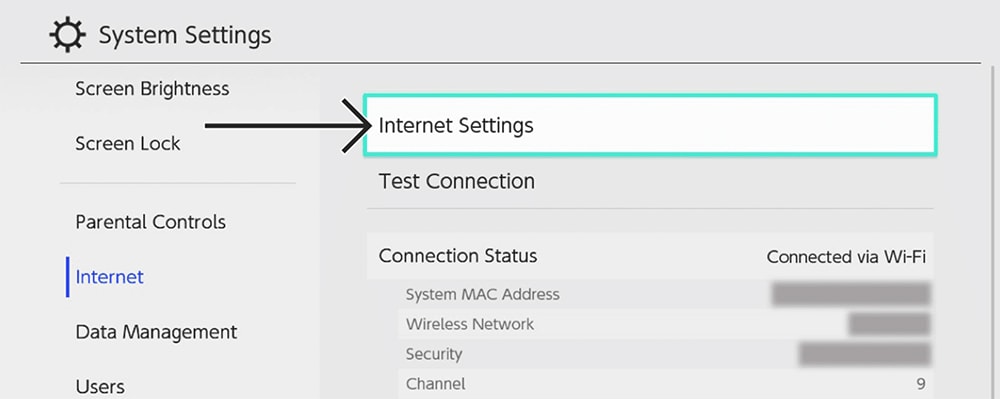
7. Select your currently active Wi-Fi connection and pick 'Change Settings.'

8. Navigate to 'DNS Settings' > 'Manual.'
9. Enter your primary and secondary DNS addresses, and restart your Switch.

10. That's it! NordVPN's SmartDNS is now active on your Nintendo Switch.
Method #2: Configure NordVPN on a Router
When you set up a VPN on your router, you create a unified VPN-protected network. So, if you connect your Switch to that network, you'll gain VPN functionality on your console. These are the steps you need to take:
1. Get your NordVPN subscription from your preferred browser using any Web-connected device.
2. Set up NordVPN on your router by adding the VPN's server config file to the router's settings.
3. On your Switch, open 'Settings' > 'Internet' > 'Internet Settings' > choose the VPN-enabled Wi-Fi.
4. Your Nintendo Switch is now protected by the VPN.
Method #3: Share NordVPN From a Windows PC
You can also set up NordVPN on your Windows PC and turn your computer into a virtual router, creating a VPN network that expands to your Nintendo Switch. Here's how to make that happen:
1. Sign up for NordVPN using your PC and any Web browser.
2. Download and Install NordVPN on Windows.
3. Log in and connect NordVPN to your preferred server.
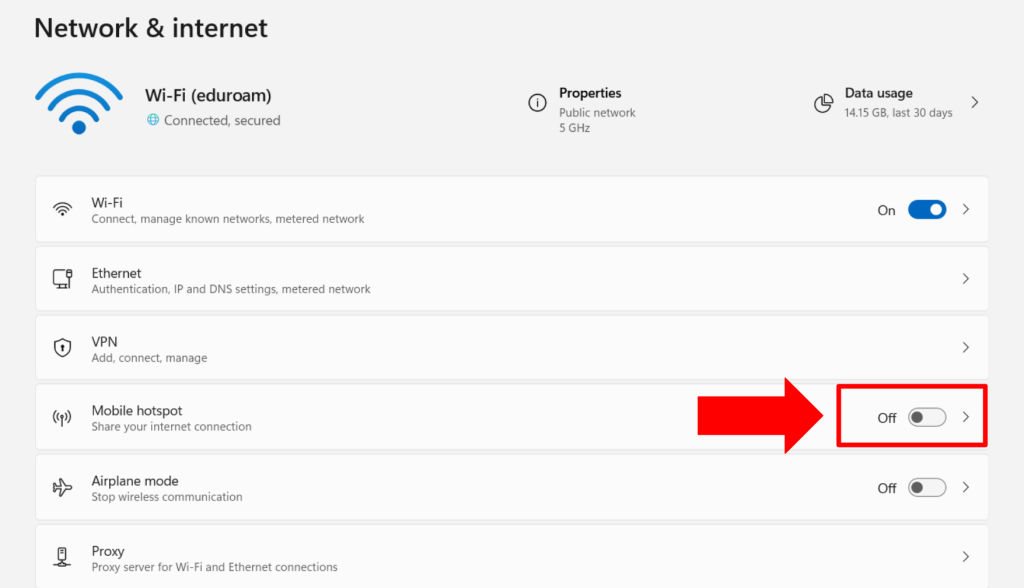
3. Navigate to the Windows Settings > 'Network & Internet' and turn on 'Mobile Hotspot.'

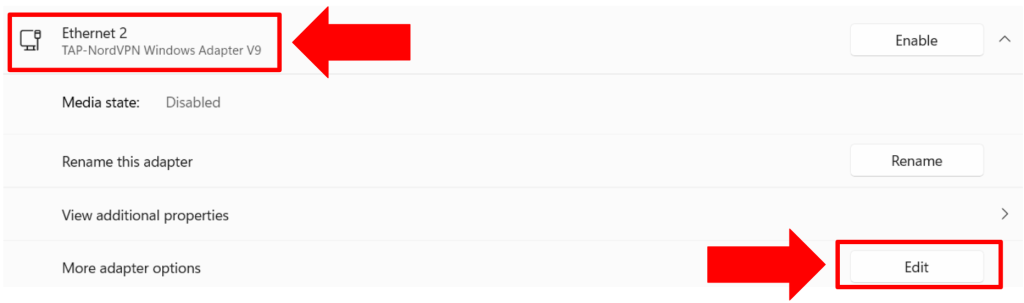
4. Now, click on 'Advanced Network Settings.'
5. Tap on NordVPN's adapter and click on 'Edit.'

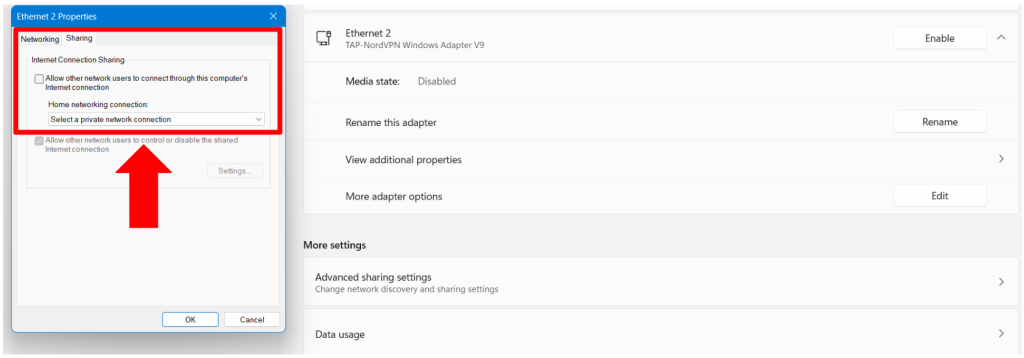
6. Click on 'Sharing.'
7. Check the box that says: 'Allow other network users to connect through this computer's internet connection.'
8. Click on the dropdown menu, select the newly created hotspot, and tap 'OK.'

9. On your Switch, open 'Settings' > 'Internet' > 'Internet Settings.'
10. Pick the newly created VPN hotspot and connect your Switch to the Web.
Final Thoughts
If you want all the VPN-related gaming benefits on your Nintendo Switch, setting up NordVPN on your router is the best option. On the other hand, you can share your VPN connection from a Windows PC if you want to avoid the hassle of configuring a router. That said, know that SmartDNS is mostly usable for streaming - not for gaming.
Once you get NordVPN to work on your Nintendo Switch, why not install it on your other devices as well? That's always a great option, especially because this VPN offers 10 simultaneous connections. So, make sure to check our guide on how to set up NordVPN - covering dozens of devices.
That's all! Now you know how to download, install, and use NordVPN on Nintendo Switch. If you have further queries, drop us a comment through the button below. Thanks for reading!
Related