When you purchase through links on our site, we may earn an affiliate commission. Here’s how it works.
How to Set Up and Use CyberGhost VPN on Xbox
Last updated June 17, 2024

Installing CyberGhost VPN on an Xbox console has many benefits, like lowering your ping and accessing bot lobbies, protecting you from DDoS attacks, and more. It will also let you unblock region-specific releases on Xbox and geo-blocked streaming content.
You can configure CyberGhost VPN on Xbox in three ways: setting up its Smart DNS feature, installing it on a router, and sharing the VPN connection from your Windows PC. Among these methods, the Smart DNS method is perhaps the easiest and quickest one. Also, this guide works for Xbox 360 and all the newer generations.
In this article, we'll teach you how to set up CyberGhost VPN on Xbox using multiple methods.
How to Set Up CyberGhost VPN on Xbox
You can configure CyberGhost VPN by setting up its DNS on your console. Also, you can install the VPN on your router or share the VPN's connection from the PC using a hotspot. That said, let's discuss these methods in detail.
Method #1: Setting up CyberGhost on Xbox With Smart DNS
You can install CyberGhost VPN on Xbox by copying the DNS address from your VPN account's dashboard and updating it in your console's settings. Here's a step-by-step guide for it.
1. Sign up for CyberGhost VPN from your computer using any Web browser.
2. Open your CyberGhost VPN account dashboard.
3. Choose 'Smart DNS' from the left bar and click 'Enable Smart DNS.'

4. Note your Primary and Secondary DNS addresses for your chosen location.
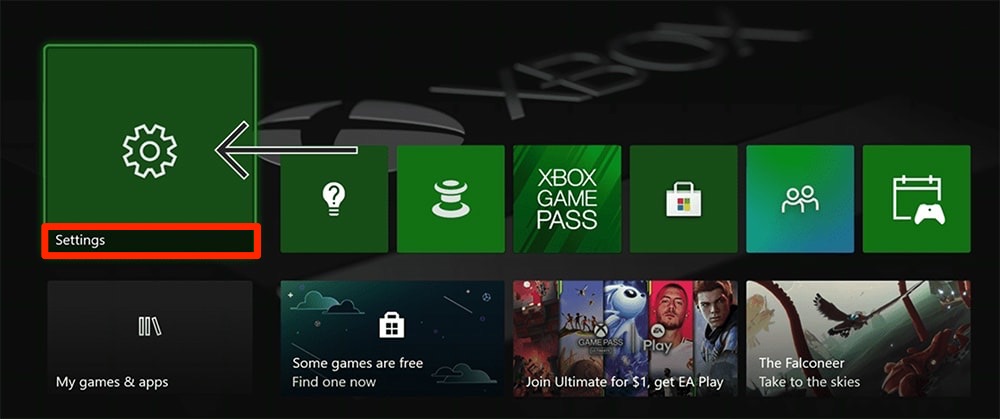
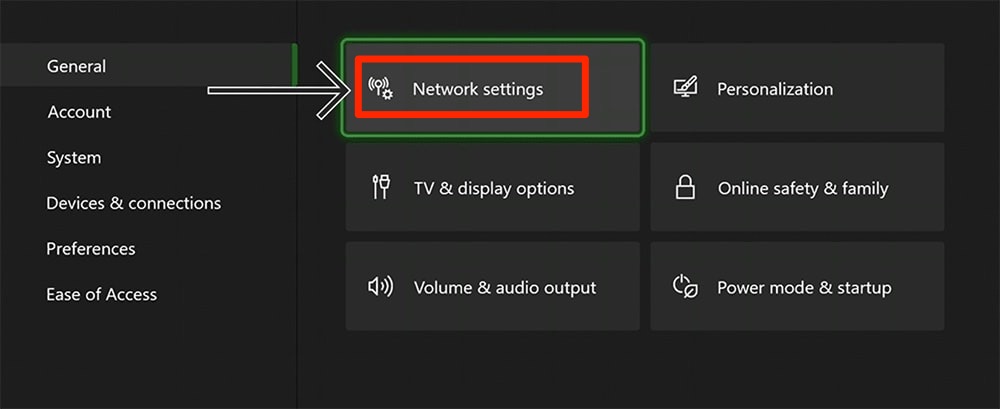
5. Now, turn on your Xbox console and navigate to 'Settings,' then select 'General.'
6. From here, choose 'Network settings.'
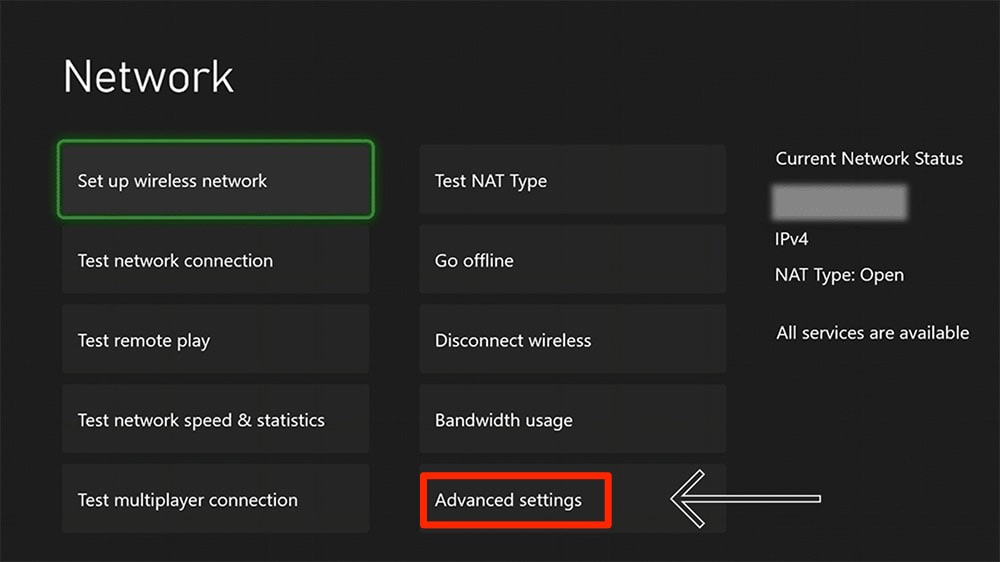
7. Under the Network screen, choose 'Advanced settings.'
8. The DNS Settings screen will appear, and you need to select 'MANUAL' here.
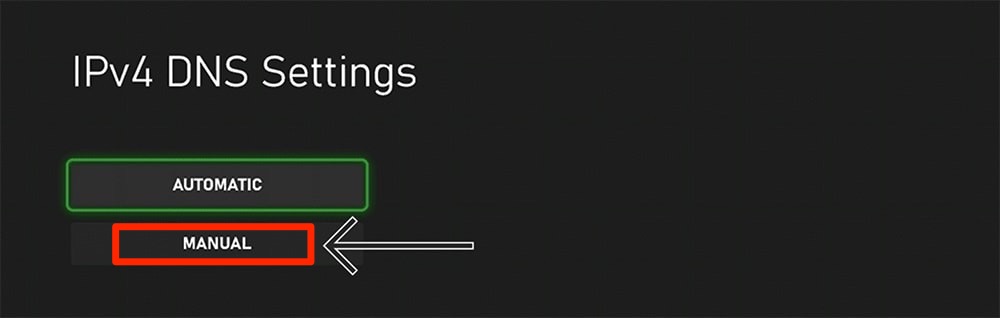
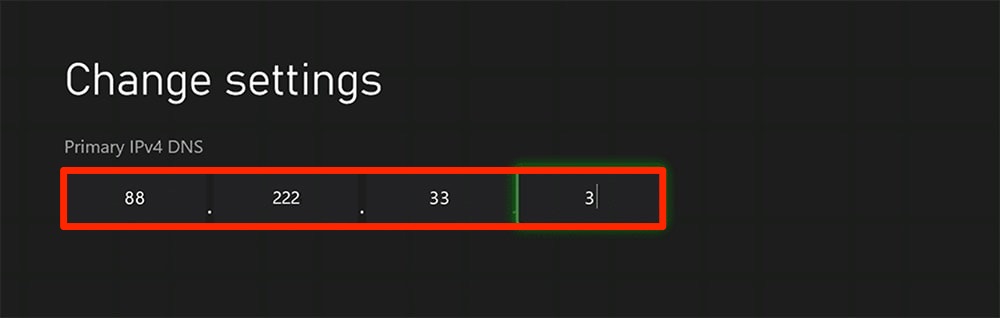
9. In the 'Change settings' screen, enter the Primary DNS address from your online account and leave 'Secondary DNS' blank.
10. Once done, use the hamburger menu and then press the 'B' button to save your changes.
11. Finally, you'll see 'It's all good,' and you can now restart your Xbox.

Method #2: Setting up CyberGhost on Xbox by Installing It on a Router
Setting up CyberGhost VPN on a router is simple. All you need to do is download its OpenVPN config files and upload them to the router's control panel. Here are the steps.
1. Subscribe to CyberGhost VPN using your computer, tablet, or phone.
2. Access your CyberGhost VPN's login page and copy your CyberGhost credentials.
3. Head to your dashboard and choose 'VPN' > 'Configure Device' under Manual Setup.
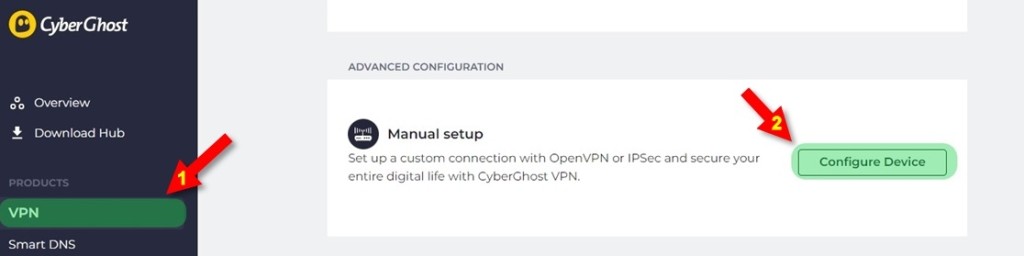

4. Select the 'Configure' button.
5. Now, fill in the below details as mentioned:
- PROTOCOL - OpenVPN 2.3 or OpenVPN TCP 2.3
- COUNTRY - Select your preferred location
- SERVER GROUP - Choose the available server group (UDP/TCP)
- DEVICE NAME - OpenVPN NAS Synology
- EXTRA FEATURES - Tick all the boxes
6. Choose the 'Save Configuration' button.

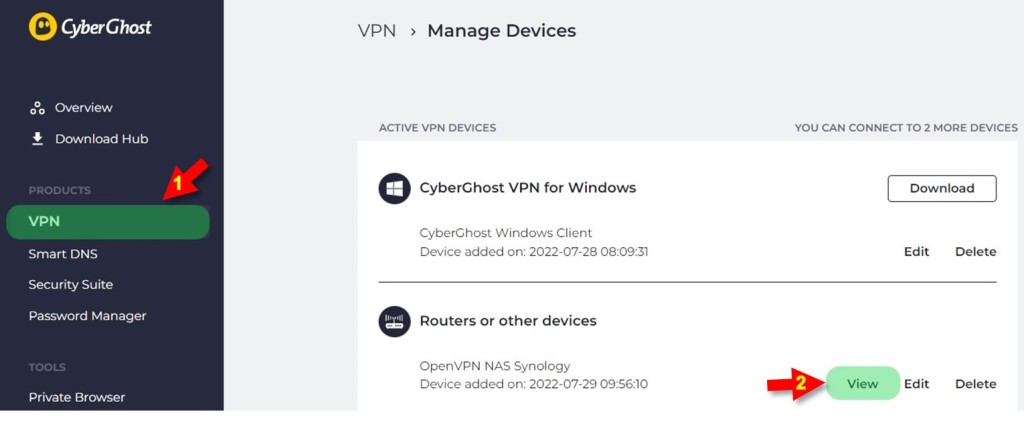
7. You'll be redirected to Manage Devices, where you can click on 'View.'
8. Then, click on the 'Router or other devices' button.

9. Note down your OpenVPN credentials and hit the 'Download Configuration' button.
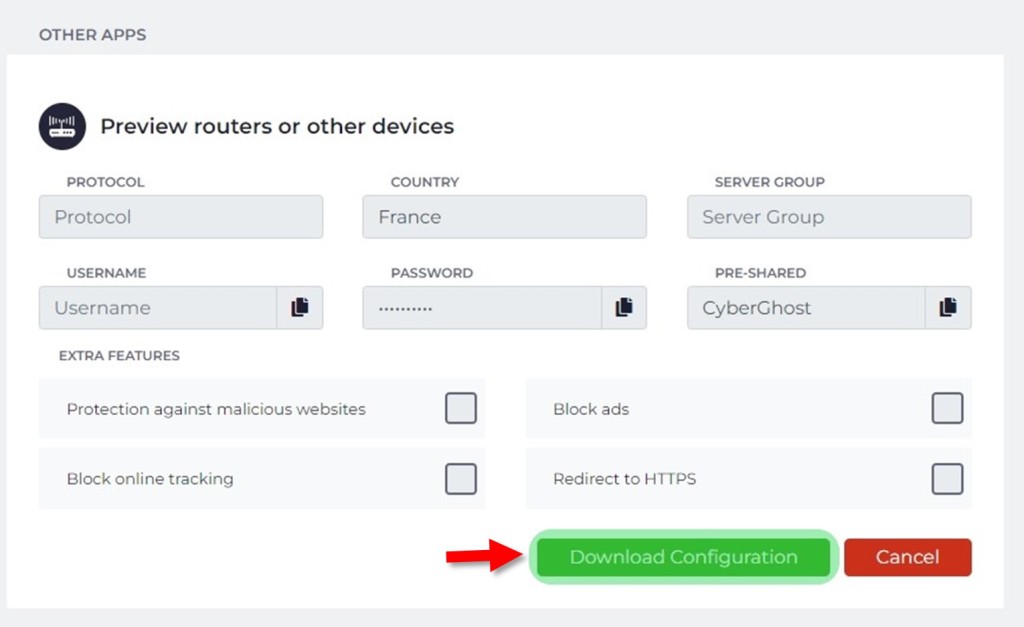
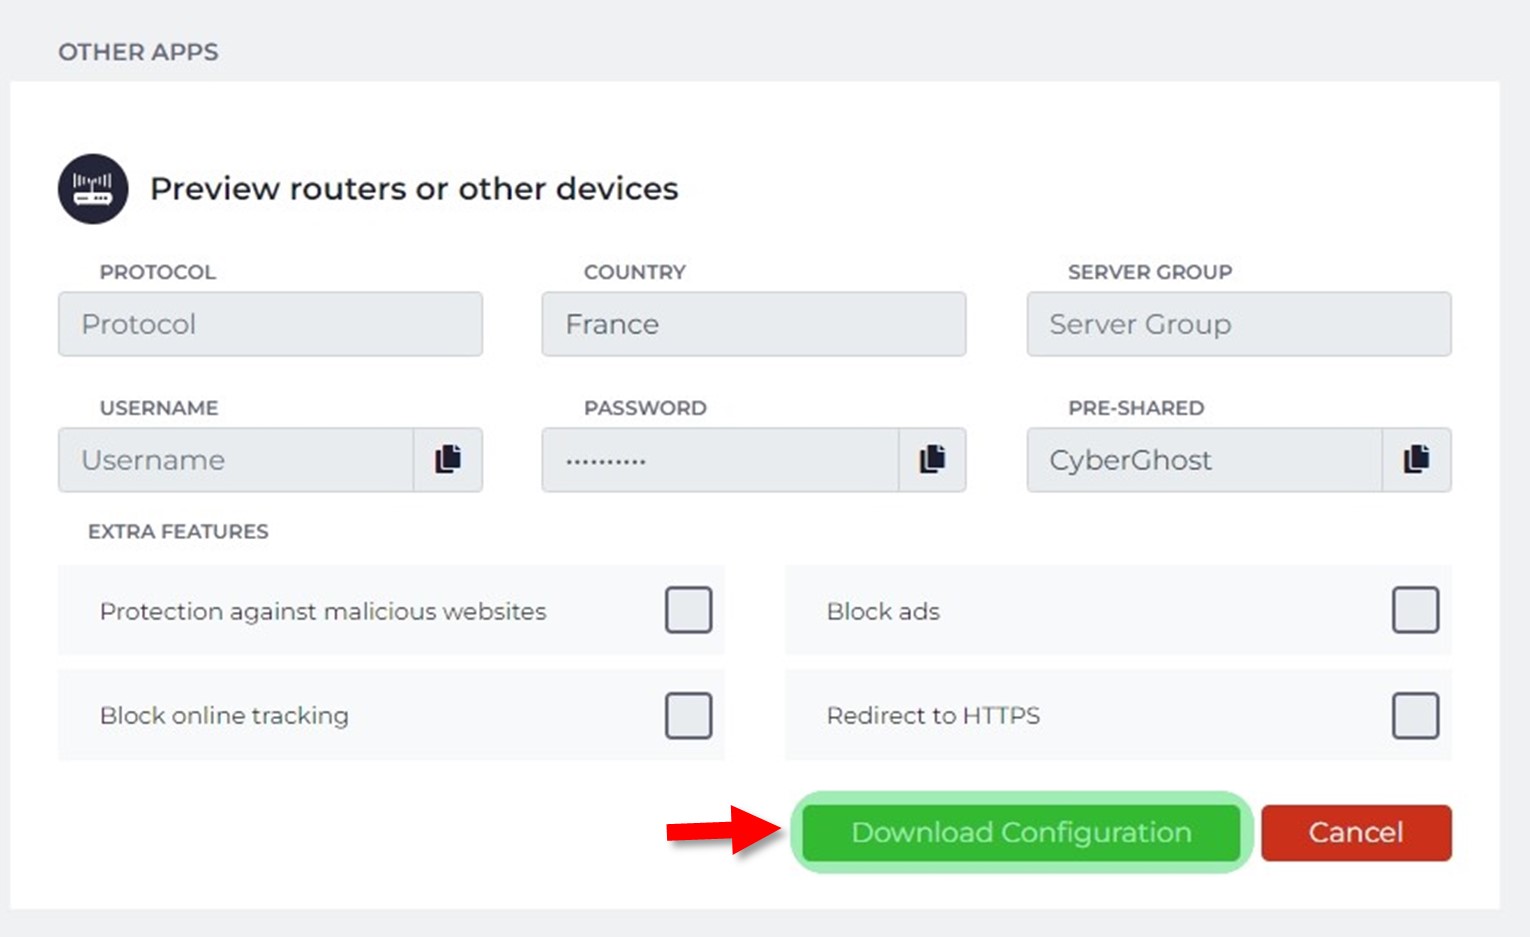
10. A .zip file will now be downloaded to your system.
11. Extract the file to get the documents below:
- ca.crt - Server security certificate
- client.crt - Client safety certificate
- client.key - Key file
- openvpn.ovpn - OpenVPN configuration file
12. Input this information into your router's settings.
13. After CyberGhost is set up, connect your Xbox to the Wi-Fi.
14. That's it! Xbox will use a connection protected by CyberGhost VPN.
For exact instructions based on your router's make and model, refer to our complete guide on how to set up CyberGhost VPN on a router.
Method #3: Sharing a CyberGhost VPN Connection From Windows
This method allows you to turn your PC into a virtual router. After that, you can share your CyberGhost VPN connection with your Xbox console. However, if you're using this method, you'll have to turn on your PC to enable the VPN. Here are the steps that you need to follow
1. Subscribe to CyberGhost VPN from a computer.
2. Download and install CyberGhost VPN on your PC.
3. Sign into the VPN and connect to your preferred server location.
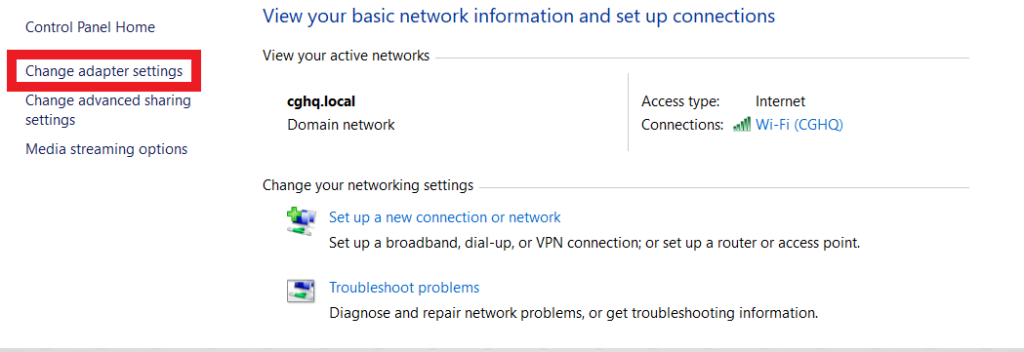
4. Navigate to the Control Panel in Windows > 'Network and Sharing Center.'


5. Click on 'Change adapter settings' and find Ethernet related to the 'TAP-Windows Adapter V9.'

6. Right-click and choose 'Properties.'
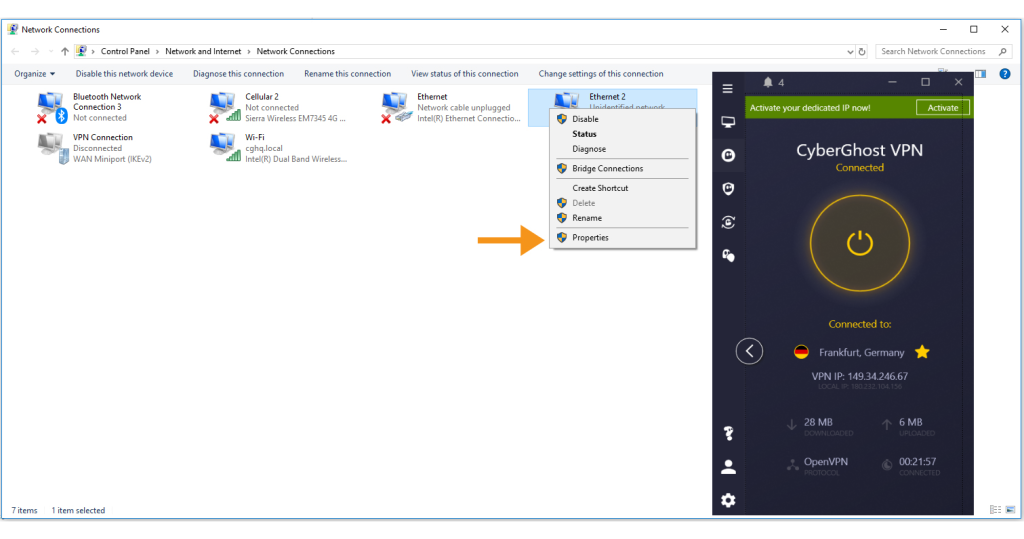

7. In the 'Sharing' tab, check the box, 'Allow other network users to connect through this computer's Internet connection.'
8. Select the 'Home networking connection' dropdown and pick a suitable connection.
9. Now, all you have to do is connect your Xbox to this new VPN-enabled Wi-Fi hotspot.
Final Thoughts
In this article, we've used three different methods to set up CyberGhost on an Xbox. However, installing the VPN on a router is the best method because it fully encrypts your Web traffic and also lets you secure all devices connected to the Web, including other gaming consoles.
You may also want to connect CyberGhost VPN on other devices, such as smartphones, tablets, and computers. To learn more about this, take a look at our complete guide on setting up CyberGhost VPN on a wide range of devices.
That's all! Now you know how to install and use CyberGhost VPN on Xbox. If you have any queries, feel free to comment below. Thanks for reading!
Related