When you purchase through links on our site, we may earn an affiliate commission. Here’s how it works.
How to Set Up and Use CyberGhost VPN on TomatoUSB Router
Last updated July 26, 2024

Tomato is a highly customizable router firmware type, so it's no surprise that it supports VPNs. That said, the main requirement is to pick a provider that supports OpenVPN. Luckily, CyberGhost VPN comes with full support for Tomato, allowing you to choose servers found across 100 countries.
Upon installing CyberGhost, you'll run your VPN connection at the source. More precisely, any device you connect to your router (via Wi-Fi or Ethernet) will receive the same VPN protection. This procedure requires only a bit of knowledge and time.
In this guide, we'll show you how to set up CyberGhost VPN on Tomato routers. We'll cover two main variants: TomatoUSB and TomatoUSB Merlin.
How to Set Up CyberGhost on a Tomato Router
Setting up CyberGhost on a router running Tomato requires you to obtain a subscription, create an OpenVPN connection, and then set up that connection on your router. Here's everything you need to do:
1. Subscribe to CyberGhost VPN using your favorite Web browser.
2. Return to the CyberGhost official site and click the 'My Account' button from the top-right corner.
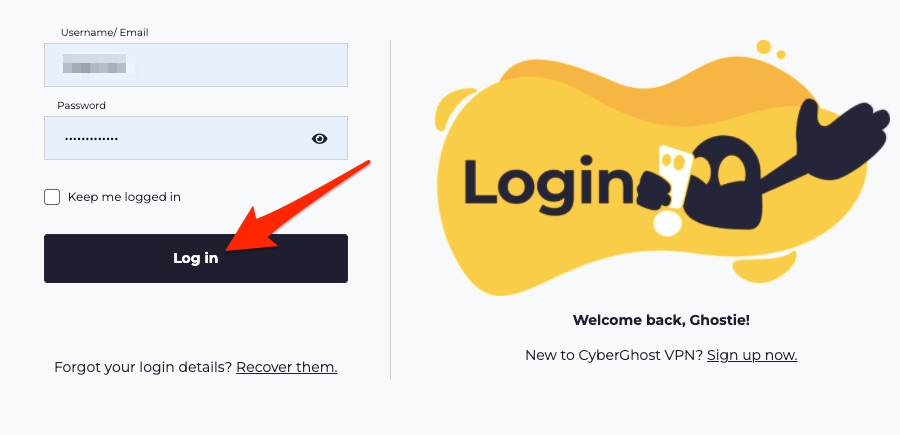
3. Enter your username and password to log in to your online dashboard.
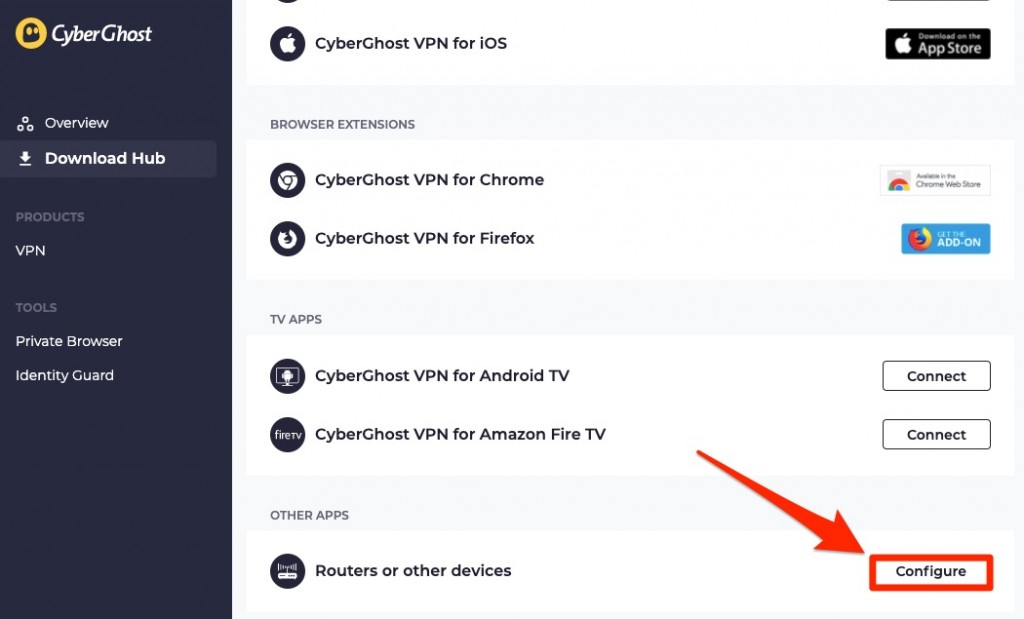
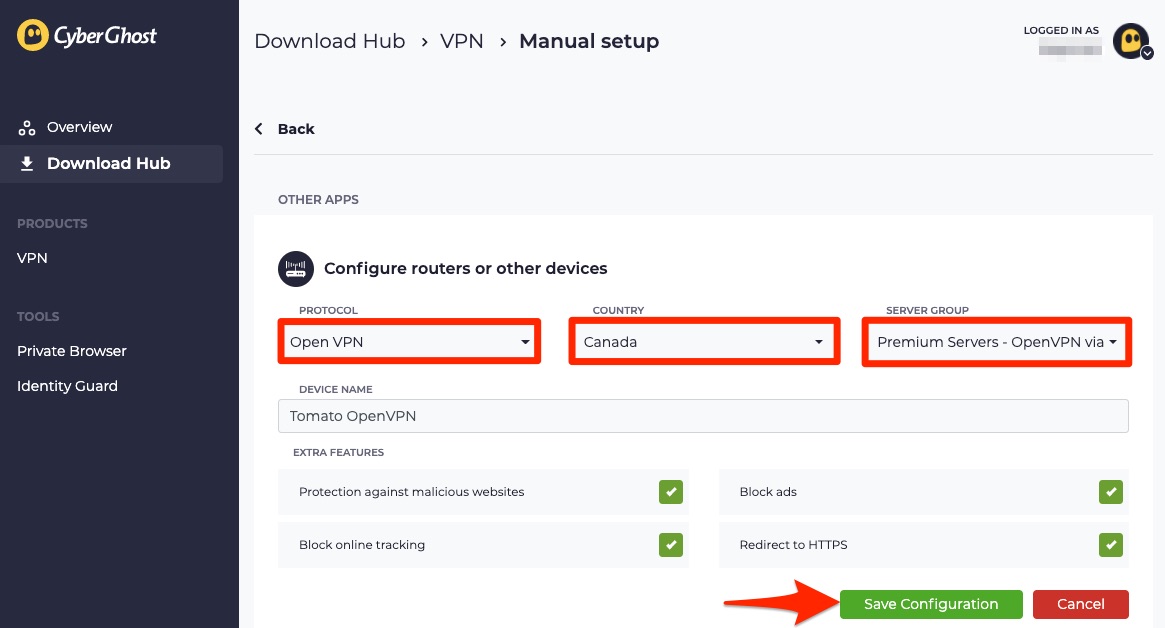
4. Navigate to 'Routers or other devices' and hit the 'Configure' button.
5. Fill in the details as mentioned below. Once done, hit the 'Save Configuration' button.
- PROTOCOL: OpenVPN
- COUNTRY: Select your preferred location from the list of countries.
- SERVER GROUP: Choose the server group (UDP/TCP).
- DEVICE NAME: Tomato OpenVPN
- EXTRA FEATURES: Tick the boxes for enhanced security.

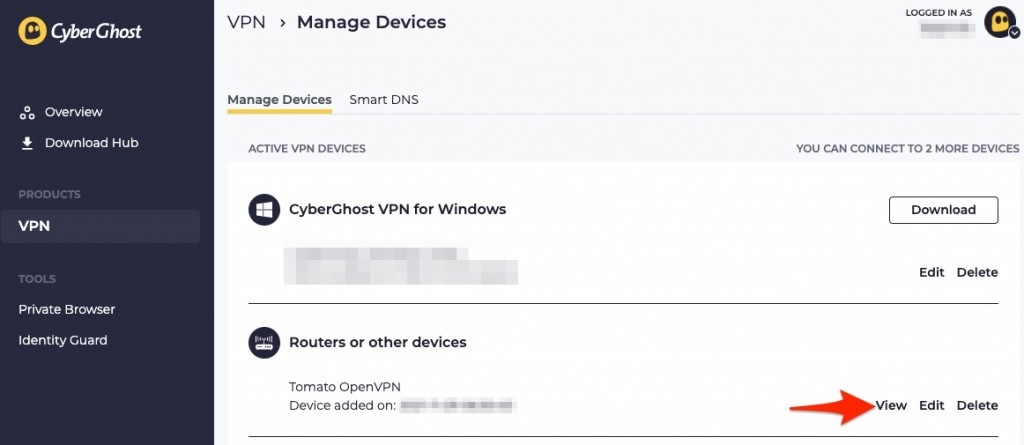
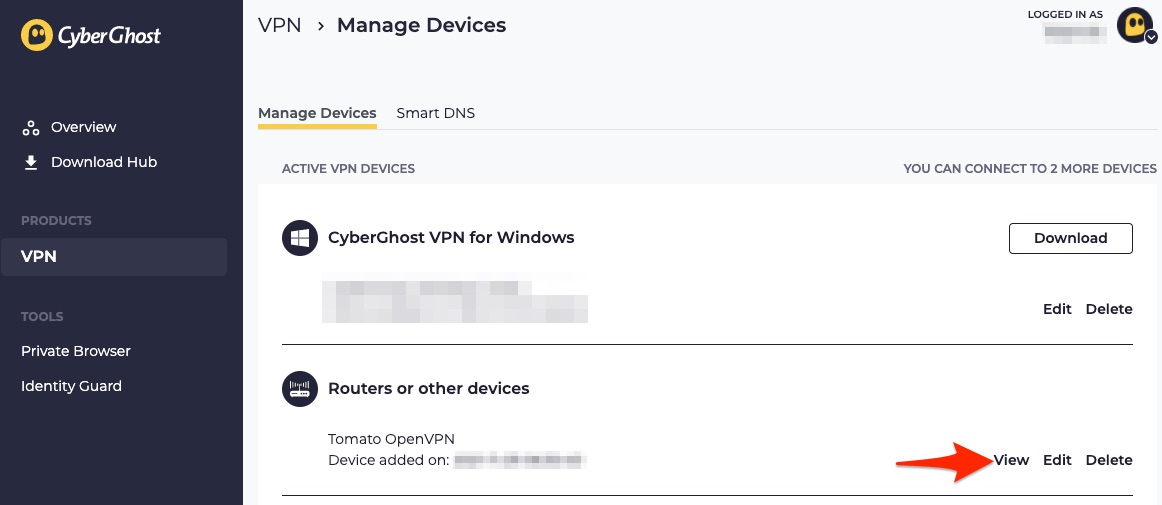
6. You'll be redirected to the 'Manage Devices' page. Find 'Routers or other device' and click 'View.'
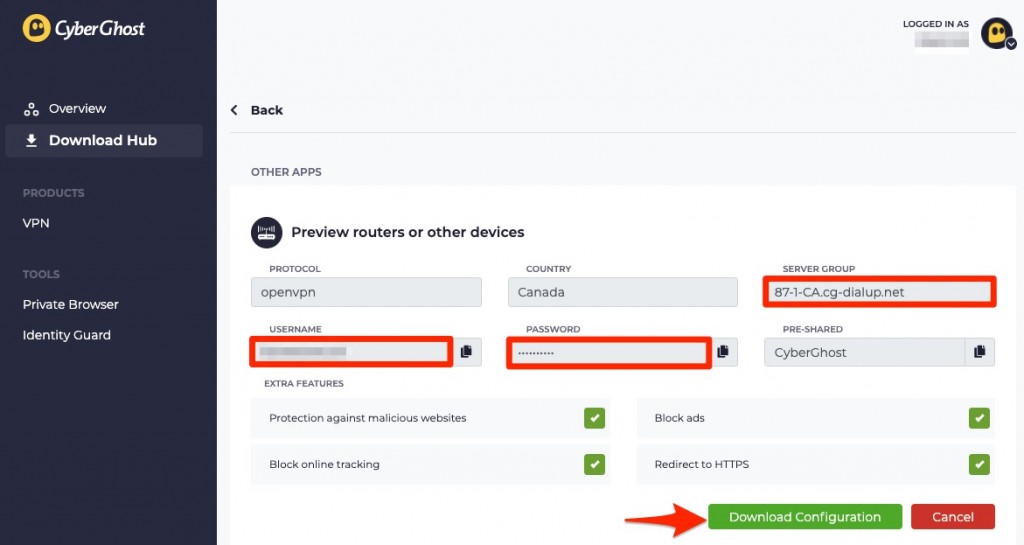
7. The full configuration will now appear. Note your username, password, and server group, then click the 'Download Configuration' button to download the corresponding ZIP file.

8. Once done, extract the .zip file, and you'll get the below entries:
- ca.crt: Certificate from the authority
- client.crt: User certificate
- client.key: Private key
- openvpn.ovpn: OpenVPN configuration
The rest of the steps will be different for TomatoUSB and TomatoUSB Merlin Build. Choose the one depending on the type of router you have.
TomatoUSB
1. Enter 192.168.1.1 or 192.168.0.1 in your browser's address bar to open your router's settings page.
2. Next, log in using your username and password.
3. Choose 'VPN Tunneling' from the left pane and click 'OpenVPN Client' from the drop-down menu.
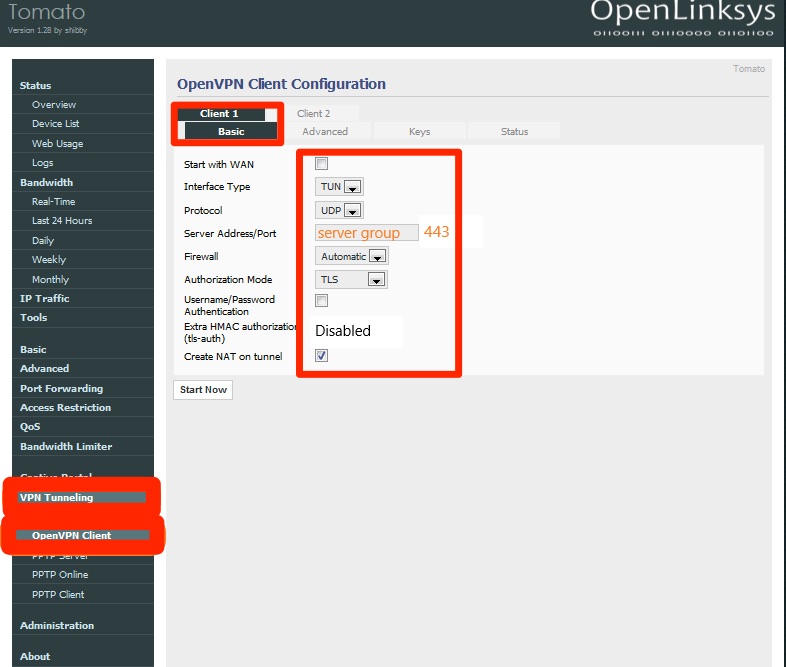
4. Navigate to the 'Client 1' tab from the right side and select the 'Basic' sub-tab.
5. You need to fill the sections with the below details now:
- Start with WAN: Uncheck the box
- Interface Type: Choose TUN
- Protocol: Choose TCP or UDP depending on what you choose while picking the SERVER GROUP.
- Server Address/Port: Enter the server address that was previewed in the configuration under Server Group.
- Firewall: Choose Automatic
- Authorization Mode: TLS
- Username/Password Authentication: Checked
- Username: Enter the username generated in the configuration preview.
- Password: Use the password you received in the configuration preview.
- Username Authentication only: Unchecked
- Extra HMAC authorization: Disabled
- Create NAT on tunnel: Checked
6. Navigate to the 'Advanced' tab and set the below options as mentioned.
- Poll Interval: 0
- Redirect Internet traffic: Checked
- Accept DNS configuration: Strict
- Encryption cipher: AES-256-CBC
- Compression: Disabled
- TLS Renegotiation Time: -1
- Connection retry: -1
- Verify server certificate: Unchecked
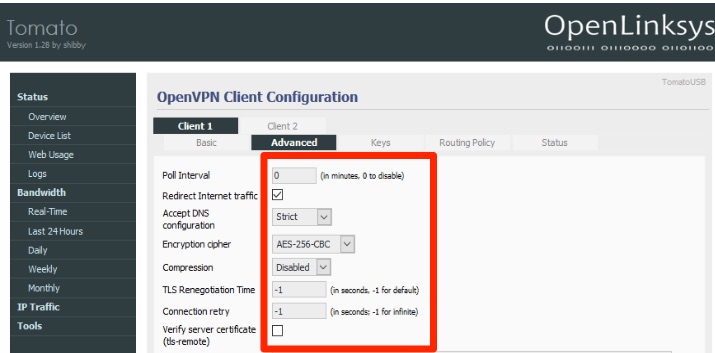
7. Open the openvpn.ovpn file and copy the text from 'resolve-retry infinite' to 'verb 4' and paste it into the 'Custom Configuration' section.
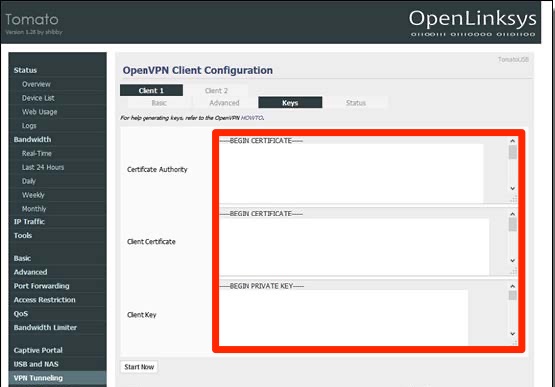
8. Move to the 'Keys' tab and fill in the below details with the help of the rest of the extracted files.
- Certificate Authority: Paste the content of 'ca.crt' file.
- Client Certificate: Paste the content of 'client.crt' file.
- Client Key: Paste the content of 'client.key' file.
9. Once done, click 'Start Now' and move to the 'Status' tab. You should be connected now.
TomatoUSB Merlin Build
1. First, open your Web browser and input one of these IPs: 192.168.1.1 or 192.168.0.1.
2. If asked to log in, input your router's username and password.
3. Find 'Advanced Settings' from the left pane and navigate to 'VPN Server.'
4. Now, find 'OpenVPN Client Settings' from the right side.
5. Under 'Basic Settings,' choose 'Client 1' beside the 'Select client Instance' option.
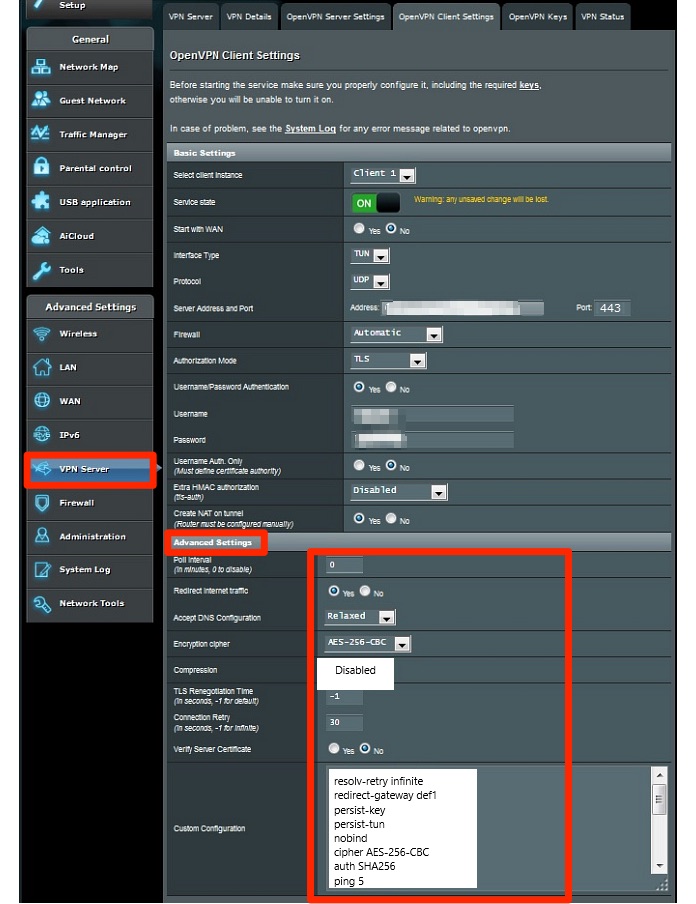
6. Now fill in the details as mentioned:
- Start with WAN: No
- Interface Type: TUN
- Protocol: UDP/ TCP [depending on what you've selected in SERVER GROUP]
- Server Address and Port: Server Group Address from configuration preview
- Firewall: Automatic
- Authorization Mode: TLS
- Username/Password Authentication: Yes
- Username: The username you’ve received in the configuration preview
- Password: The password you’ve received in the configuration preview
- Username Authentication only: No
- Extra HMAC authorization: Disabled
- Create NAT on tunnel: Yes
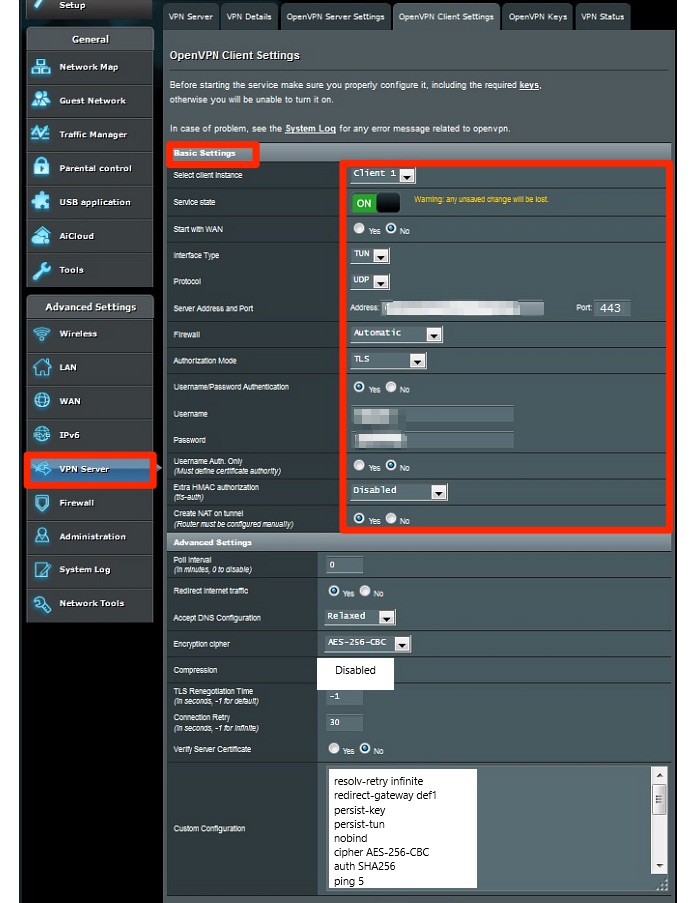
7. Navigate to 'Advanced Settings' and fill in the below details:
- Poll Interval: 0
- Redirect Internet traffic: Yes
- Accept DNS configuration: Relaxed
- Encryption cypher: AES-256-CBC
- Compression: Disabled
- TLS Renegotiation Time: -1
- Connection retry: 30
- Verify server certificate: No
- Custom Configuration: Copy the text from 'resolve-retry infinite' to 'verb 4' from the openvpn.ovpn file and paste it here.
8. Move to the OpenVPN Keys tab next and enter the below details as mentioned:
- Certificate Authority: The content received in 'ca.crt' file.
- Client Certificate: Paste the text from 'client.crt.'
- Client Key: Enter the text from 'client.key.'
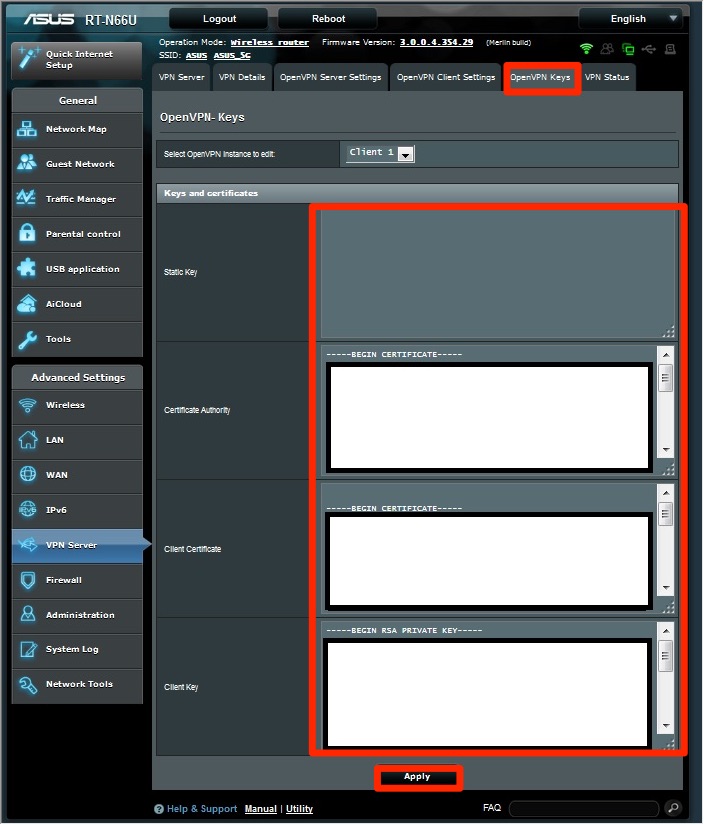
9. Finally, hit the 'Apply' button to save the new configuration.
Final Thoughts
In conclusion, setting up CyberGhost on Tomato is somewhat complex and takes some time. That said, keep in mind that you'll protect the source of your Internet connection. No matter how many devices you connect to your Tomato router, they'll all receive high-end encryption, privacy, and security.
Of course, CyberGhost works on many other devices as well. If you'd like to protect yourself while on the go, visit our central guide on how to set up CyberGhost.
That's all for our guide on how to configure CyberGhost VPN on Tomato. If you have any questions or doubts, let us know via the comments section below. Thanks for reading!
Related