When you purchase through links on our site, we may earn an affiliate commission. Here’s how it works.
How to Configure & Use NordVPN on MikroTik
MikroTik routers can run VPN connections through the IKEv2 EAP protocol. However, having RouterOS version 6.45 or later is mandatory, as NordVPN won't work on older versions. That said, updating your router to MikroTik versions 7+ is highly recommended for optimal performance.
All you need to do is create an IKEv2 EAP VPN tunnel on your router to your preferred NordVPN server. This is done by accessing the RouterOS terminal manually and changing the settings. It's a one-time process that fully enables the VPN on your home network and lets you protect all the connected devices (as many devices as your router can support).
This article will teach you how to configure and use NordVPN on MikroTik with step-by-step instructions.
How to Configure NordVPN on MikroTik
The procedure explained below will first instruct you to manually install NordVPN's root CA certificate. After that, you need to update your service credentials, preferred server's hostname, and other settings. You'll need to input a series of commands, so make sure to copy them correctly to avoid errors and technical issues with your router. Here's a step-by-step guide.
1. Subscribe to NordVPN using your computer and any Web browser.
2. Open the NordVPN account dashboard and click 'NordVPN.'
3. Choose 'Set up NordVPN manually.'
4. Enter the verification code from your email inbox.
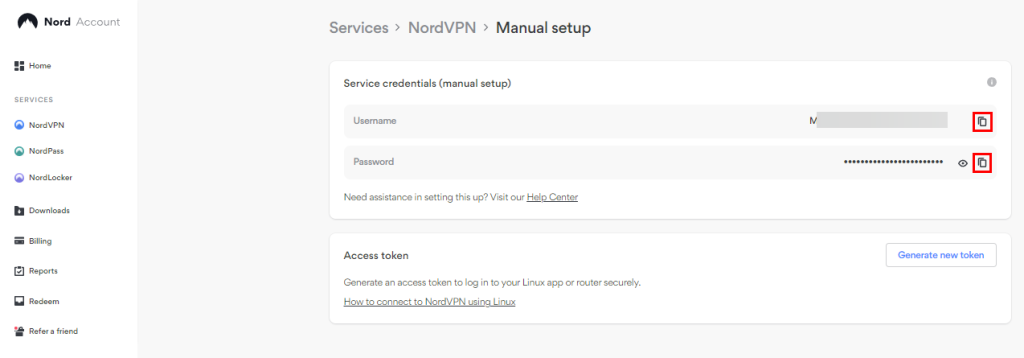
5. Copy your username and password under the 'Service credentials (manual setup)' section.

6. Open the terminal in the settings of your RouterOS.
7. Now, install the root CA certificate of NordVPN by entering the below commands:
/tool fetch url="https://downloads.nordcdn.com/certificates/root.der"
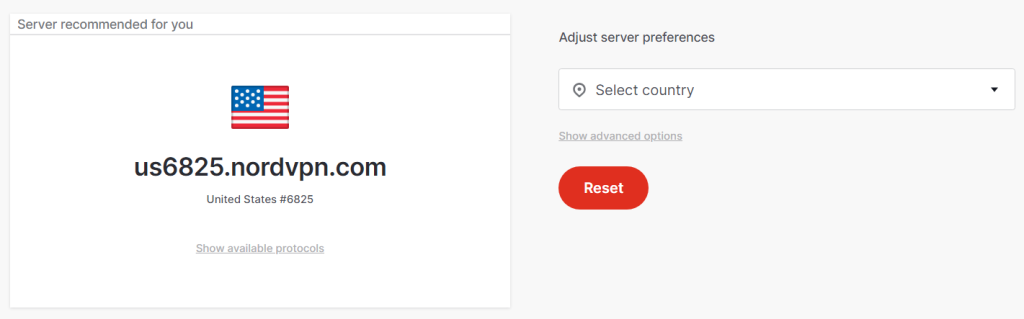
/certificate import file-name=root.der8. Go to the NordVPN Server Tool and note the hostname for the VPN server you want to use.

9. Set up the IPsec tunnel by creating a Phase 1 profile and a separate Phase 2 proposal configuration:
/ip ipsec profile
add name=NordVPN
/ip ipsec proposal
add name=NordVPN pfs-group=none
10. You have to create a new policy group and template now.
/ip ipsec policy group add name=NordVPN
/ip ipsec policy add dst-address=0.0.0.0/0 group=NordVPN proposal=NordVPN src-address=0.0.0.0/0 template=yes
11. Create a new mode configuration entry with responder=no with the following commands:
/ip ipsec mode-config
add name=NordVPN responder=no
12. Set peer and identity configurations next and add your NordVPN credentials copied earlier.
/ip ipsec peer
add address=nl125.nordvpn.com exchange-mode=ike2 name=NordVPN profile=NordVPN
/ip ipsec identity
add auth-method=eap certificate="" eap-methods=eap-mschapv2 generate-policy=port-strict mode-config=NordVPN peer=NordVPN policy-template-group=NordVPN username=YourNordVPNServiceUsername password=YourNordVPNServicePassword
13. To choose what to send over the VPN tunnels, enter the command below to create a new list:
/ip firewall address-list
add address=YourLocalNetworkIP list=local
14. Next, assign this list to mode-config using the below commands:
/ip ipsec mode-config
set [ find name=NordVPN ] src-address-list=local
15. When done, verify the correct source NAT rule is generated by using the following command:
/ip firewall nat printFinal Thoughts
The process of configuring NordVPN on MikroTik may appear complex and difficult at first. However, it's quite straightforward. And you don't need to repeat the process every time you want to connect. Once it's set up, you can continue to enjoy the benefits of NordVPN on all your devices.
Fortunately, NordVPN supports up to 10 simultaneous connections through its apps and Web browser extensions. Setting up NordVPN on a router helps you avoid that limit and connect even more devices. For the times when you're away from your router, remember to download and install NordVPN on all your other devices.
That's all we have prepared for this installation guide. If you have any questions, connect with us using the button below. Thanks for reading!
Related