When you purchase through links on our site, we may earn an affiliate commission. Here’s how it works.
How to Configure and Use NordVPN on OpenWRT
OpenWRT firmware-based routers use the Telnet protocol to connect to the Internet. If you’re using such a router, you’ve got to set it up to accept SSH connections to be able to configure NordVPN. Moreover, the OpenWRT firmware image doesn’t include the OpenVPN package by default.
This means you must manually set up the OpenVPN package before running the OpenVPN client for NordVPN on your OpenWRT router. While it may initially seem complicated, the overall process is quite straightforward. All you must do is follow the instructions found below.
In this article, we provide a step-by-step guide to help you configure and use NordVPN on OpenWRT from scratch. We also made sure to include helpful screenshots throughout.
How to Set up NordVPN on OpenWRT
There are multiple ways to set up NordVPN on routers, but you're limited to two options when it comes to OpenWRT. You can set up this VPN on OpenWRT via a GUI (graphical user interface) or CLI (command-line interface). The GUI method is much simpler, while the CLI method is suitable for advanced users. Let's discuss both these methods in detail.
Method #1: Set up NordVPN on OpenWRT via GUI
In this method, you have to update your OpenVPN router's settings using its LuCI Web interface. Here's a step-by-step guide for it.
1. Get a NordVPN subscription using your PC and a Web browser.
2. Access your router's LuCI interface by entering its local IP in your browser's search bar (default is 192.168.1.1).
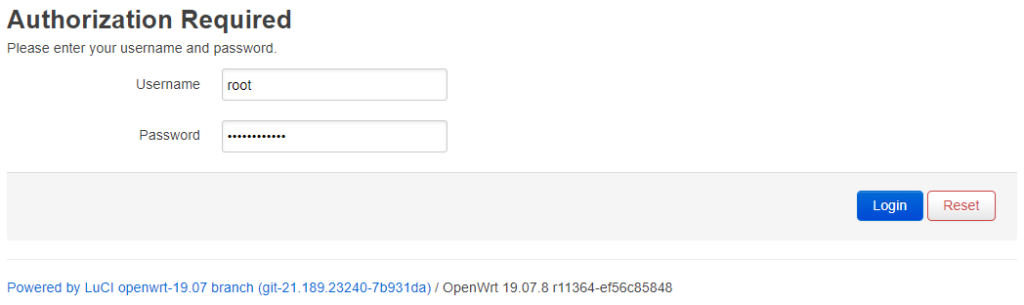

3. Enter your administrative credentials to access the router's control panel.
4. Click on 'System' > 'Software.'

5. Click the 'Update lists' button and then 'Dismiss' when the process ends.
6. In the 'Filter' field, enter the following one-by-one and click 'Install.'
openvpn-openssl
ip-full
luci-app-openvpn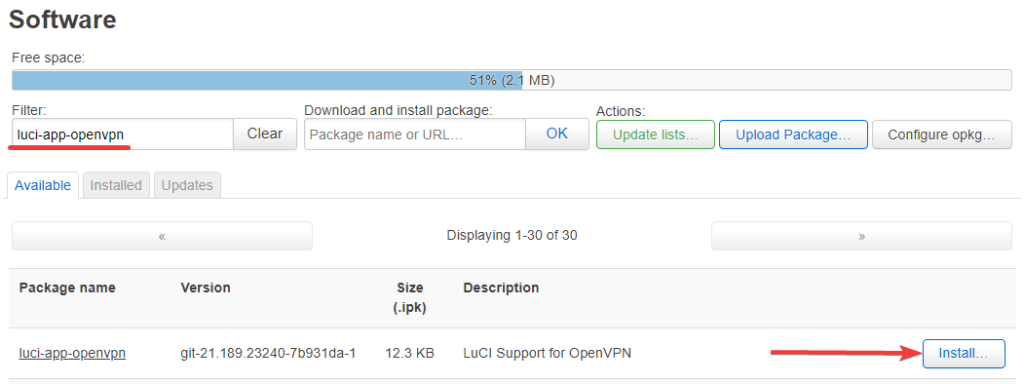

7. Choose 'Save & Apply' and refresh the page.
8. Click on the 'VPN' tab and select 'OpenVPN.'
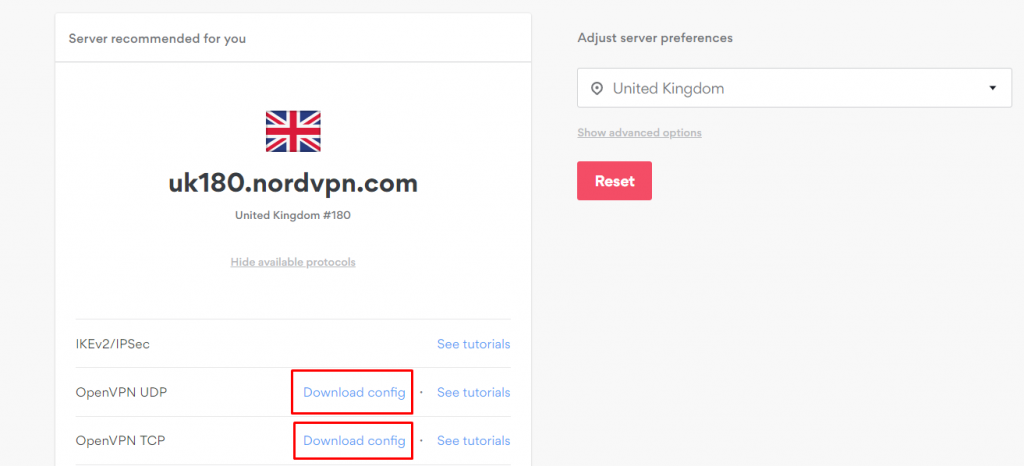
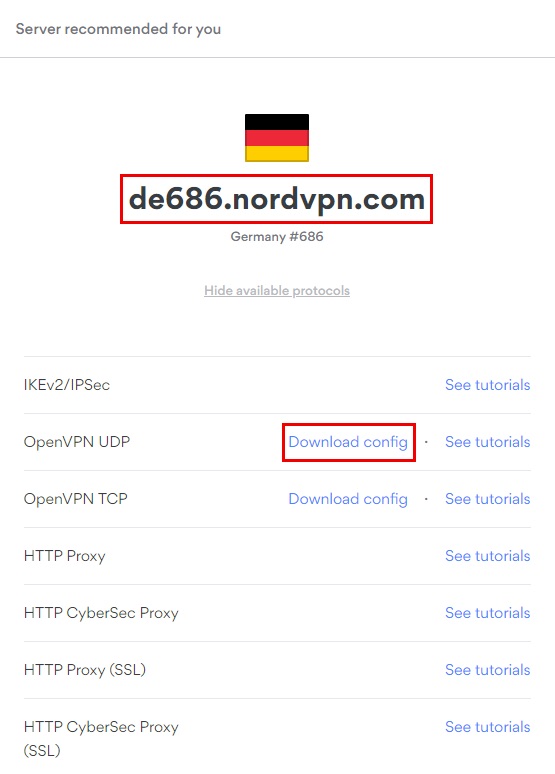
9. Open the NordVPN server tool, pick a server, and click 'Download config' next to OpenVPN.

10. Go back to your router's page and upload the .ovpn config file by clicking 'Choose File' > 'Upload.'


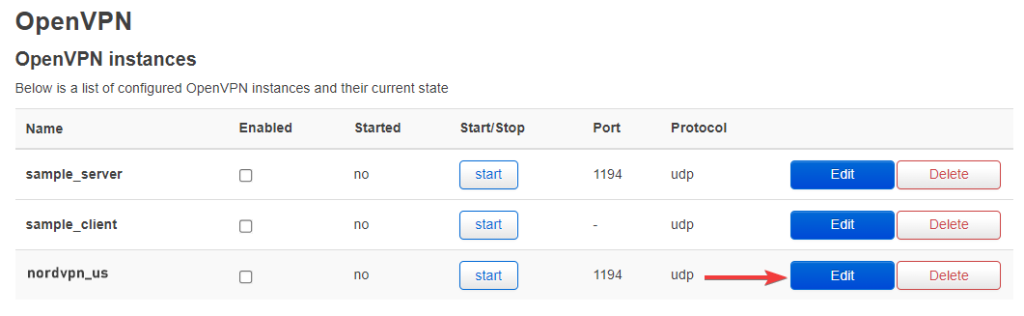
11. Go to the 'OpenVPN instances' section and click on 'Edit' next to the new instance.

12. Open your NordVPN account dashboard and click 'NordVPN.'
13. Click 'Set up NordVPN manually.'
14. Verify yourself by entering the security code from your registered email.
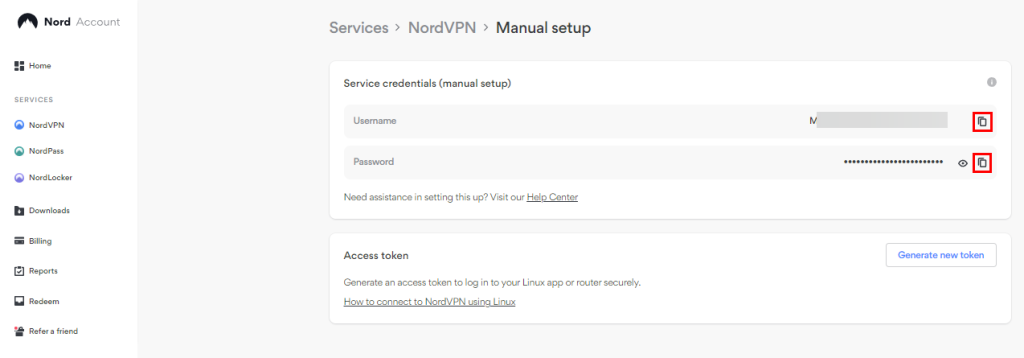
15. Copy your username and password.

16. Go back to your router's page and paste the credentials in the lower field.

17. Copy the path to the credentials file from above the field containing your credentials.

18. Paste it next to 'auth-user-pass' in the 'Config file' section.
19. Scroll down and click on 'Save.'
20. From the top of the page, click 'Network' > 'Interfaces.
21. Choose 'Add new interface' and enter 'nordvpntun.'
22. Click on 'Protocol' > 'Unmanaged.'
23. Choose 'Interface' > 'custom field,' and enter 'tun0.'

24. Click on 'Create interface' > 'Save.'
25. Now open the 'Network' tab again and choose 'Firewall.'
26. Click on 'Add' and input the following information:
- Name: 'vpnfirewall'
- Input option: Reject
- Output: Accept
- Forward: Reject
- Masquerading: Check box
- MSS clamping: Check box
- Covered Networks: 'nordvpntun'
- Allow forward from source zones: 'lan'
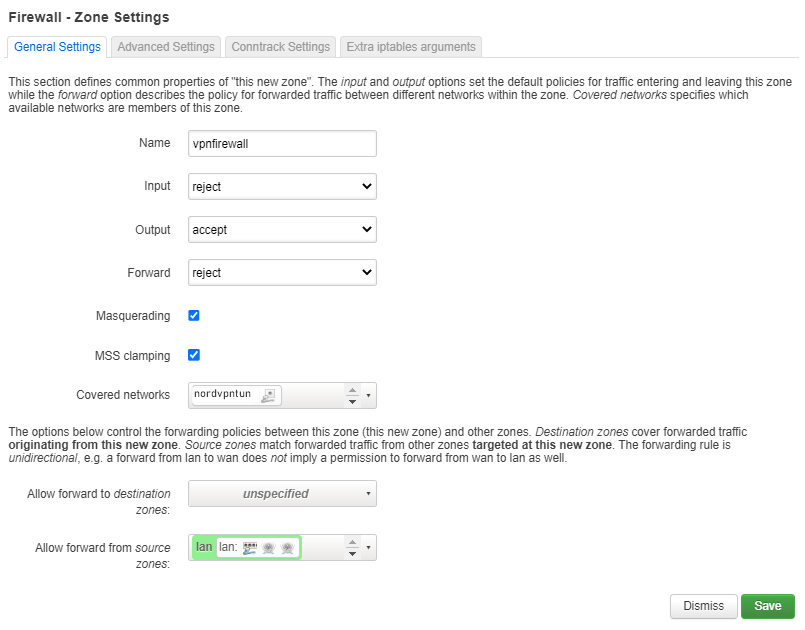
27. Once you're done, click the 'Save' button.
28. In the 'Zones' section, click 'Edit' next to 'lan.'

29. Check the 'nordvpntun' entry in the 'Allow forward to destination zones' dropdown.

30. Scroll down and click 'Network' > 'DHCP and DNS.'
31. Click on the 'General Settings' tab, and in the fields next to 'DNS Forwardings,' enter:
- 103.86.96.100
- 103.86.99.100

32. Open the 'Resolve and Hosts Files' tab, check 'Ignore resolve file,' and click on 'Save & Apply.'

33. Go to the 'VPN' > 'OpenVPN' tab again.
34. In the 'OpenVPN instances' section, check 'Enable' next to NordVPN's instance.
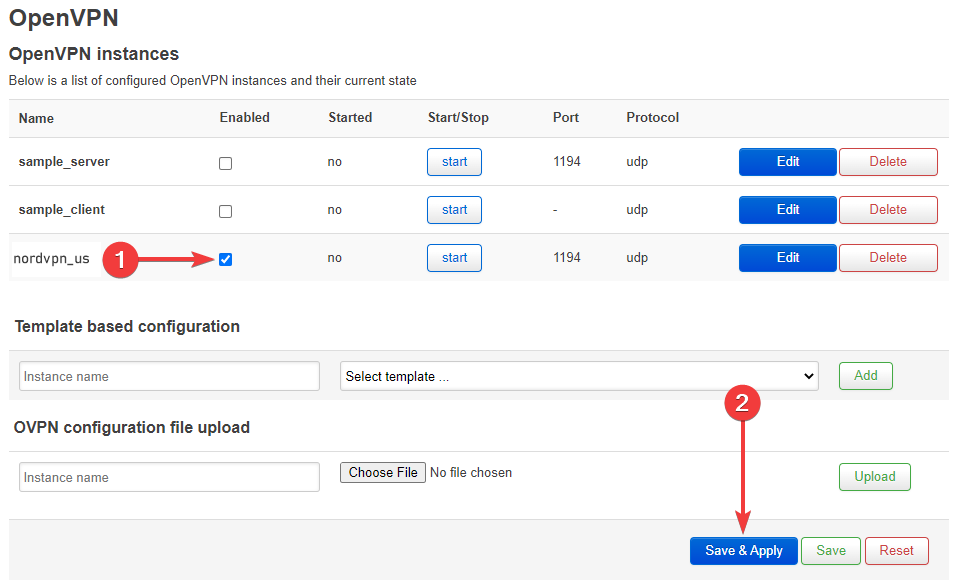
35. Click on 'Save & Apply.'
36. Click the 'Start' button next to NordVPN's instance to connect to the VPN.
Method #2: Set up NordVPN on OpenWRT via CLI
To set up NordVPN on OpenWRT via CLI, you need to install the OpenVPN package on your router and then upload your preferred VPN server's .ovpn config files. Along with that, you also need to adjust several other settings in the router's interface using the command line. Here's a step-by-step process.
1. Subscribe to NordVPN from your PC using a Web browser.
2. Visit the '192.168.1.1' IP in your browser's window to open your router's management page.
3. Now, run the below commands in a terminal window to install the OpenVPN package.
opkg update
opkg install openvpn-openssl
opkg install ip-full
4. Once the installation is complete, set OpenVPN to launch automatically whenever your router starts by using the following command.
/etc/init.d/openvpn enable5. Go to NordVPN's server tool and pick a server of your choice.
6. Right-click on 'Download config' next to OpenVPN (UDP or TCP) to download the .ovpn file of that server.
7. Copy the .ovpn file using WinSCP or PSCP on Windows and scp command on Linux.
8. Paste it to the '/etc/openvpn' folder on your router's filesystem.
9. Add the word 'secret' to the auth-user-pass string (it should look like 'auth-user-pass secret').
10. Create a file 'secret' in '/etc/openvpn' with two separate line entries: 'username' and 'password.'
11. Access your NordVPN account dashboard and then choose 'NordVPN.'
12. Click on 'Set up NordVPN manually.'
13. Enter the security code from your NordVPN-associated email for verification.
14. Copy your username and password from the box titled 'Service credentials (manual setup).'
15. Configure OpenVPN by changing the .ovpn extension to .conf.
16. Also, you can put the file name specifically in '/etc/config/openvpn' and use the uci command:
uci set openvpn.nordvpn=openvpn
uci set openvpn.nordvpn.enabled='1'
uci set openvpn.nordvpn.config='/etc/openvpn/al1.nordvpn.com.tcp.ovpn'
uci commit openvpn
17. The file '/etc/config/openvpn' will contain the following strings.
- config openvpn 'nordvpn'
- option enabled '1'
- option config '/etc/openvpn/al1.nordvpn.com.tcp.ovpn'
18. Create a network interface using the following commands:
uci set network.nordvpntun=interface
uci set network.nordvpntun.proto='none'
uci set network.nordvpntun.ifname='tun0'
uci commit network
19. Create a new firewall zone next and add the below forwarding rule from LAN to VPN.
uci add firewall zone
uci set firewall.@zone[-1].name='vpnfirewall'
uci set firewall.@zone[-1].input='REJECT'
uci set firewall.@zone[-1].output='ACCEPT'
uci set firewall.@zone[-1].forward='REJECT'
uci set firewall.@zone[-1].masq='1'
uci set firewall.@zone[-1].mtu_fix='1'
uci add_list firewall.@zone[-1].network='nordvpntun'
uci add firewall forwarding
uci set firewall.@forwarding[-1].src='lan'
uci set firewall.@forwarding[-1].dest='vpnfirewall'
uci commit firewall
20. The file 'etc/config/firewall' will now contain the below strings:
config zone
- option name 'vpnfirewall'
- option input 'REJECT'
- option output 'ACCEPT'
- option forward 'REJECT'
- option masq '1'
- option mtu_fix '1'
- list network 'nordvpntun'
config forwarding
- option src 'lan'
- option dest 'vpnfirewall'
21. Configure DNS servers using NordVPN DNS for the WAN interface of the router with the command.
uci set network.wan.peerdns='0'
uci del network.wan.dns
uci add_list network.wan.dns='103.86.96.100'
uci add_list network.wan.dns='103.86.99.100'
uci commit
22. Now, the file '/etc/config/network' will contain wan with the below-mentioned strings.
- config interface 'wan'
- option ifname 'eth0.2'
- option force_link '1'
- option proto 'dhcp'
- option peerdns '0'
- list dns '103.86.96.100'
- list dns '103.86.99.100'
23. You can also add Google's DNS with the following command:
uci set network.wan.peerdns='0'
uci del network.wan.dns
uci add_list network.wan.dns='8.8.8.8'
uci add_list network.wan.dns='8.8.4.4'
uci commit
24. Create the file 99-prevent-leak within the folder '/etc/hotplug.d/iface/' with the following script:
#!/bin/sh
if [ "$ACTION" = ifup ] && (ip a s tun0 up) && (iptables -C forwarding_rule -j REJECT); then
iptables -D forwarding_rule -j REJECT
fi
if [ "$ACTION" = ifdown ] && (! ip a s tun0 up) && (! iptables -C forwarding_rule -j REJECT); then
iptables -I forwarding_rule -j REJECT
fi
25. Once done, your VPN connection will be established, and your status show as 'Protected.'
Final Thoughts
That's all! Now you know how to configure and use NordVPN on OpenWRT. While both methods are straightforward, the method involving a GUI is simpler and more intuitive for most users. Once you've completed this process, you should be able to connect and protect unlimited devices.
In other words, any device connected to your OpenWRT router will route its traffic through your newly set-up VPN connection. That way, you get NordVPN's high-end encryption, the ability to bypass geo-blocks, an dmore.
To protect other devices that aren't connected to your router, you can look at alternative ways to set up and install NordVPN and establish up to 10 simultaneous connections. These include installing native apps, using SmartDNS, and sharing connections via a PC hotspot/ethernet.
That's all we have prepared for this setup guide. If you have any further queries, please comment below. Thanks for reading!
Related