When you purchase through links on our site, we may earn an affiliate commission. Here’s how it works.
How to Configure NordVPN on QNAP
Last updated January 23, 2025

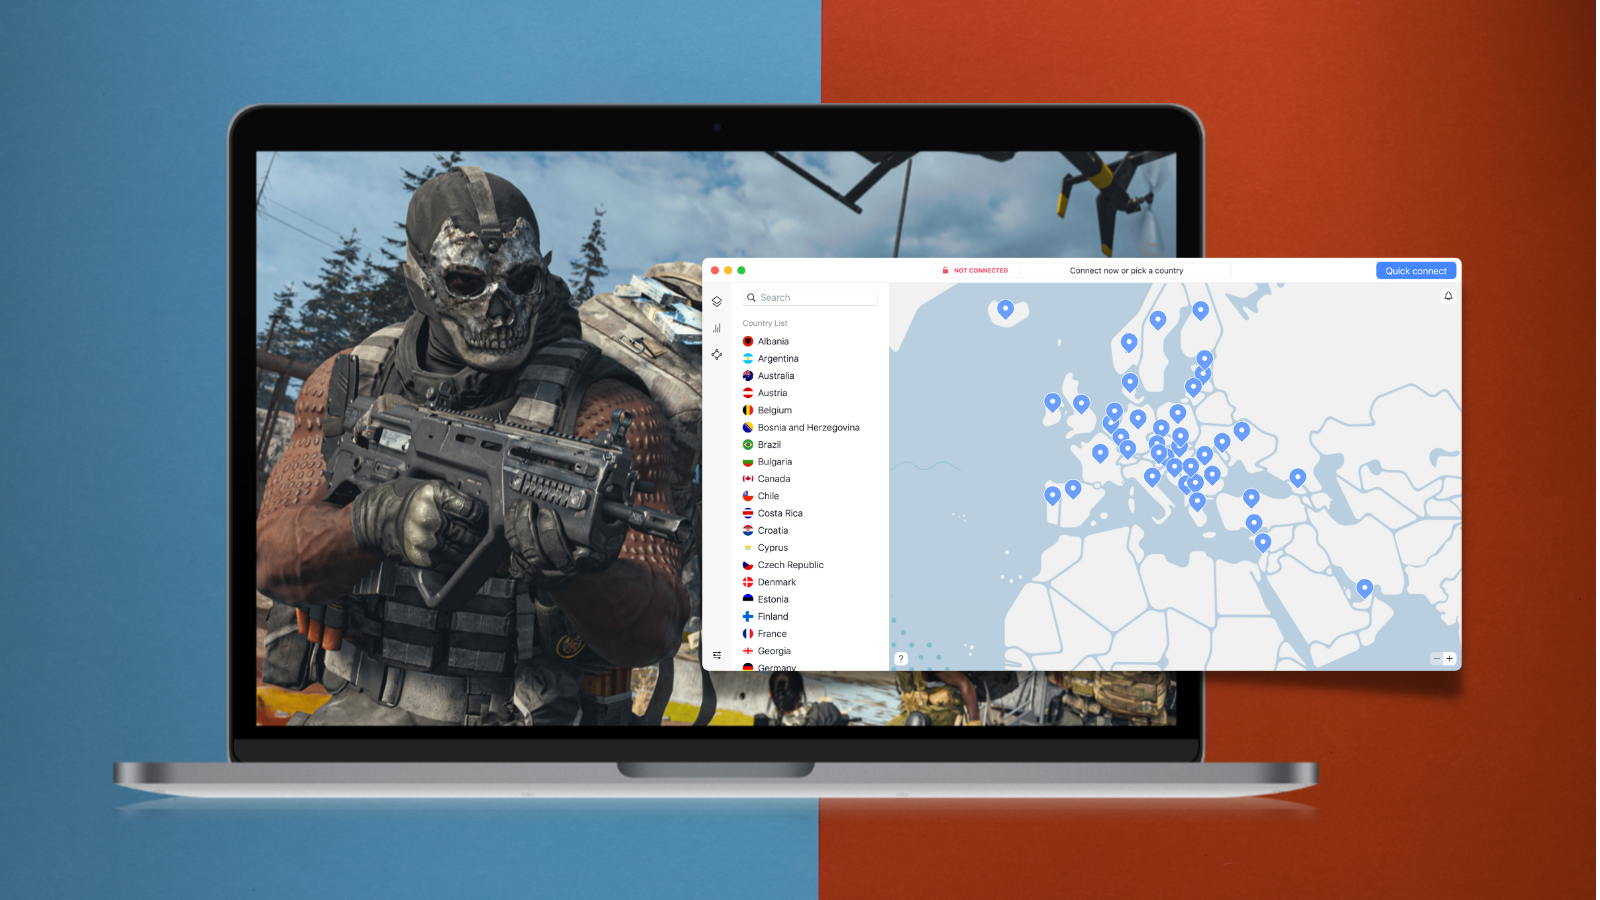
You can set up NordVPN on QNAP by manually creating an OpenVPN connection. That means you can pick any of NordVPN's 7,400+ servers in 118 countries and set up your NAS device to encrypt your data without geographical limitations. In other words, all your incoming and outgoing traffic will be encrypted.
We'll also add that NordVPN doesn't provide a list of supported QNAP devices, but it mentions versions 4.2.1 and 4.4.2. However, the only requirement here is support for OpenVPN. So, as long as your QNAP supports that protocol, you won't have an issue setting up or running NordVPN.
In this guide, we'll show you how to set up NordVPN on two versions of QNAP software (4.4.2 and 4.2.1), and you can expect helpful screenshots throughout as well.
How to Configure NordVPN on QNAP
No matter which QNAP software version you have, setting up NordVPN starts by getting a subscription. Following that, you'll need to pick an OpenVPN-supported server and retrieve its OVPN file. The rest of the procedure is done on your QNAP, and we'll cover two different software versions with distinct user interfaces.
Configure NordVPN on QNAP 4.4.2
You can configure NordVPN on QNAP 4.4.2 using QVPN. Before that, you need to pick a server and obtain its OpenVPN files. Go through the following steps:
1. Subscribe to NordVPN using a computer and your preferred Web browser.
2. Now, access your QNAP and choose QVPN Service.
3. Move to the 'VPN Client' option and pick 'VPN Connection Profiles.'
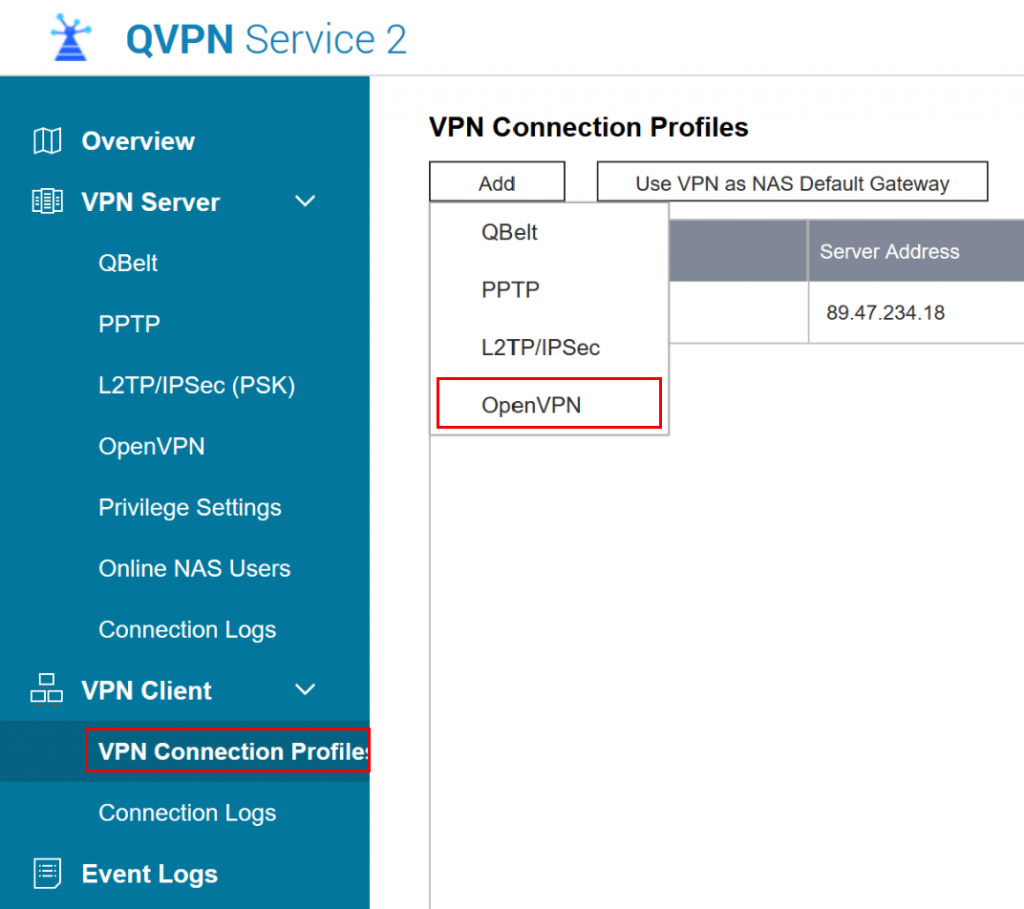

4. Click the 'Add' button, and choose 'OpenVPN' from the dropdown list.
5. Open NordVPN's server tool, pick a server, and click 'Download config' next to OpenVPN.


6. Once downloaded, import those files to the control page of your device.
7. Open your NordVPN account dashboard and click 'NordVPN' > 'Set up NordVPN manually.'
8. Enter the verification code from your NordVPN-associated email.
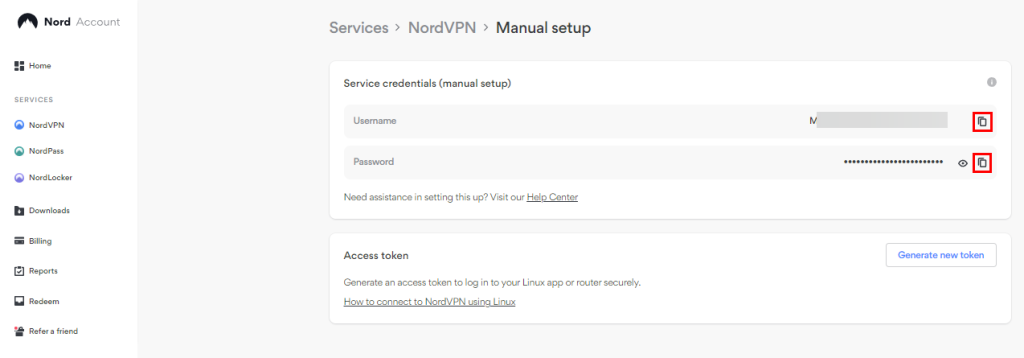
9. Copy the Service Username and Password under the box 'Service credentials (manual setup).'

10. Now, paste these NordVPN service credentials in the OpenVPN section on the QNAP page.
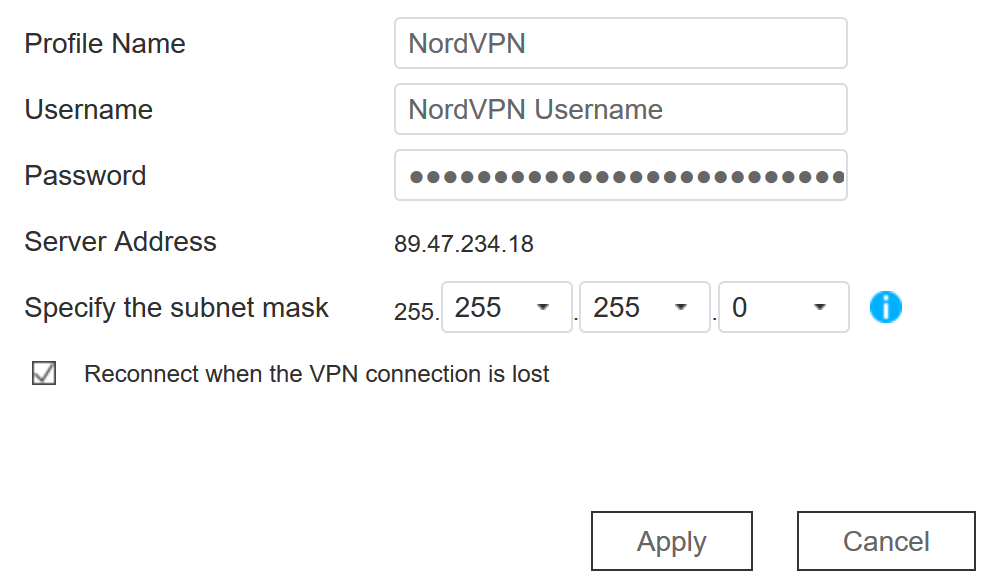
11. Once you enter the details, click on 'Apply'.
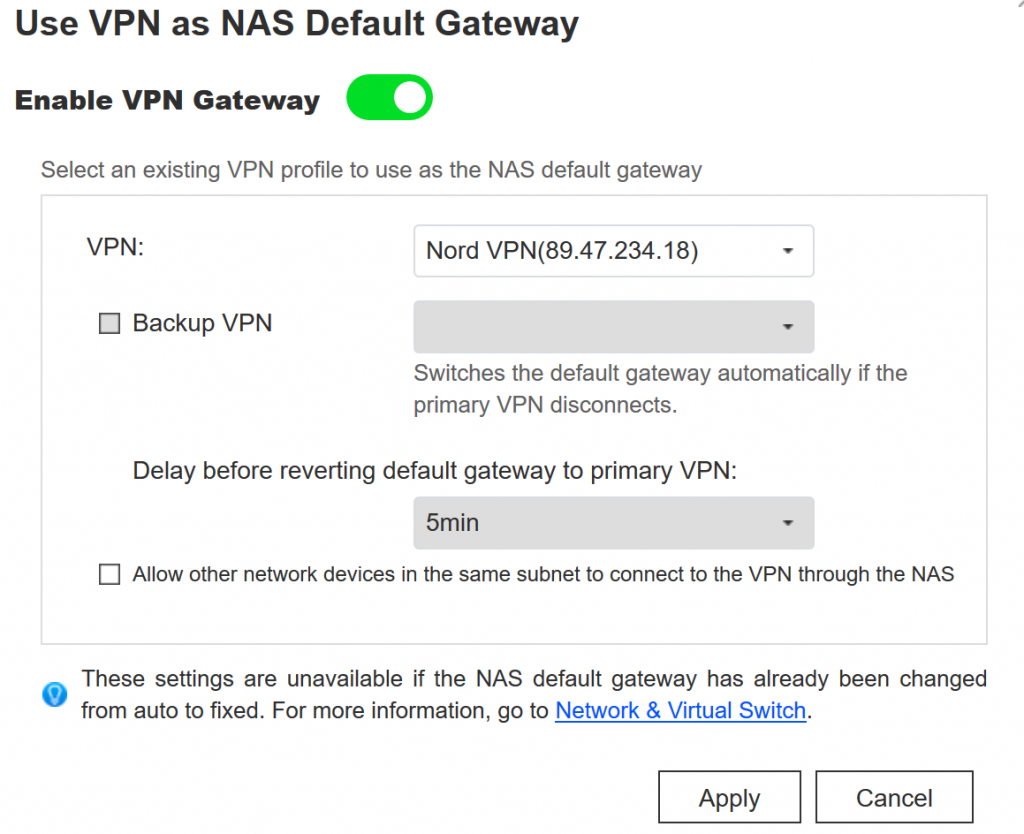
12. From the VPN connection profiles, select 'NordVPN profile' > 'Use VPN as NS Default Gateway'.
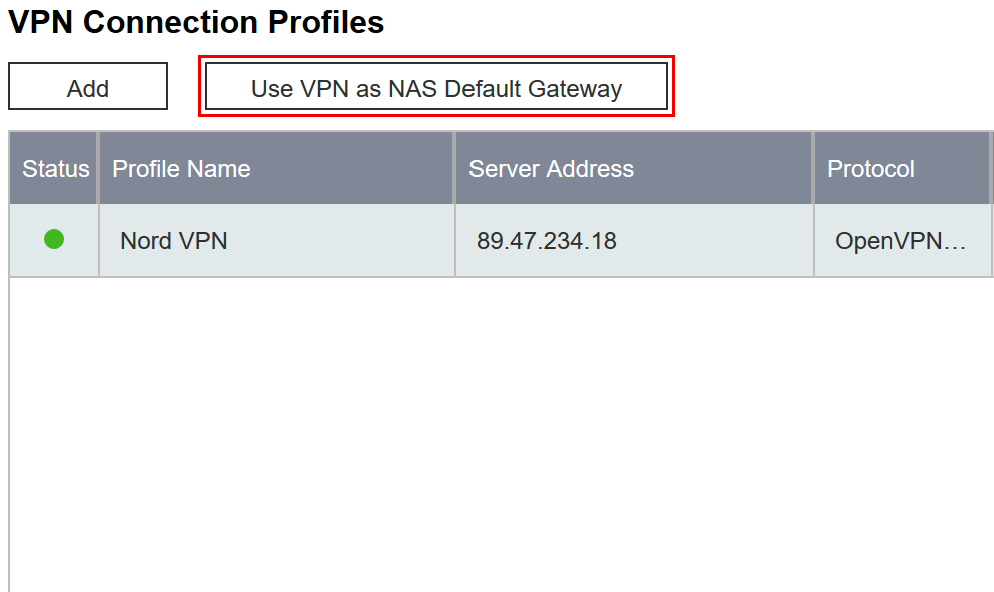
13. Toggle the switch next to Enable VPN Gateway to establish a NordVPN connection.

Configure NordVPN on QNAP 4.2.1
You need to set up NordVPN on QNAP 4.2.1 using the Qfinder app, which is how you'll upload the required OpenVPN certificates to your NAS device. Follow these steps:
1. Sign up for NordVPN using your computer and a Web browser.
2. Access the control panel of your NAS using the Qfinder app that comes with the QNAP NAS system.
3. Run Qfinder and let it detect your QNAP device connected to your local network.
4. Once you see your QNAP device listed, double-click on it to open its control panel in your browser.
5. Log into your QNAP control page with administrative privileges.
6. Go to NordVPN's server tool and pick a server.
7. Click on the 'Download config' button next to OpenVPN (UDP or TCP) to download .ovpn file.
8. Open your NordVPN account dashboard and click on 'NordVPN.'
9. Click on 'Set up NordVPN manually.'
10. Enter the verification code from your NordVPN-associated email.
11. Copy the Service Username and Password under the box 'Service credentials (manual setup).'

12. Create a new text file, 'nordvpnpass.txt,' comprising your NordVPN service username and password.
13. Next, access your QNAP UI and open File Station.
14. Navigate to /Download/directory and click the '+' button to create a new folder named VPN.
15. Now move the .ovpn and nordvpnpass.txt files to this directory within the VPN folder.
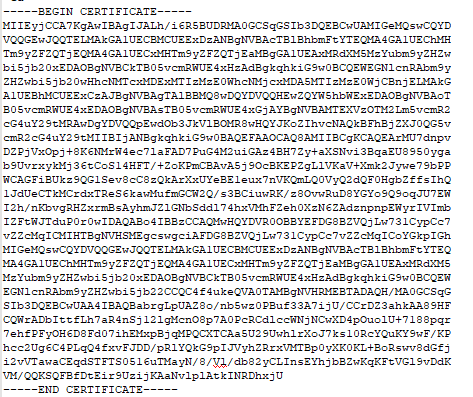
16. Create another text file named ca.crt, which needs to contain the CA certificate of your chosen server.
17. Access your QNAP user interface and move to 'Control Panel' > 'Applications' > 'VPN Client.'
18. From the VPN client menu, choose Add and select OpenVPN from the drop-down.
19. Next, fill in the OpenVPN client settings as mentioned below:
- Profile Name: Anything you like.
- Server Address: The IP address of the VPN server you want to connect to.
- Server Port: Choose UDP or TCP (select port number 1194 for UDP and 443 for TCP).
- Username: Your NordVPN service username.
- Password: Your NordVPN service password.
- Encryption: Pick High (AES 256 bit).
- Certificate: Browse the ca.crt file that you created earlier and upload it here.
- Enable compressed VPN link: Check.
- Use default gateway on remote network: Check.
- Allow other network devices in the same subnet to connect to the VPN through the NAS: Check.
- Reconnect when the VPN connection is lost: Check.

15. Hit the Create button next.
16. Connect QNAP disk station via SSH with Putty/WinSCP for Windows and Terminal for MacOS/Linux.
17. After opening the app, enter the local IP address of your QNAP in Host Name (or IP address).
18. Click on 'Open' and enter the admin username and password to access your QNAP account.
19. Next, use the below command to open the vpn_openvpn_client.sh file.
vi /etc/init.d/vpn_openvpn_client.sh20. Once done, press 'A.'
21. After that, change the beginning of this .sh file as mentioned below:
change this script from
#!/bin/sh
VPN_CONF="/etc/config/vpn.conf"
VPN_NUM="$2"
VPN_CONF_S=1
VPN_CONF_E=10
to
#!/bin/sh
OPENVPN=/usr/sbin/openvpnclient
PIDFILE="/var/run/openvpn.client.pid"
OPENVPN_CONF="/share/Download/VPN/us119udp.ovpn"
OPENVPN_CONF_PATH="/etc/openvpn"
VPN_CONF="/etc/config/vpn.conf"
VPN_NUM="$2"
VPN_CLIENT="OPENVPN_CLIENT""${VPN_NUM}"
MAX_VPN_INDEX="255"
22. When done, press 'Esc' and enter the command ':wq' to save the changes that you've made.
23. Once done, connect to NordVPN using the below command:
openvpn --config /share/Download/VPN/us936.nordvpn.com.udp.ovpnFinal Thoughts
So, you've created a new default gateway for your QNAP NAS device. With NordVPN in place, you now have complete protection for your data by ensuring that your QNAP traffic is encrypted at all times. Also, you're free to reconfigure your connection at any moment if you need another IP location or a different geo-target. But you can do even more with NordVPN!
Your subscription to NordVPN gives you up to 10 simultaneous connections. So, why not protect your other devices as well, going beyond your QNAP? You can also use NordVPN on your phone, computer, tablet, streaming devices, and more - and our central guide on how to set up NordVPN will help you do just that.
That's all we have prepared for this installation guide. If you have any questions, let us know in the comments section below. Finally, thanks for reading!
Related