When you purchase through links on our site, we may earn an affiliate commission. Here’s how it works.
How to Set Up and Use CyberGhost VPN on Linux
Last updated January 15, 2025


There are several ways to set up CyberGhost VPN on Linux. The easiest way is to use CyberGhost's CLI app, which works on various Debian- and RPM-based Linux flavors, such as Ubuntu, Fedora, PopOS, CentOS, and more. After you install the VPN, you'll interact with it using a series of commands.
Another way to get started with CyberGhost is to set up an OpenVPN connection manually. According to the VPN's documentation, this works on Linux Ubuntu 19.10 and newer. However, as long as your Linux flavor allows you to set up OpenVPN connections, you should be covered.
In this guide, we'll discuss all the possible methods of installing CyberGhost on Linux through its CLI app and OpenVPN configuration, coupled with helpful screenshots.
How to Set Up CyberGhost on Linux
We'll first explain how to set up CyberGhost using its CLI Linux app, as that's how you get multiple protocols (OpenVPN and WireGuard), advanced settings, and an easy way to connect to various servers. Then, we'll explain how to configure an individual OpenVPN connection based on your targeted location. You can repeat this procedure to set up connections for multiple VPN locations.
Method #1: Set Up CyberGhost on Linux via the CLI App
The process of setting up CyberGhost's Linux app requires you to download its application, install it, and then use the Terminal to interact with servers. Here's all you need to do:
1. Sign up for CyberGhost VPN using your computer and any Web browser.
2. Return to CyberGhost's home page and click 'My Account' in the top-right corner. Provide your credentials to access your dashboard.


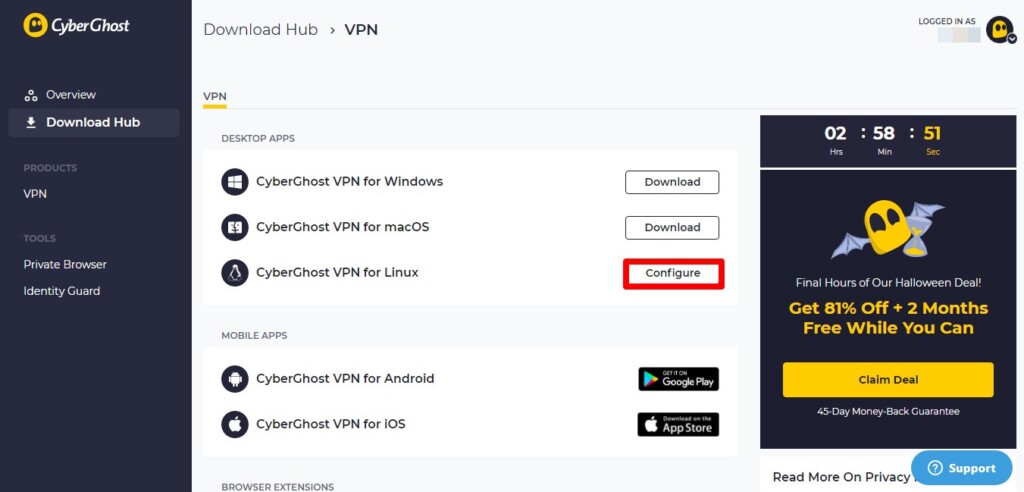
3. Once you can access your dashboard, find 'CyberGhost VPN for Linux' from the Download Hub and hit the Configure button.

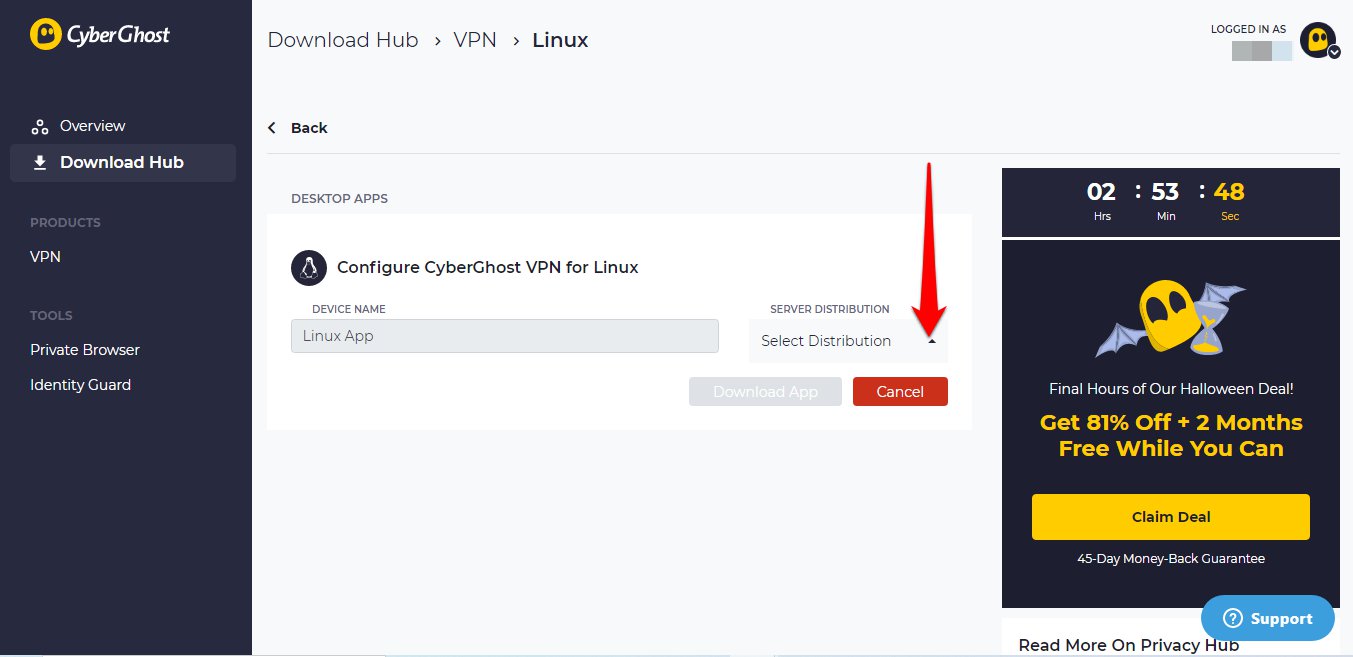
4. On the next page, locate SERVER DISTRIBUTION and click the Select Distribution button.

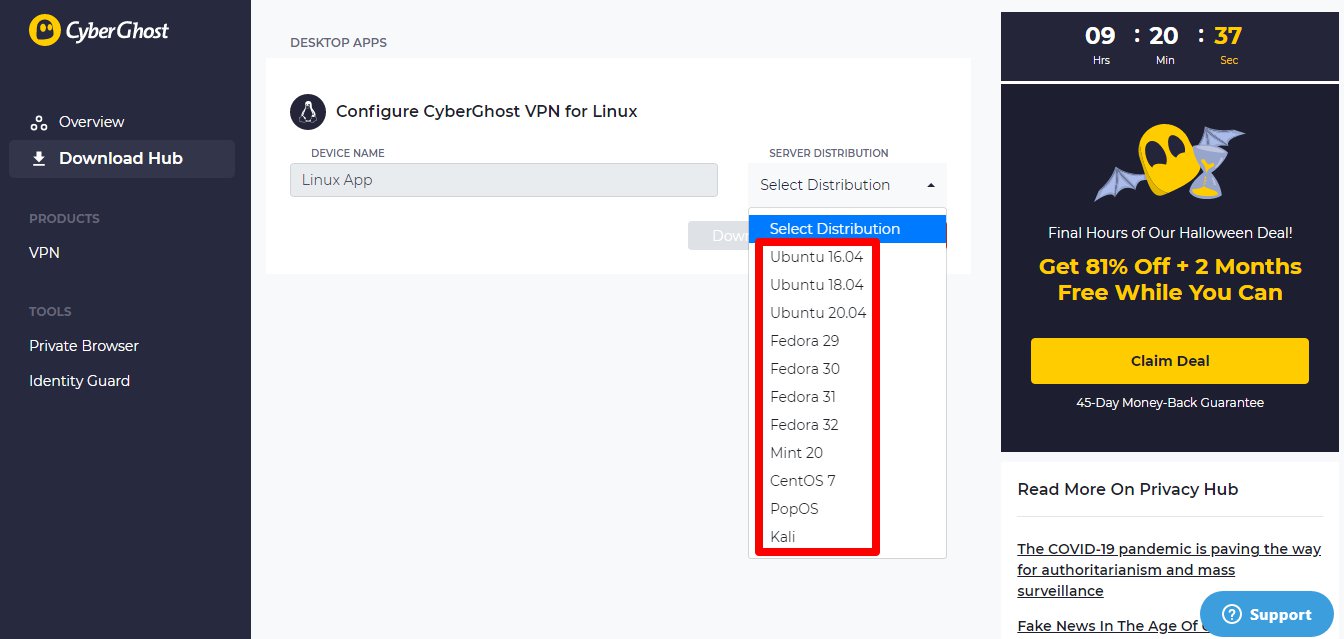
5. A drop-down menu will appear now; choose the Linux distro on which your system is running.

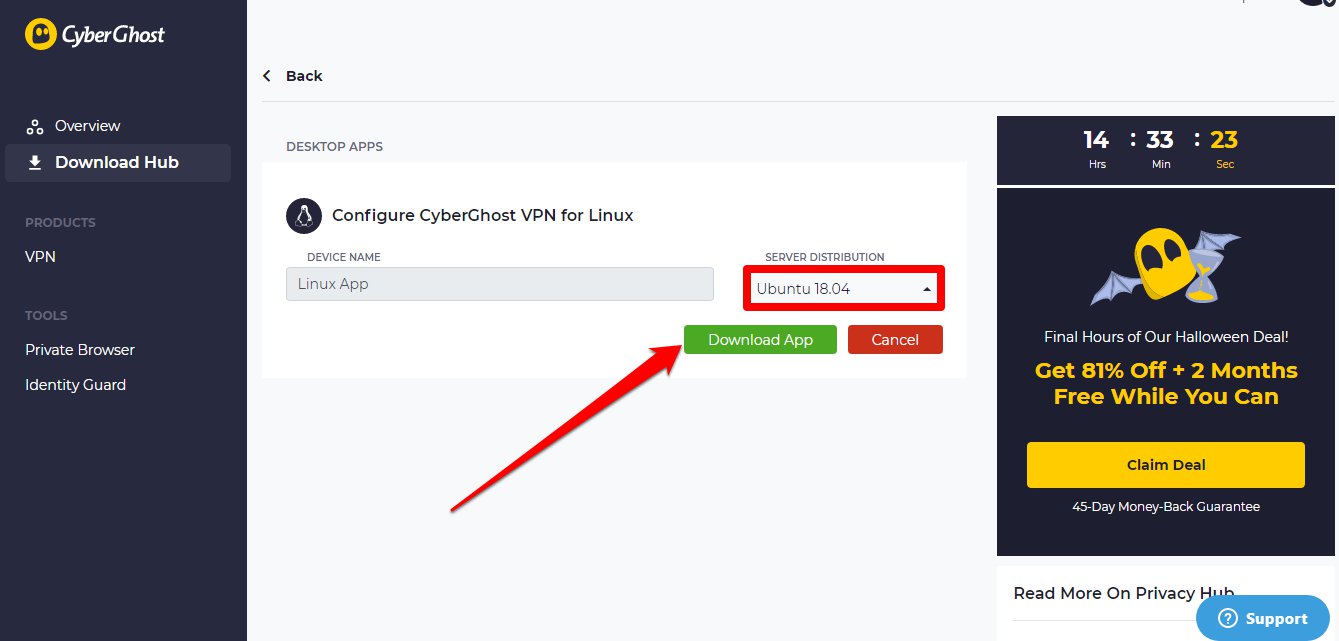
6. Now, hit the Download App button to download the setup package.

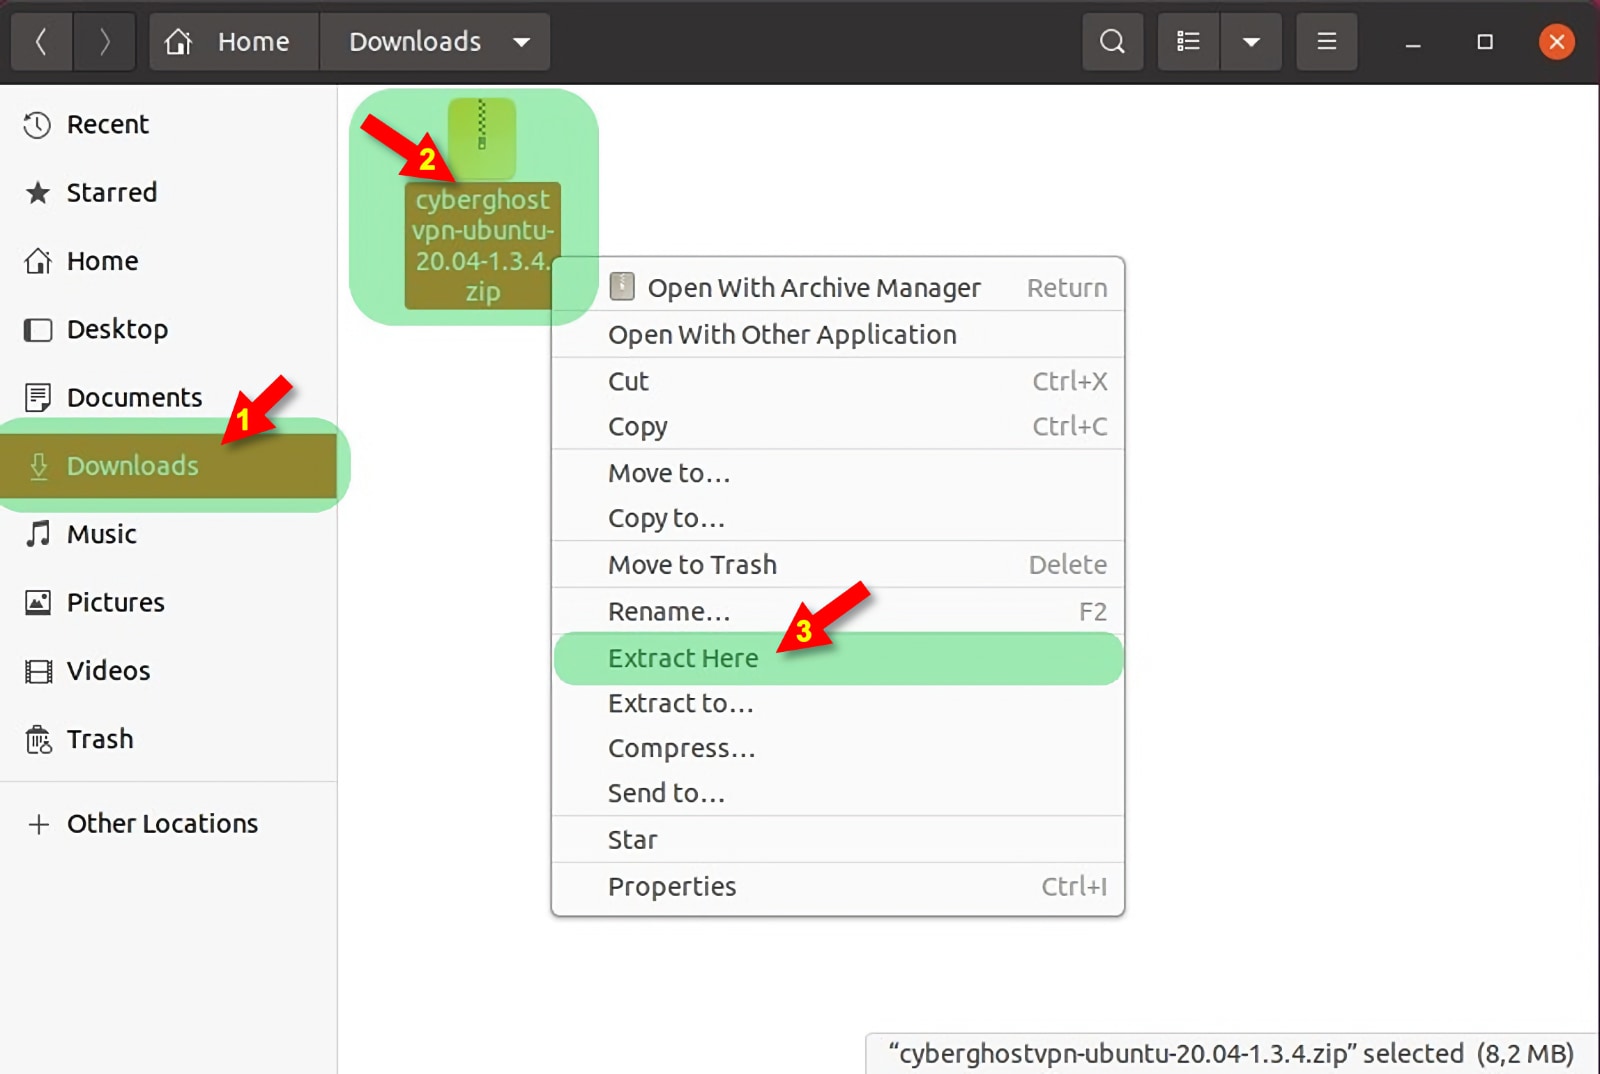
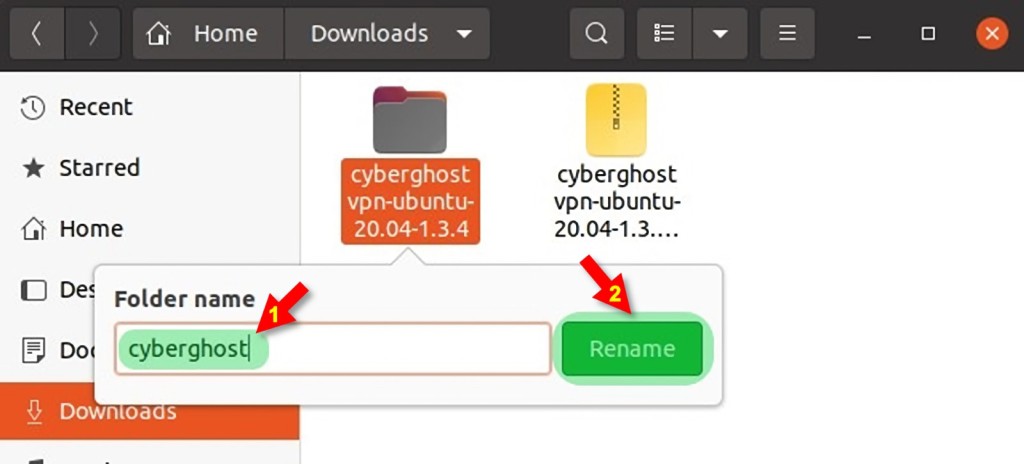
7. Once the zip folder is downloaded, locate it and extract its content by choosing the Extract Here option from the menu. You can also rename the extracted folder by pressing the F2 button.


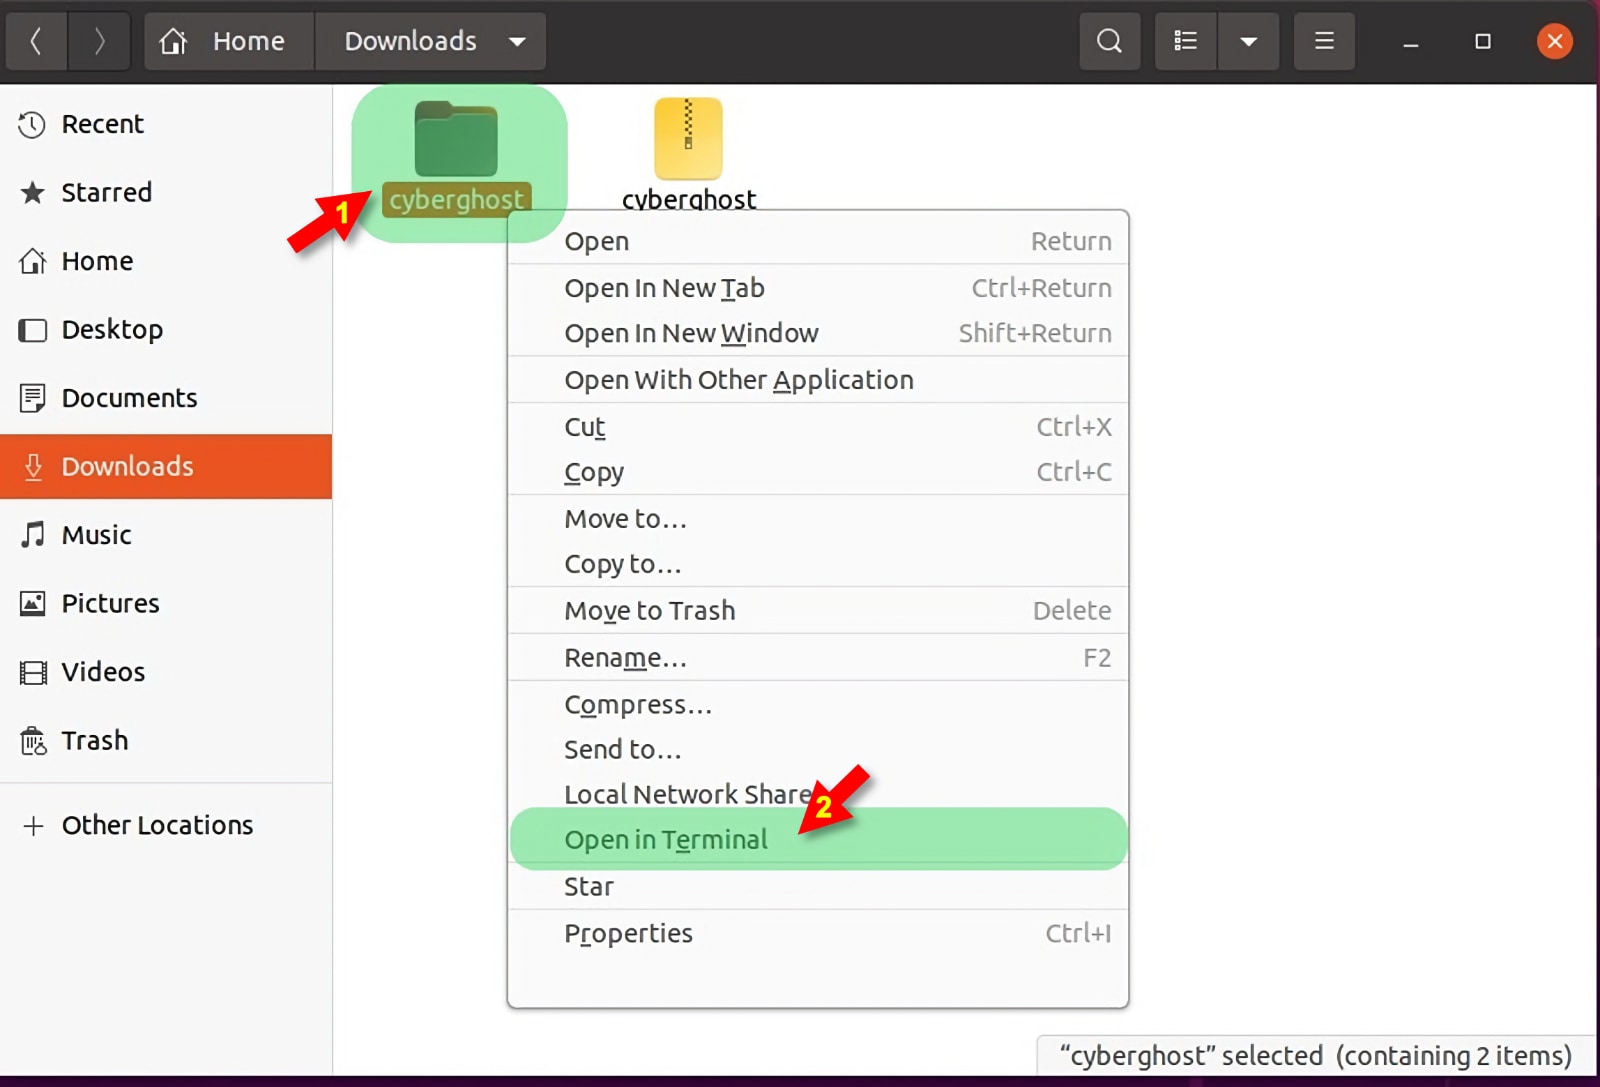
8. Right-click on CyberGhost's installation file and pick 'Open in Terminal.'

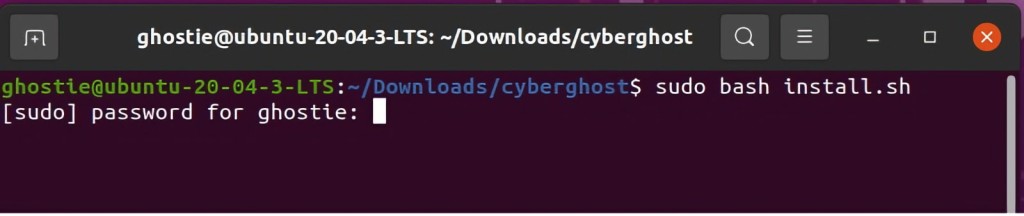
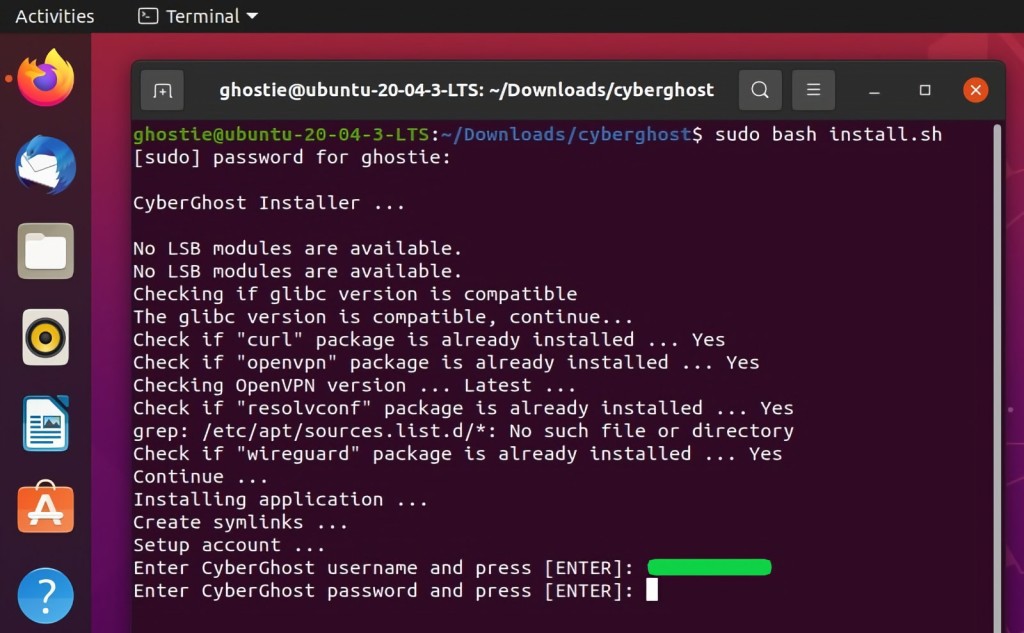
9. Type in the "sudo bash install.sh" code and press Enter. You'll need to provide your password.

10. You'll now see a prompt asking you to install the required packages (this happens in most cases). To proceed, press 'Y' on your keyword.
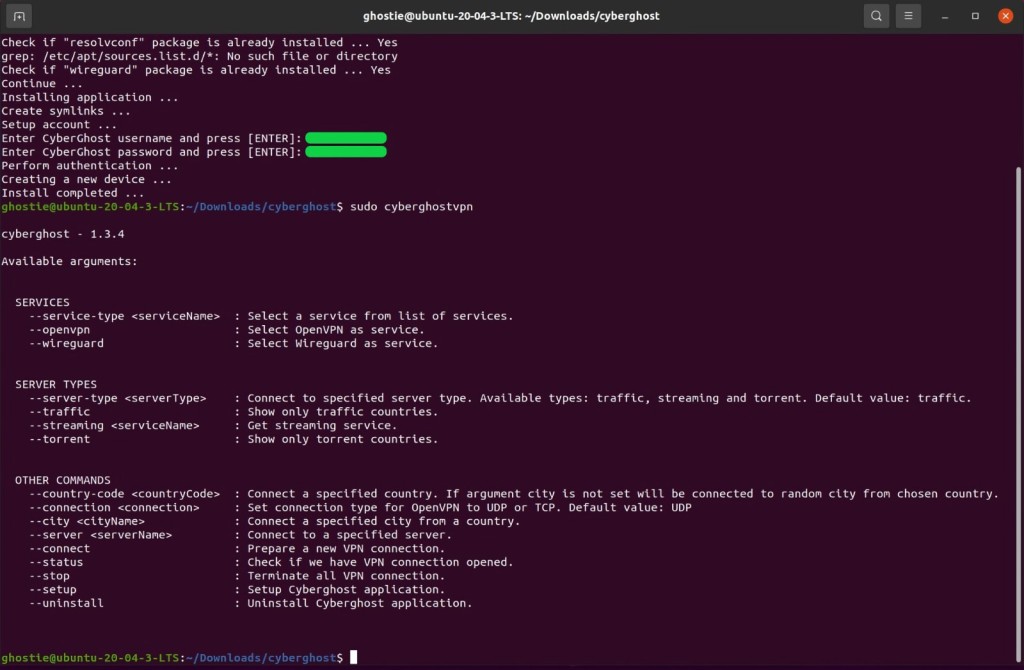
11. Type in your CyberGhost username and password to confirm the installation.

12. You can now start interacting with CyberGhost. Go with "sudo cyberghostvpn" to preview all of the available commands for CyberGhost's CLI app.

Method #2: Set Up CyberGhost on Linux Through OpenVPN
This method will instruct you to set up an OpenVPN connection on your Linux manually. You can repeat the procedure explained below if you wish to add multiple connections. Let's explain everything you need to do:
1. Get your CyberGhost subscription using your Linux PC and any Web browser.
2. Go back to CyberGhost's home page, click 'My Account,' and access your online dashboard.
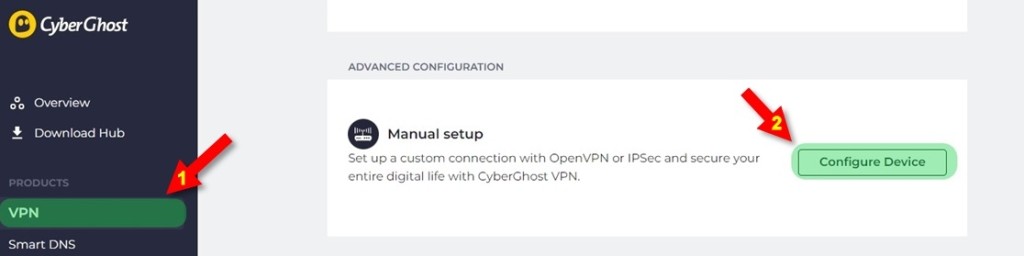
3. Pick 'VPN' on the left and 'Configure Device' on the right.

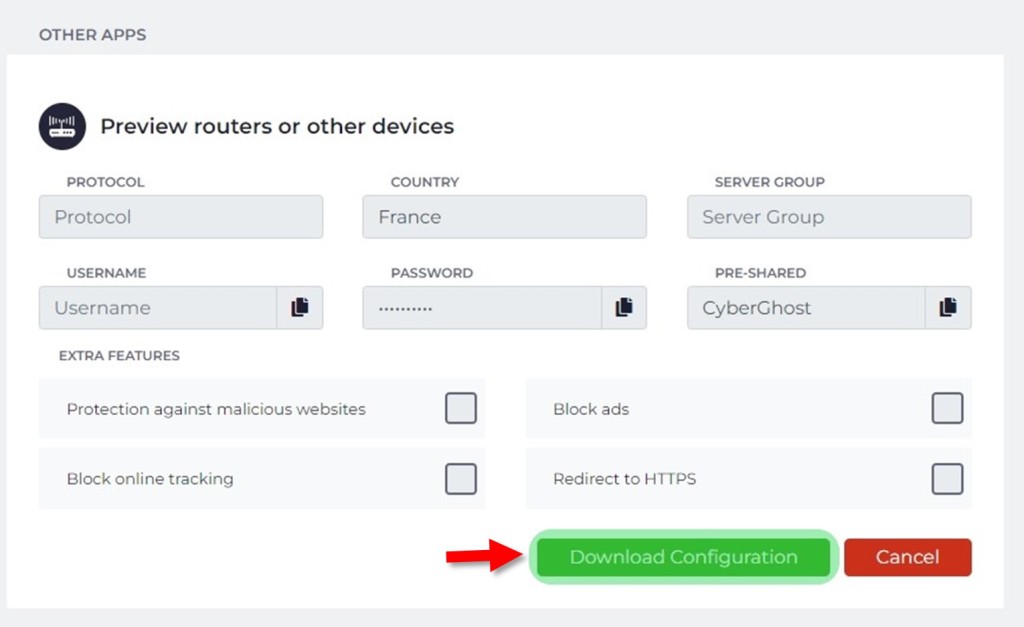
4. Create a new configuration by picking 'OpenVPN,' any country you want, and provide a name for your connection. Once done, use the 'Save Configuration' button.

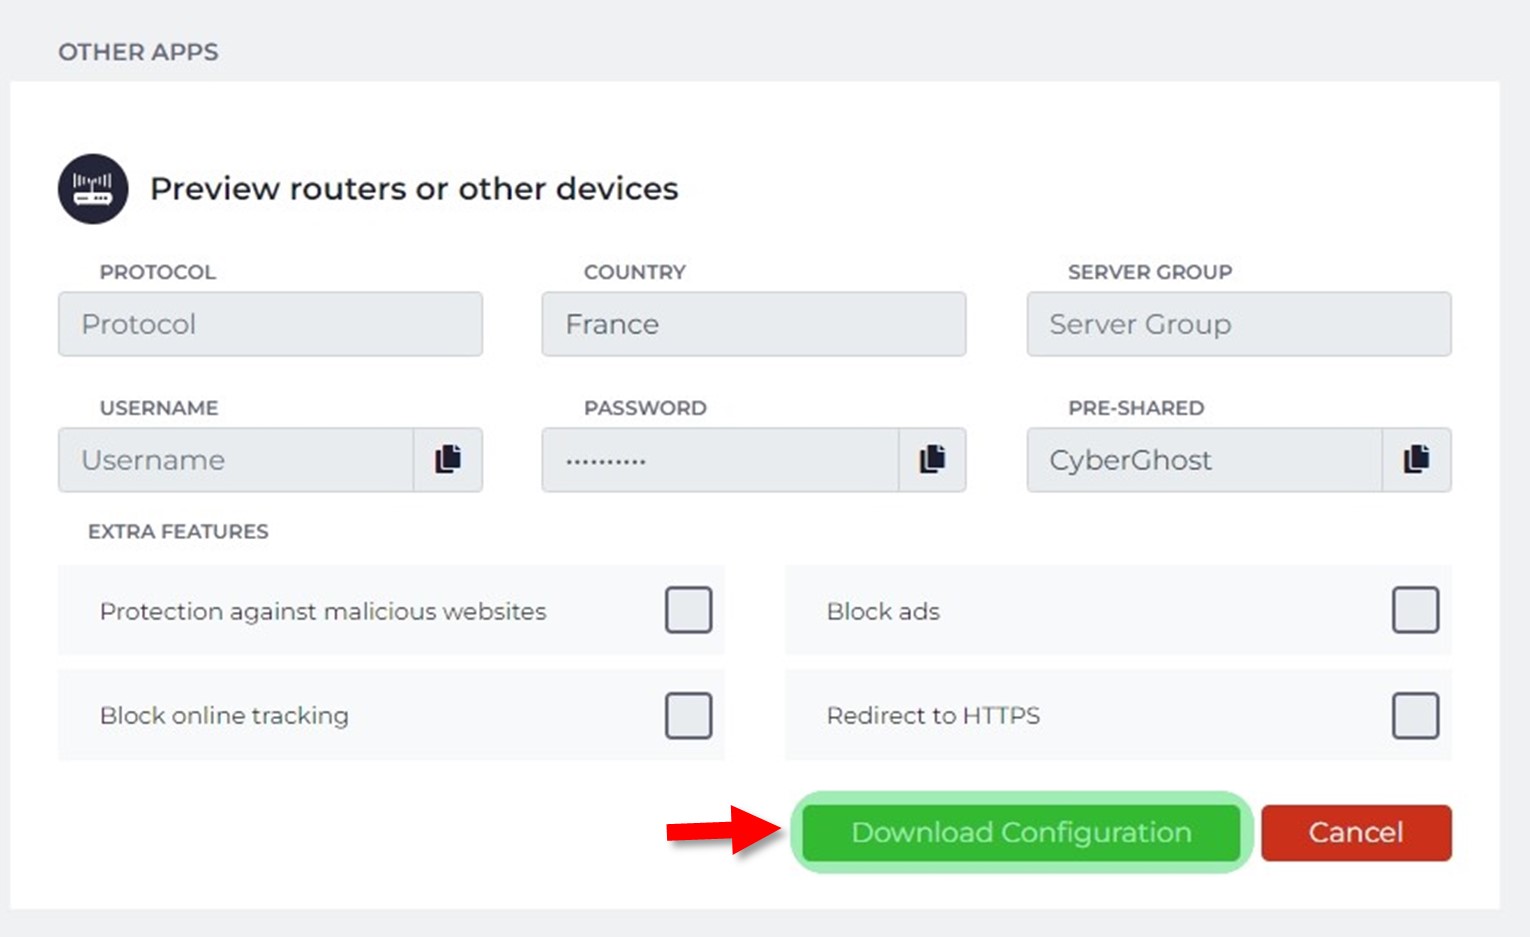
5. Find your new connection and click 'View' to see its details. Make a note of its server group, username, and password (these are your OpenVPN credentials). Click 'Download Configuration.'
6. Unzip the file you just downloaded. It contains several files you'll soon use to configure CyberGhost on your Linux machine.
7. Launch Terminal on your computer and input the following commands:
sudo apt-get update
sudo apt-get install openvpn
sudo apt-get install network-manager-openvpn
8. If your machine's Network Manager doesn't support OpenVPN out of the box, you need to use Terminal with the following commands:
sudo apt-get install network-manager-openvpn
sudo apt-get install network-manager-openvpn-gnome
sudo apt-get install network-manager-pptp
sudo apt-get install network-manager-vpnc
9. Click on the 'Network' icon in the top-right corner of your screen and pick 'Settings.'
10. Go to Network > VPN, and then click on the plus sign to add a new connection.

11. Pick 'Import from File' and upload the file whose extension ends with 'OVPN.'


12. You'll now have to enter a series of information, as displayed below:
- Gateway: This information should be already filled in.
- Type: Pick 'Password with certificates (TLS).'
- Username: This is your OpenVPN username.
- Password: This is your OpenVPN password.
- CA Certificate: Enter the path to the CA.CRT file.
- User Certificate: Enter the path to the CLIENT.CRT file.
- User Private Key: Enter the path to the CLIENT.KEY file.
- User Key Password: Your previously created OpenVPN password.
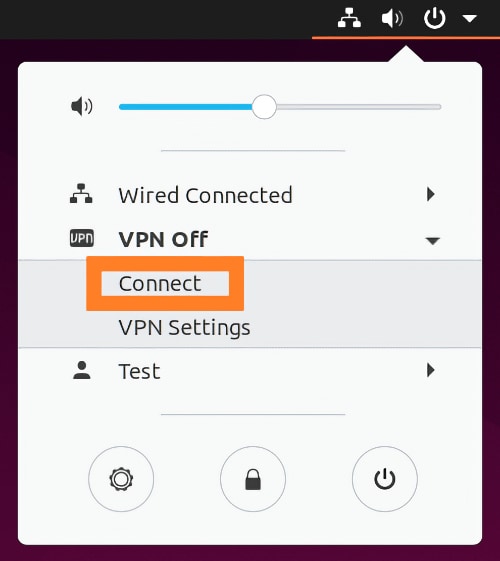
13. Click 'Add' to finish setting up your connection. Then, you can use the system menu's 'Network' icon to connect to your VPN. That's it!
Final Thoughts
In conclusion, we'll add that going for CyberGhost's CLI application is the best option. That way, you'll get advanced VPN features, thousands of servers, multiple VPN protocols, and more. However, if you wish to use OpenVPN only, you can do that on Ubuntu through manual configuration.
Aside from Linux, this VPN provider supports dozens of other platforms. So, make sure to learn how to set up CyberGhost on your phone, tablet, streaming device, and more - allowing you to cover all your digital devices with reliable encryption. CyberGhost is among the best VPNs for Linux, so don't hesitate to test out its geo-unblocking, streaming, gaming, and torrenting abilities without hesitation.
That's all we have prepared for this setup guide. If you have any questions, post them in the comments section below. Thanks for reading!
Related