When you purchase through links on our site, we may earn an affiliate commission. Here’s how it works.
How to Set Up CyberGhost VPN on LibreELEC and OpenELEC
Last updated July 26, 2024

On LibreELEC and OpenELEC, CyberGhost VPN works through manual configuration. In other words, you'll use Kodi on your Linux-based system to set up an OpenVPN connection, which will be kept active in the background. Based on your chosen server location, you'll unblock specific Kodi add-ons and optimize your streaming experience.
In this guide, we'll cover both new and older LibreELEC and OpenELEC versions. More precisely, we'll show you how to set up CyberGhost on LibreELEC 7, 8, and 9, and the same applies to OpenELEC 5 and 7. And if you use OpenELEC 6, you'll find a separate guide below.
How to Set Up CyberGhost VPN on LibreELEC and OpenELEC
To set up CyberGhost on LibreELEC and OpenELEC, you'll need to pick a VPN location, download its corresponding OVPN (OpenVPN) files, and then use a Kodi add-on to configure that connection. More detailed information is below.
Set Up CyberGhost VPN on LibreELEC
If you use LibreELEC 7, 8, or 9, or OpenELEC 5 or 7, you'll need to use a Kodi add-on named 'VPN Manager' to create an OpenVPN-based connection using CyberGhost's setup files. Go through the following steps:
1. Sign up for CyberGhost using your computer and any Web browser.
2. Visit CyberGhost's official website and click 'My Account' in the top-right corner.
3. Enter your username and password on the next screen and hit the 'Log in' button.
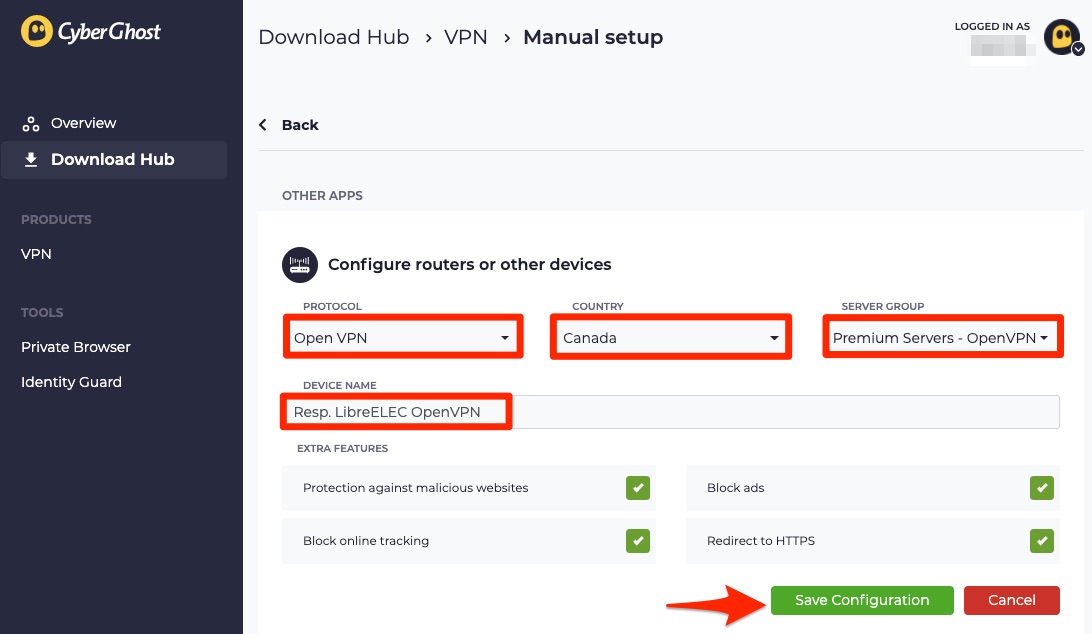
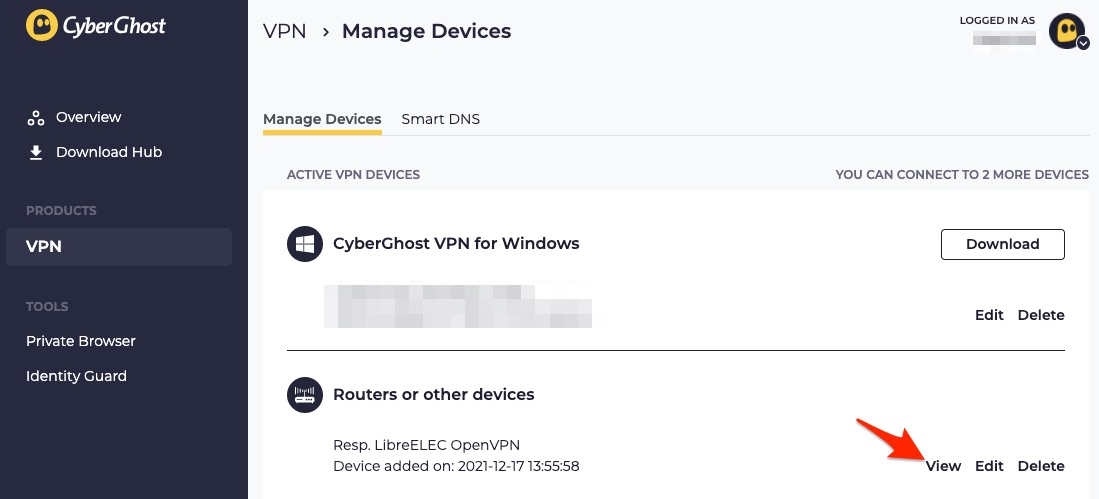
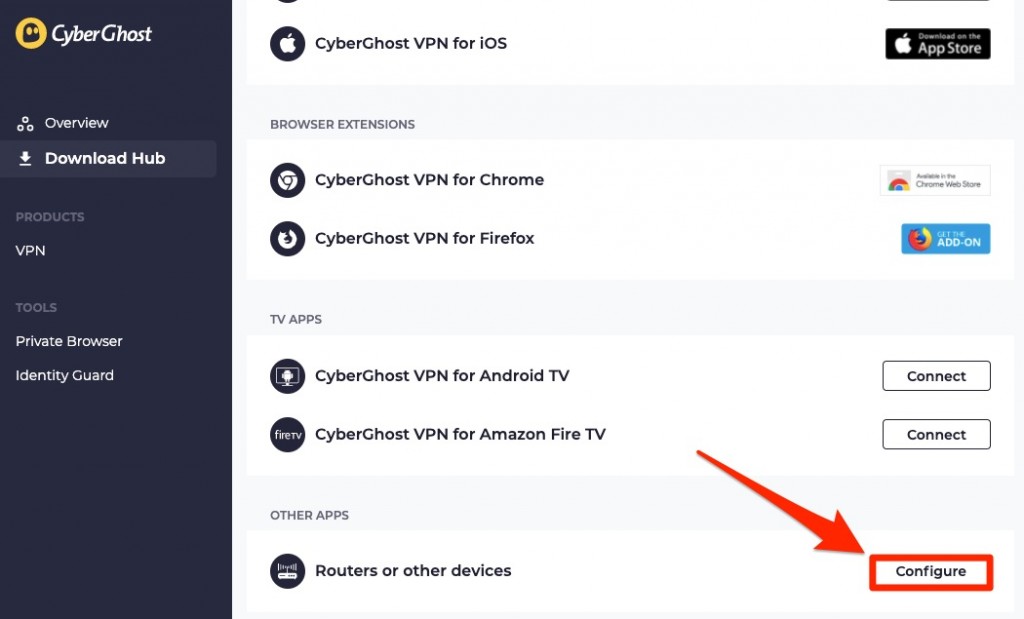
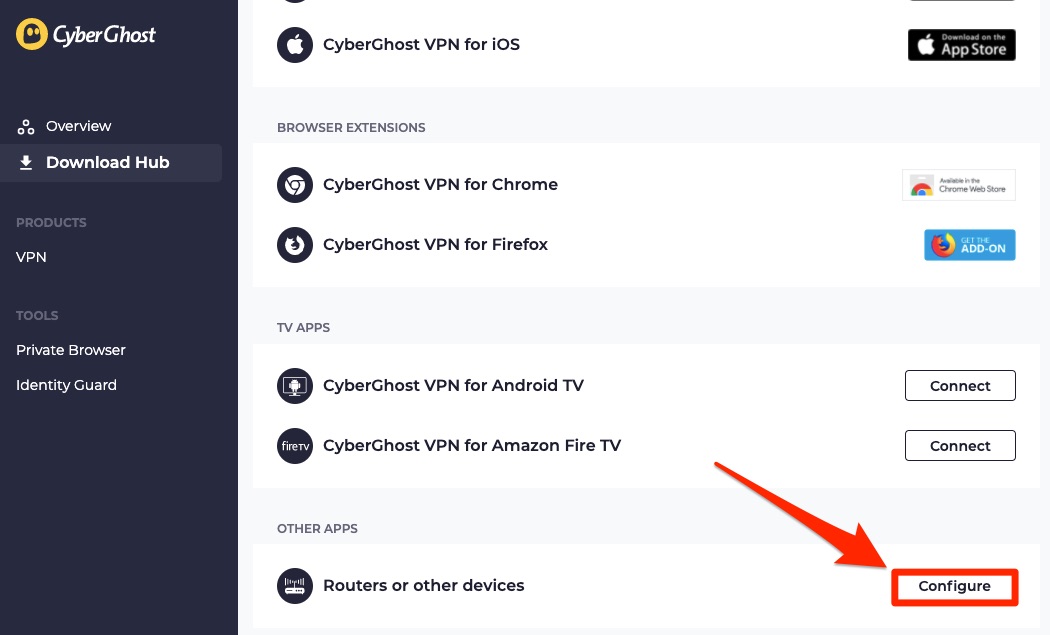
4. Find 'Routers or other devices' and click the 'Configure' button.


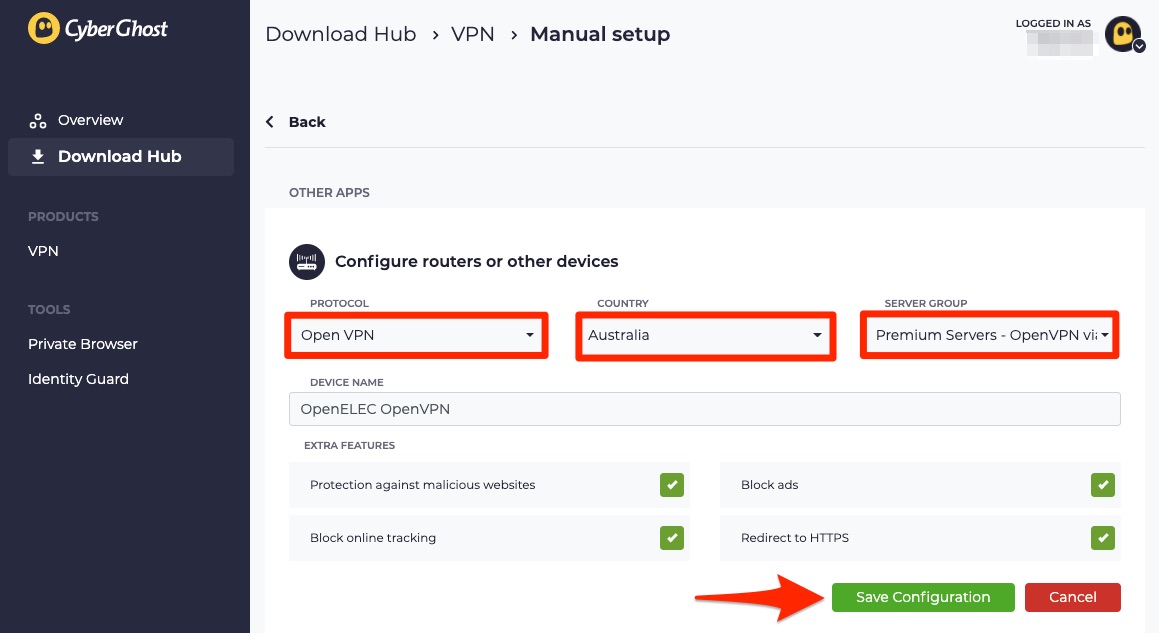
5. You have to fill in the below-mentioned details on the next screen. Once done, hit the 'Save Configuration' button.
- PROTOCOL: OpenVPN
- COUNTRY: Enter the location where your preferred Kodi add-on is available.
- SERVER GROUP: OpenVPN via UDP or TCP.
- DEVICE NAME: Enter Resp. LibreELEC OpenVPN.
- EXTRA FEATURES: Tick all the boxes.

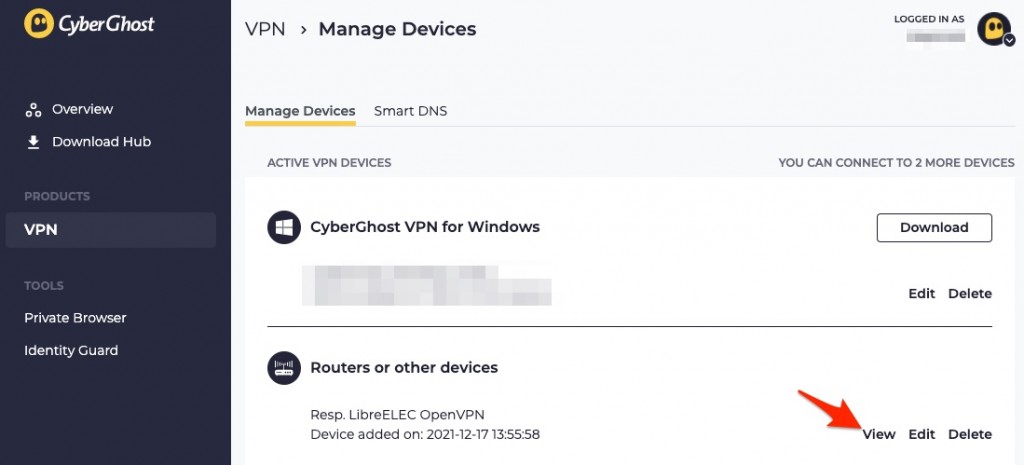
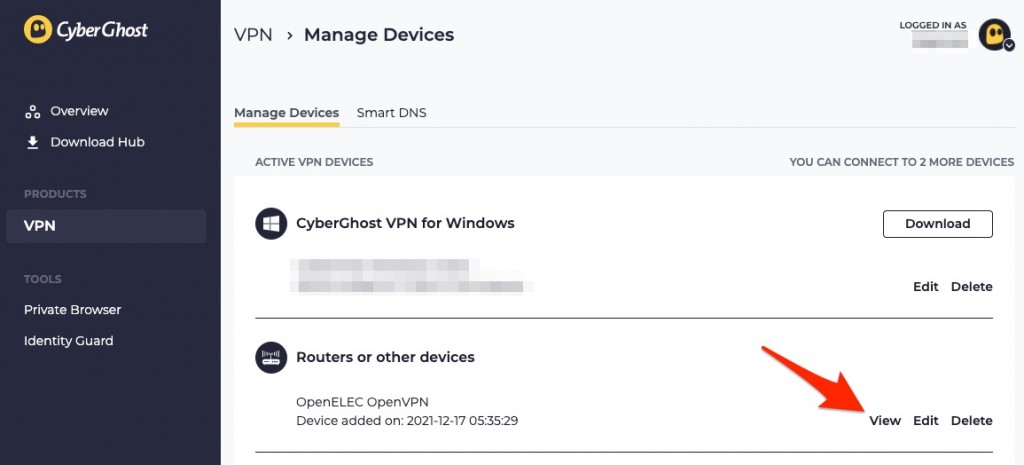
6. Now, you'll be redirected to the 'Manage Devices' page. Find 'Routers or other devices' from there and hit the 'View' button under Resp. LibreELEC OpenVPN.
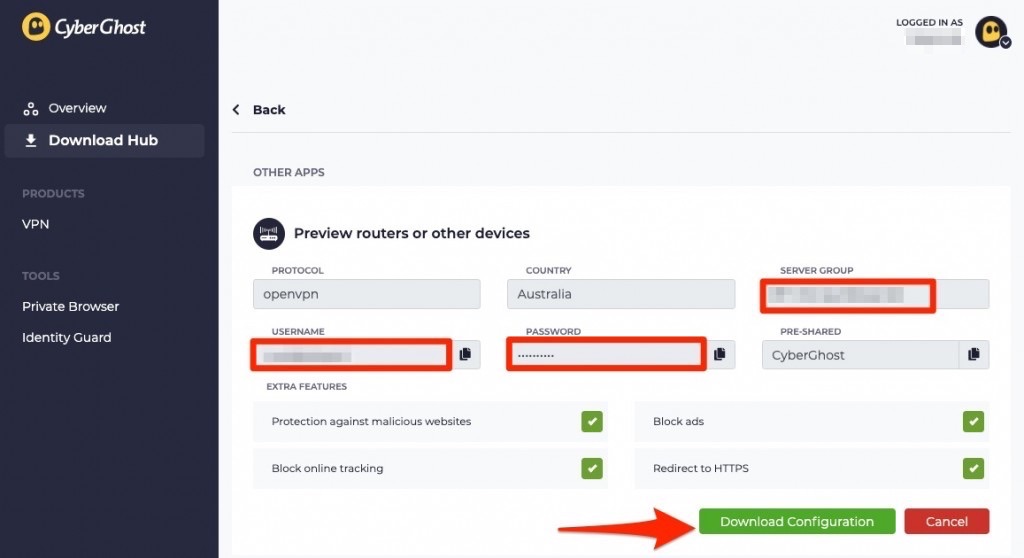
7. The complete OpenVPN configuration will be previewed now. Take note of your username, password, and server group.
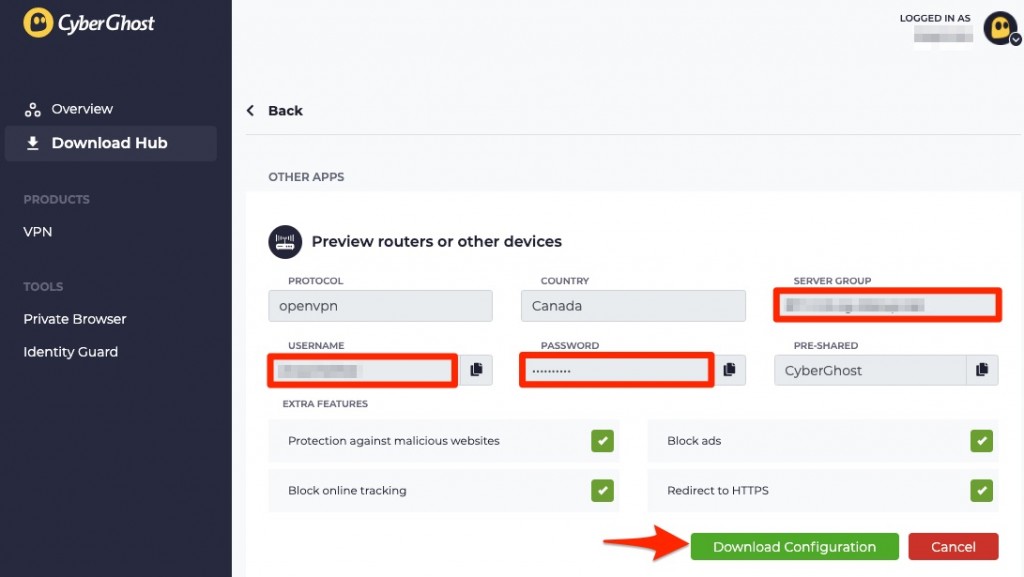

8. When done, hit the 'Download Configuration' button.
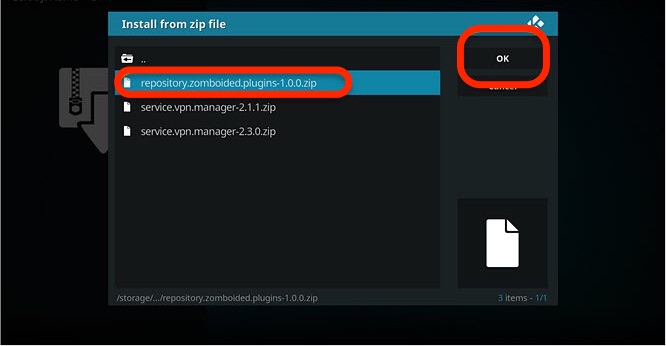
9. Now, the below files will get downloaded on your device in the .zip format; extract them in an easily accessible place.
- client.key: It's the Private key.
- ca.crt: It's a Certificate from the certification authority.
- client.crt: This is User certification.
- openvpn.ovpn: The complete OpenVPN configuration.
10. Get the 'VPN manager for OpenVPN' Kodi add-on. For that, click here to download the repository.
11. Next, unzip it and save it in the location where you've kept the user key file and others.
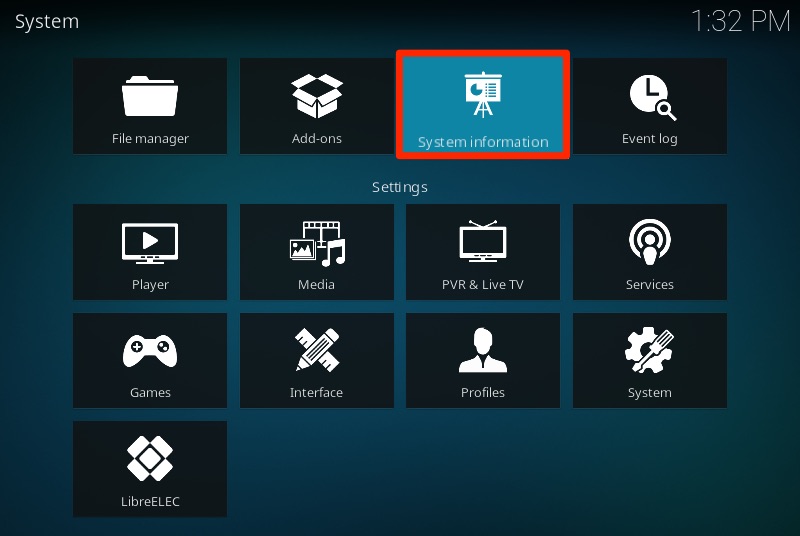
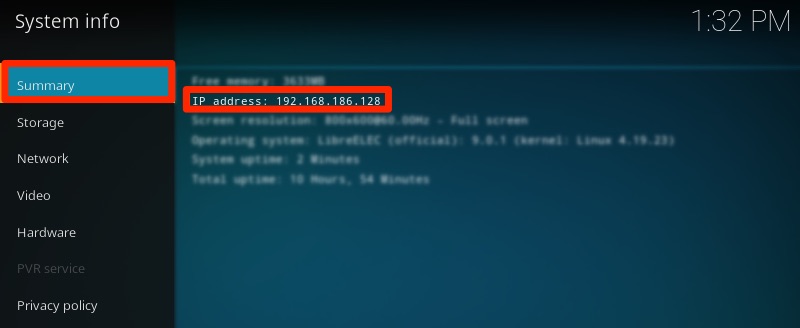
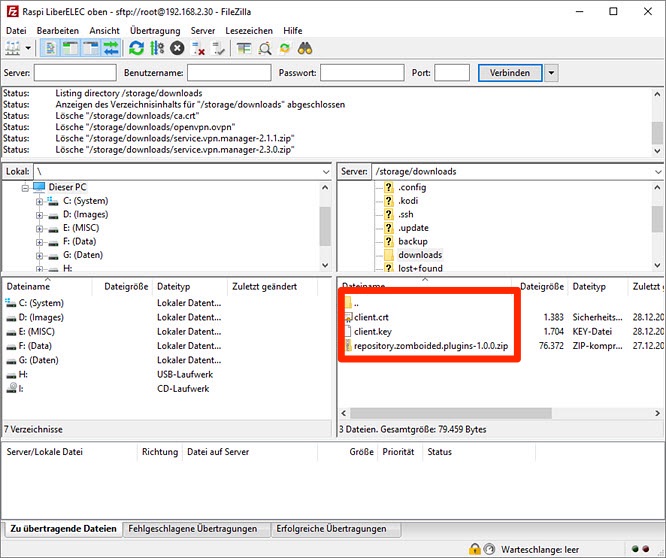
12. Copy these files to your device using Filezilla. To do so, check the LibreELEC/OpenELEC network IP by following the below path: System > System information > Summary > IP address.
13. Now, note your IP and start Filezilla.
14. Next, click 'File,' then navigate to 'Site manager,' choose 'New Site,' and name it 'Kodi.'
15. Now, fill in the below details:
- Host: The IP address of your device.
- Protocol: Choose SFTP.
- Logon type: Set as Normal.
- User: The user name of your device.
- Password: Enter the password of your device.

16. When done, hit the 'Connect' button.
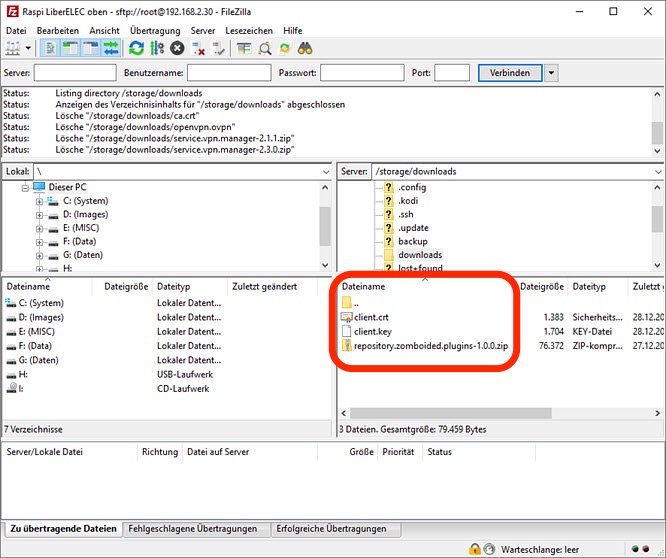
17. Now, Filezilla will open the Kodi installation file inside the storage folder. Here, you have to create a new folder named 'VPN.' Next, copy all the files, i.e., client.key, client.crt, and repository into it.
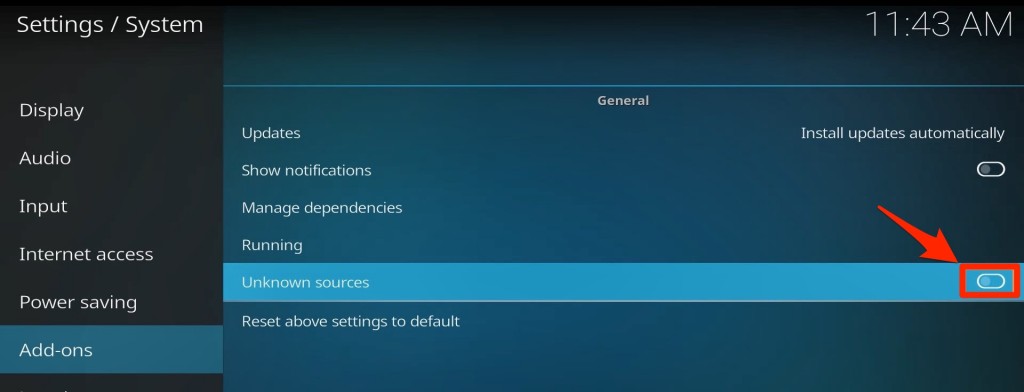
18. At this point, you need to install the VPN Manager for OpenVPN. For that, launch Kodi, and then activate the installation of apps from unknown sources by following the below path: SETTINGS > SYSTEM > Add-ons > Toggle on Unknown sources.

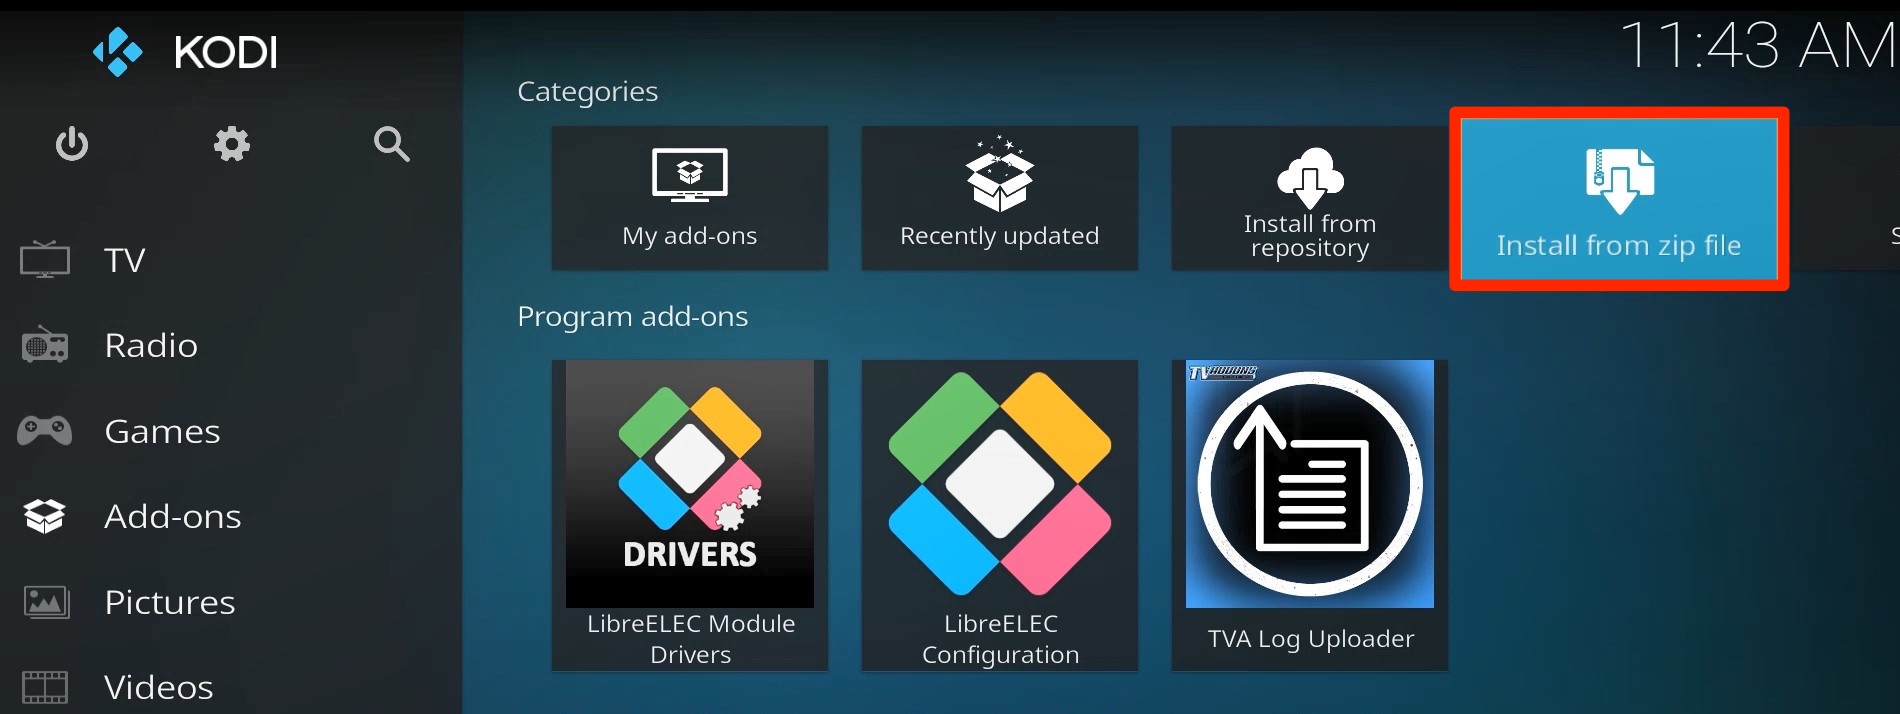
19. Now, navigate to the main screen and click Add-ons.
20. On the next screen, click Install from the ZIP file.

21. Locate the folder where you've kept all the files via FileZilla.
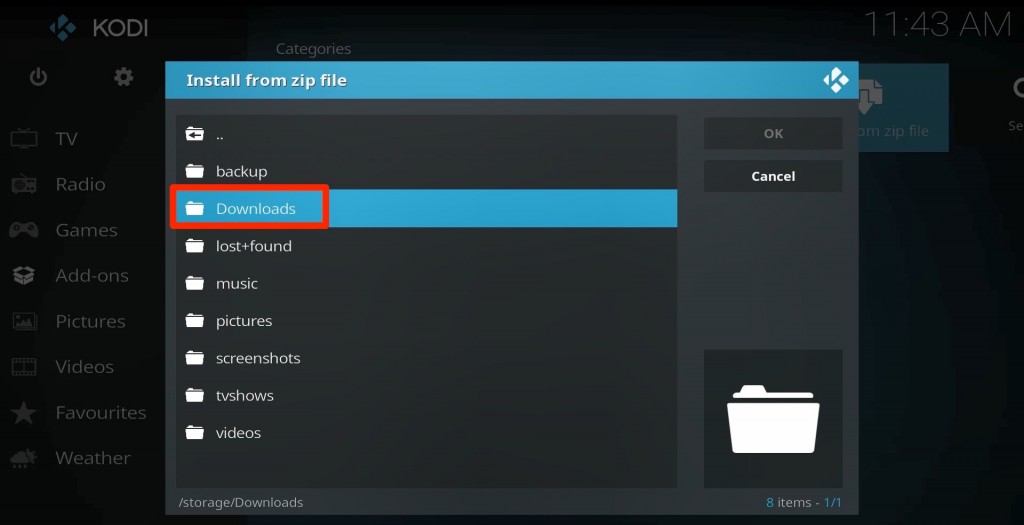
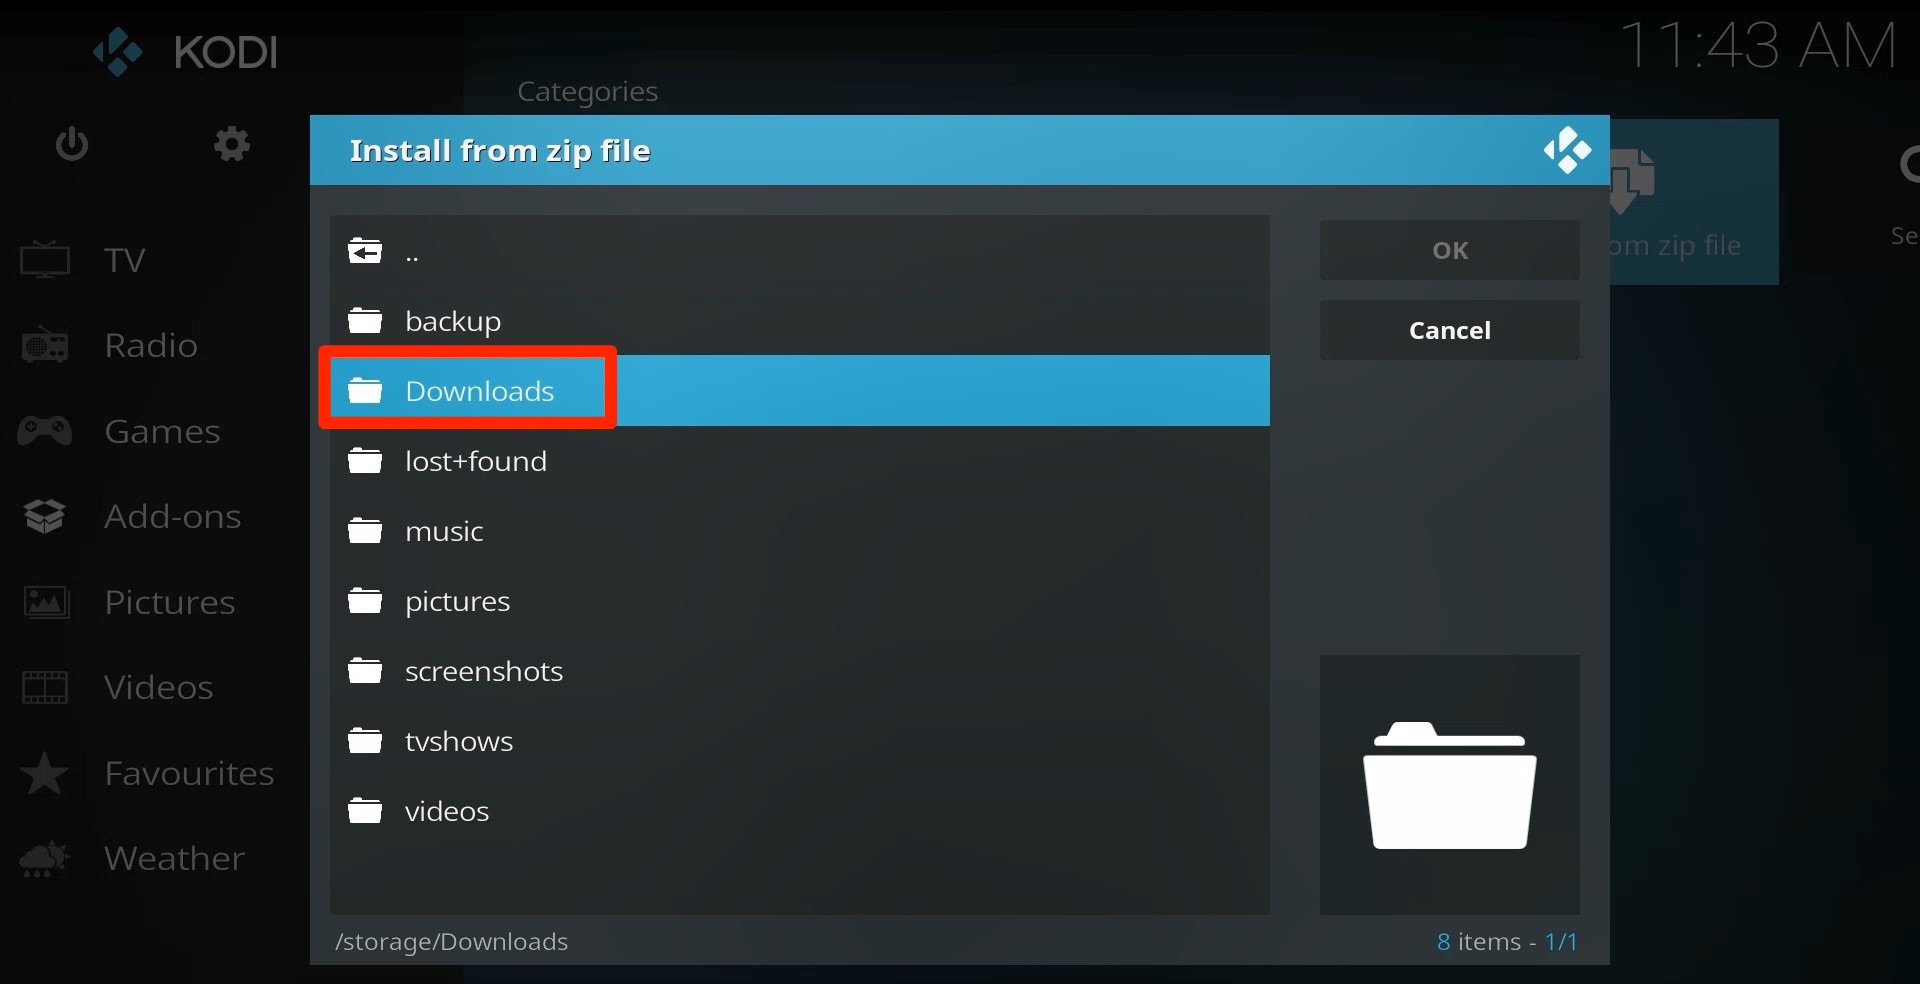
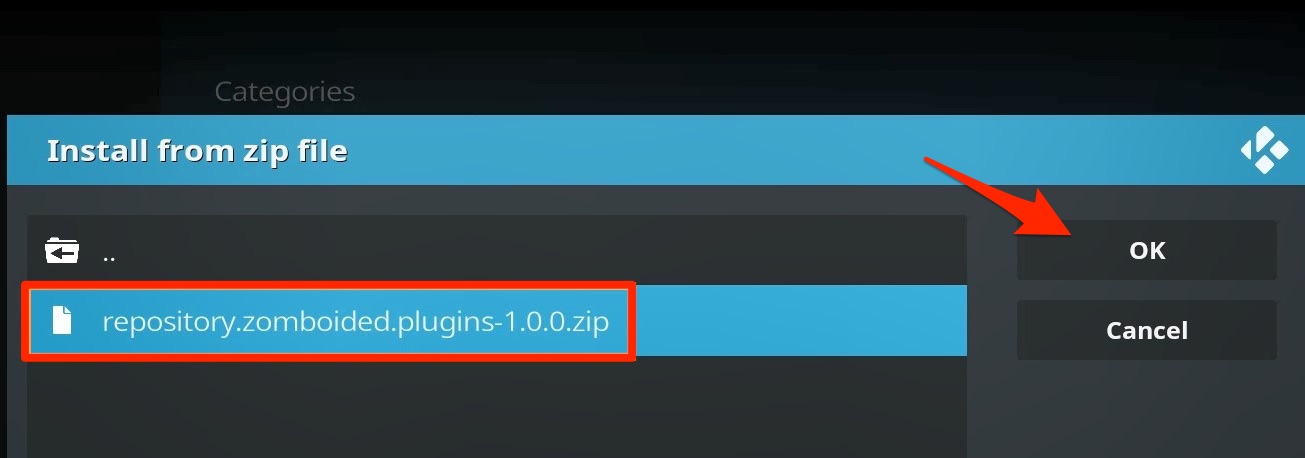
22. Select the Zomboided Repository ZIP file here and hit the 'OK' button.

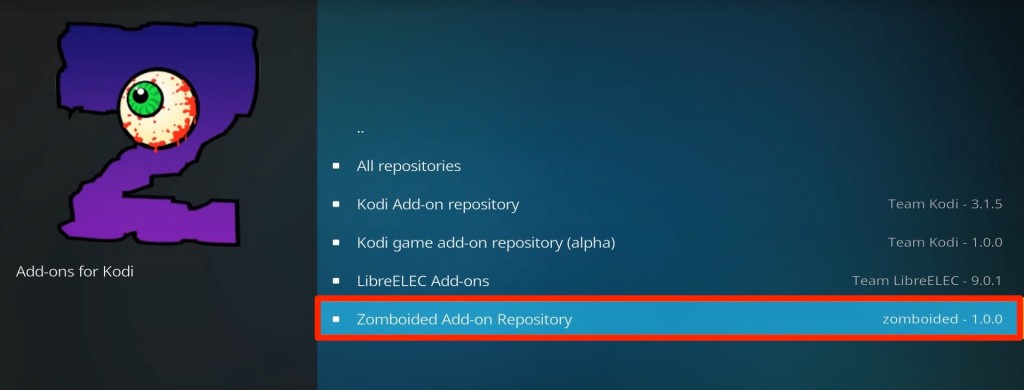
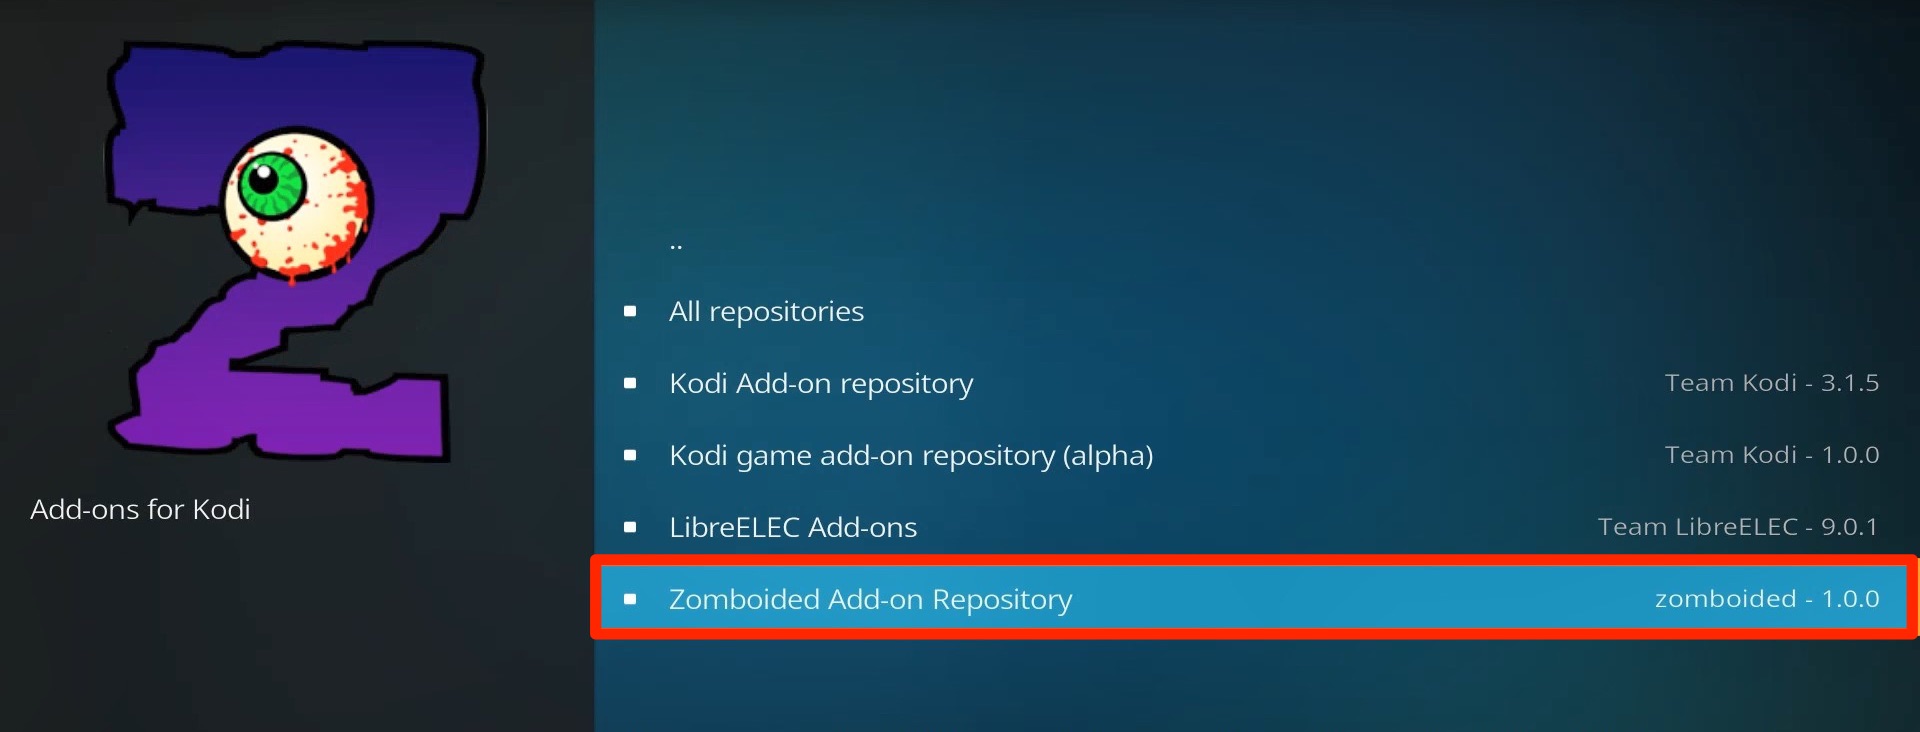
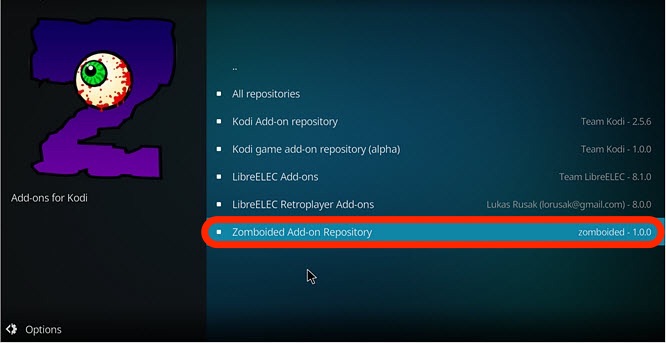
23. Now, go back to Add-ons, and choose 'My Add-ons' followed by Zomboided Repository.
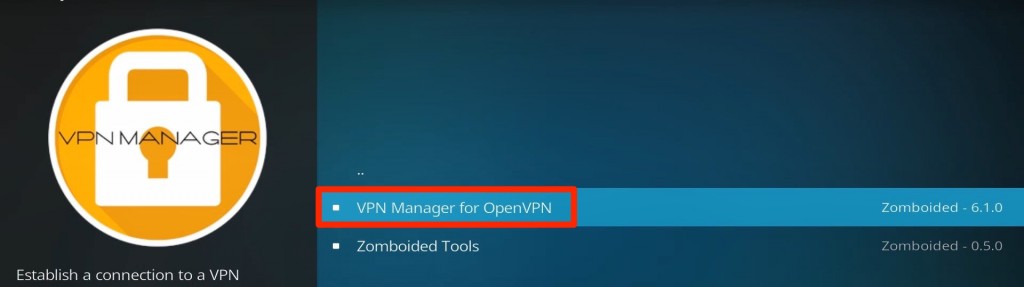
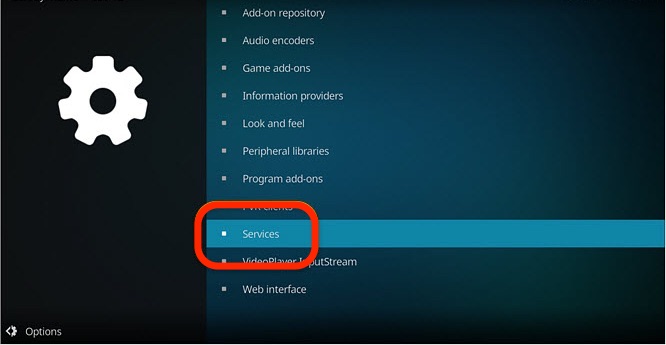
24. Next, click 'Services' and choose 'VPN Manager for OpenVPN' from the appearing list.

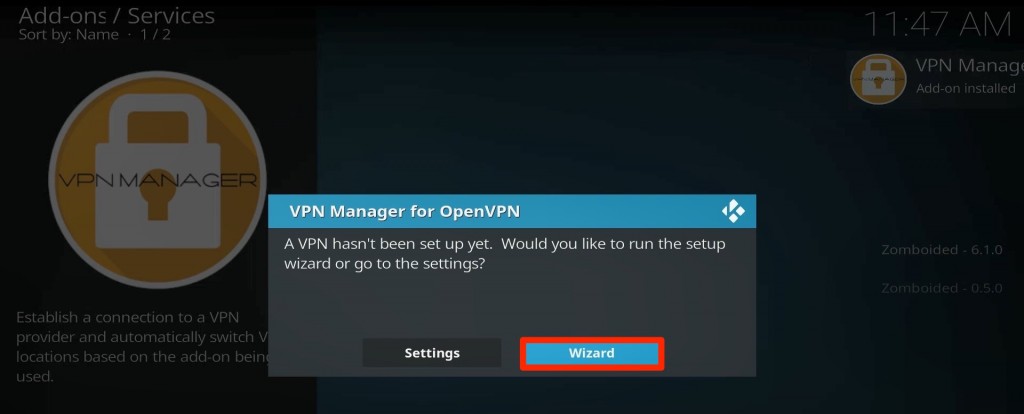
25. Once done, hit the INSTALL button. As soon as the installation process ends, the VPN Manager Setup Wizard will appear.

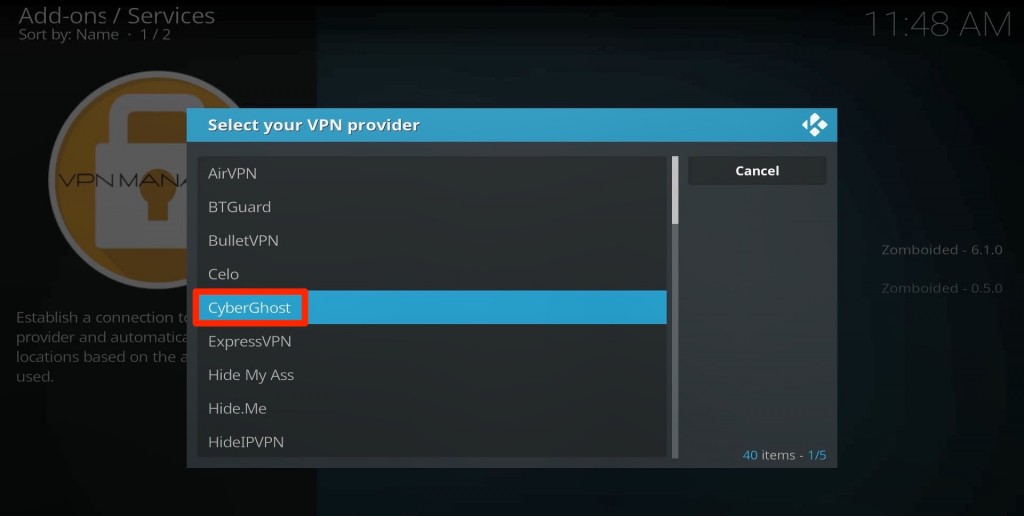
26. Click 'Wizard,' then choose 'CyberGhost' as the VPN provider to proceed.
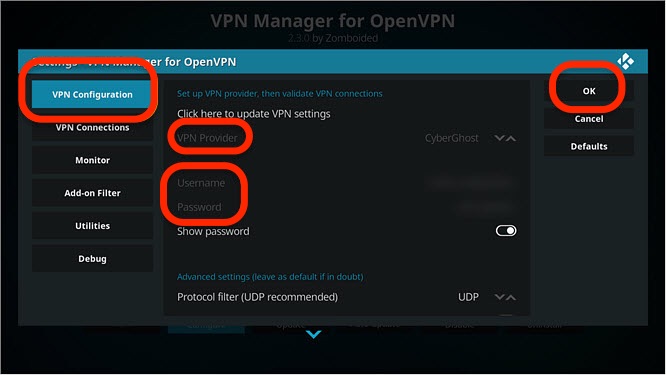
27. On the next screen, enter your Username and password (the ones you obtained from your online account dashboard) and hit 'OK' after each input.
28. Now, you'll be asked whether you would like to launch the VPN at startup or manually; choose Yes or No as you want.
29. Next, another notification will pop up, asking to establish a connection. Click 'Ok.'
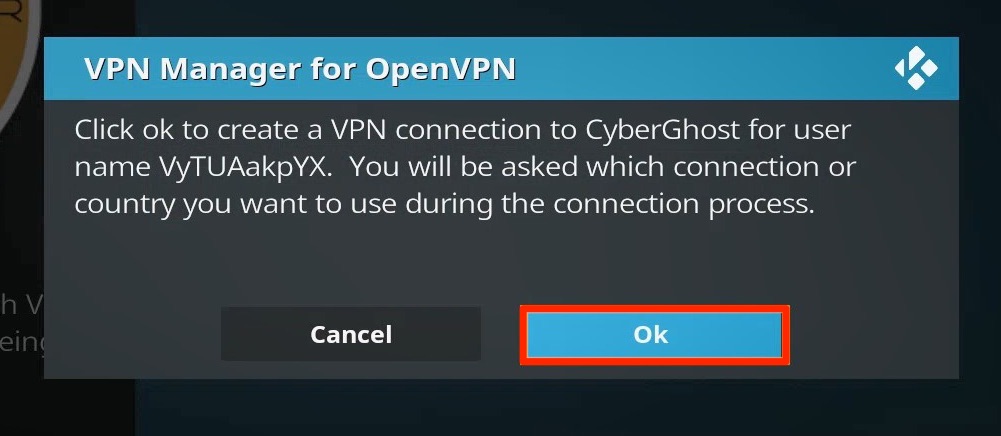
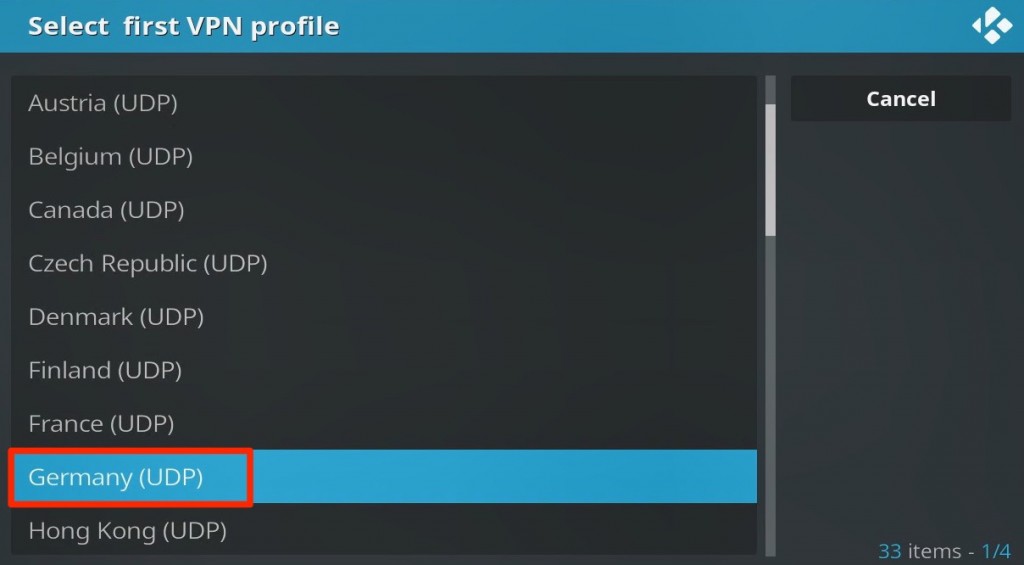
30. After that, choose your desired country from the appearing list.

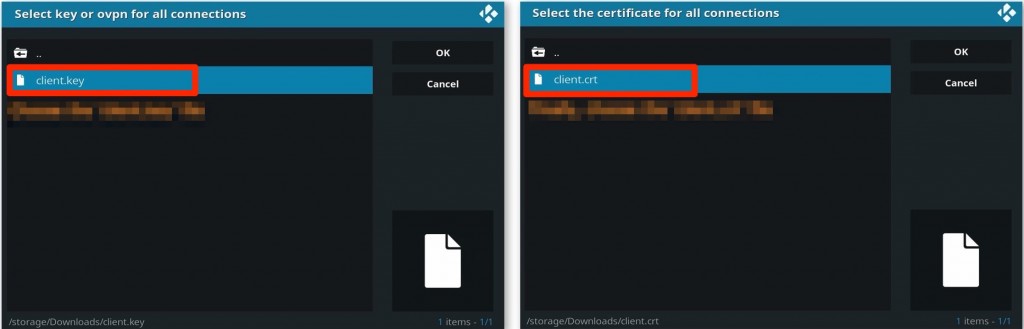
31. Then, you'll be asked to upload your client.key and client.crt files.

32. When done, the VPN manager will automatically connect you to your selected location.
Set Up CyberGhost VPN on OpenELEC
If you use OpenELEC 6, you'll go for a third-party OpenVPN Kodi add-on to set up CyberGhost. You'll gather all the info from CyberGhost's website, so you'll need a computer to start this process, which looks like this:
1. Sign up for CyberGhost using your computer and your favorite Web browser.
2. Now, visit CyberGhost's official website and click 'My Account' from the top-right corner.
3. Enter your username and password on the next screen and hit the 'Log in' button.
4. Move to 'Routers or other devices' and hit the 'Configure' button.
5. Next, fill in the details as mentioned below and then hit the 'Save Configuration' button:
- PROTOCOL: OpenVPN
- COUNTRY: Your preferred location.
- SERVER GROUP: OpenVPN via UDP or TCP.
- DEVICE NAME: Enter OpenELEC OpenVPN.
- EXTRA FEATURES: Tick off the boxes.

6. You'll be redirected to the Manage Devices page now. Find 'Routers or other devices' and click the 'View' button.

7. On the next page, your username, password, and server group will be previewed; take note of them and click 'Download Configuration.'
8. Now, a .zip file will download. Unzip it to get the below files:
- client.key: Private key
- ca.crt: Certificate from certification authority
- client.crt: User certification
- openvpn.ovpn: OpenVPN configuration
9. Next, you need to install OpenVPN on your OpenELEC. For that, click on System, then navigate to Addons and select Search.
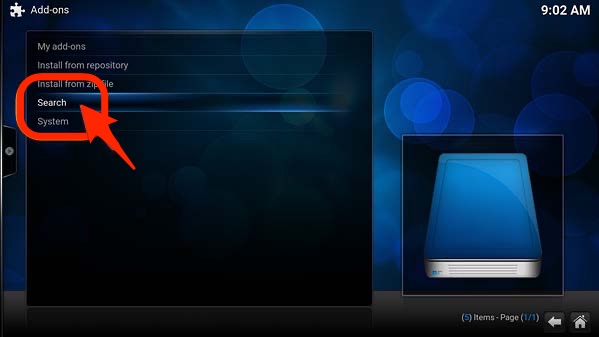
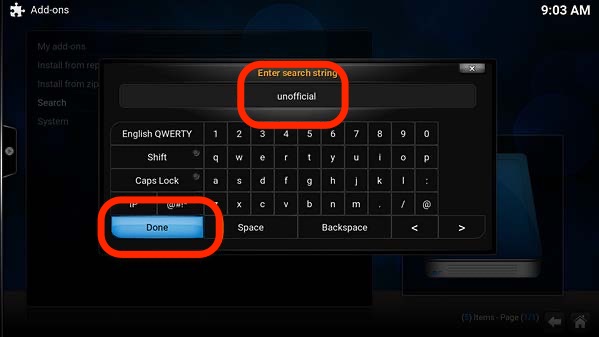
10. Type Unofficial in the search field and click Done.
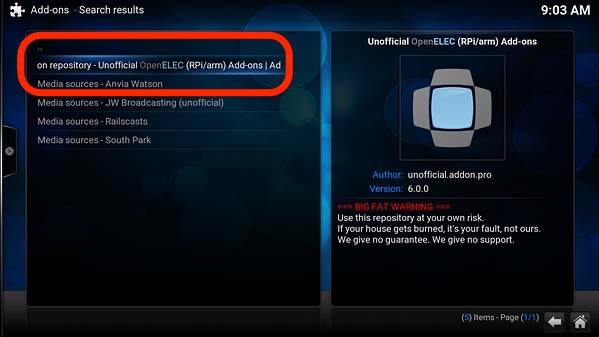
11. Now, double-click on the repository entry to open it.
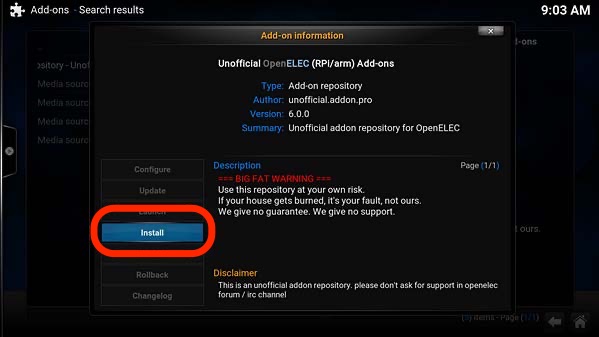
12. Hit the 'Install' button on the next screen.
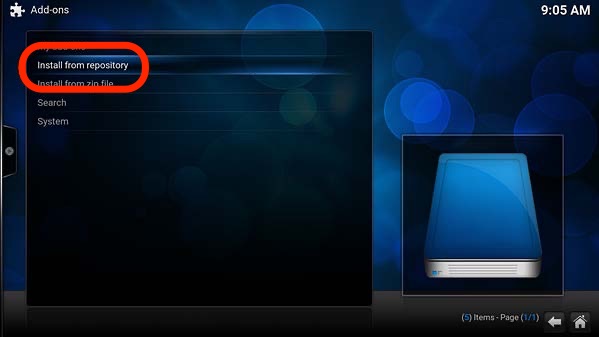
13. Once done, navigate to My Add-ons and click the 'Install from repository' option.
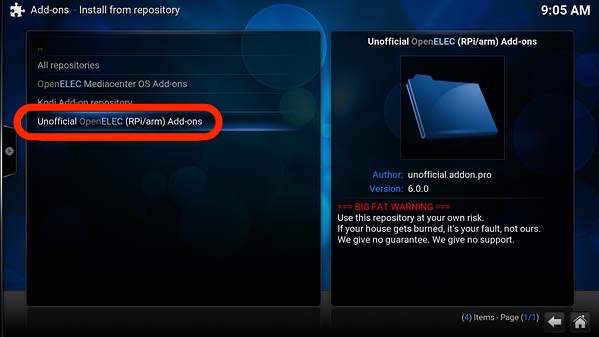
14. Next, choose 'Unofficial OpenELEC Add-ons.'
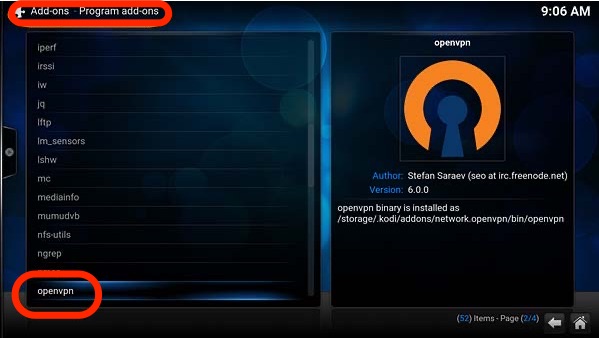
15. Then, move to Program add-ons and install openvpn.
16. Once done, you need to get the VPN Manager for OpenVPN. To do so, click here and download the complete repository.
17. Unzip the file and save it in the location where you saved the certificate and user key.
18. Next, copy all the files to your device. For that, use an FTP client like Filezilla.
19. First, check your OpenELEC network IP address by following the path: System > System info > Summary > IP address
20. Now, start Filezilla by first clicking 'File,' then 'Server manager,' and configure a new connection as mentioned below:
- Server: Enter the network IP address of your device.
- Protocol: SFTP
- Connection type: Normal
- User name: root
- Password: openelec
21. Next, hit the 'Connect' button to proceed.
22. Once you do so, Filezilla will upload the files inside the storage folder.
23. Create a new folder here; name it 'VPN'. Now, open this folder and copy all the files like client.crt, client.key, repository into it.
24. When done, go to My add-ons and click 'Install from the .zip file.'
25. From the results, find the path where you've copied the previous files, mark it, and click 'OK.'
26. Once the repository is installed, click the 'Install from repository' option and choose Zomboided Add-on Repository.
27. Click the Services button next and move to VPN Manager for OpenVPN.
28. Finally, hit the Install button and locate My add-ons next.
29. Now, find and click Services from the list.
30. Open the VPN Manager for OpenVPN next and hit the Configure button.
31. Next, click the VPN Configuration tab and set your VPN Provider as CyberGhost.
32. Enter your Username and Password next, and hit the OK button.
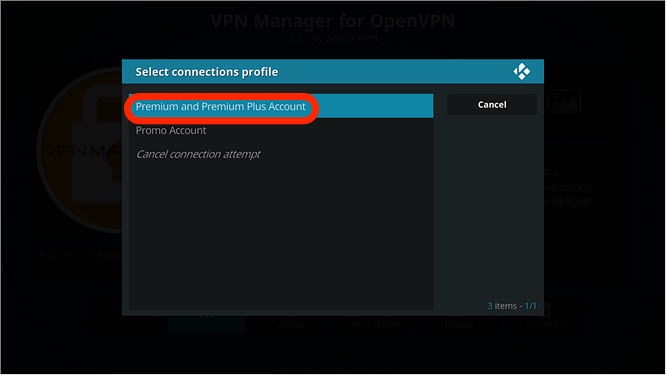
33. On the next screen, select your subscription type from the appearing options.
34. Now, a notification will pop up, click OK.
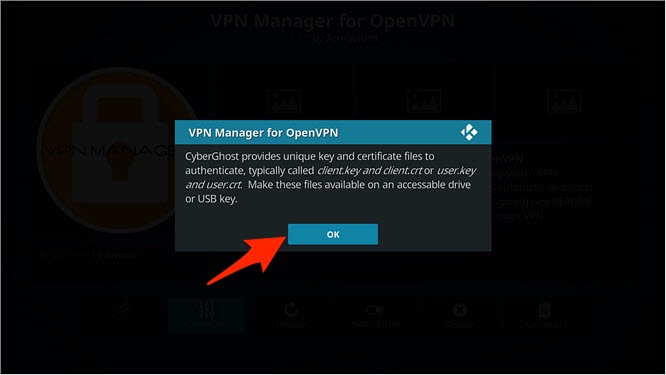
35. On the final screen, upload the client.crt and client.key file. As soon as you do so, the VPN manager will connect you to the internet securely.
Final Thoughts
Setting up CyberGhost VPN on LibreELEC and OpenELEC isn't the quickest process. However, once you set it up, CyberGhost will always work in the background, allowing you to unblock Kodi add-ons, anonymize your traffic, and bypass bandwidth throttling - all you need for a pleasurable experience.
Don't forget that you'll get 7 simultaneous connections, though. So, after installing the VPN on LibreELEC or OpenELEC, why not try it on other devices? Our central guide on how to set up CyberGhost will help you with that.
That's all for our guide on how to set up CyberGhost VPN on LibreELEC and OpenELEC. If you have any questions, let us know in the comments section below. Thanks for reading!
Related