
How to back up an iPhone, iPad or iPod Touch using iTunes or iCloud
Last updated June 16, 2021
Taking a backup of your data is more advisable and worth enough to recover your information like photos, videos, messages, health data, documents, accessory setups, settings and much more even when they are broken or lost. In case, if you have lost your iPhone, iPad or iPod Touch data, you can make use of this backup to restore your information back on your iPhone. You can either backup your data manually or automatically. Once you enable the backup settings, your data will be stored automatically once in a week or month. Else, you can replace the method by adopting the manual process.
Do you wish to have a copy of your data on your iPhone, iPad or iPod Touch? Well, you can do that using an iCloud or iTunes. It depends on you. Your data is more important and you don't want to lose them anymore for any cause. The best way to secure your data is to take a copy of your data (i.e. backup) frequently to never lose any information that is updated on your device. If you failed to take a backup of your iPhone or iPad device, then you might lose all your confidential information. You can't restore them anyway rather than having a backup file.
It is possible for you to take a regular backup either using iCloud or iTunes. Below, you can find the topics with complete guide.
- How to backup your iPhone or iPad or iPod Touch using iCloud
- How to backup your iPhone or iPad or iPod Touch using iTunes
Before backing up your device data using iCloud and iTunes, you need to know the difference between making backups with iCloud and iTunes.
How to back up your iPhone or iPad or iPod Touch using iCloud
Taking a backup in iCloud is bit more advantage. They offer you 5GB for free and extends up to 2TB of storage for the premium user. The plan starts at 50GB for $0.99, 200GB ($2.99), 1TB ($9.99) and 2TB ($19.99). iCloud allows you to encrypt your backups after the creation. By connecting to Wi-Fi, you can create and use your backups anywhere around the world.
To back up with iCloud, you don't need to plug your device into a computer or Mac instead you need to have a Wi-Fi. To access iCloud, you need to have an account. If you don't have one, then create a new account and sign in using your private password.
You will have everything on your iCloud backups expect those that I mentioned below:
- Touch ID settings.
- Apple Pay information and settings.
- Data stored in other cloud services, like Gmail and Exchange mail.
- Data that's already stored in iCloud, like Contacts, Calendars, Notes, My Photo Stream, and iCloud Photo Library.
- iCloud Music Library and App Store content (If it's still available in the iTunes, App, or iBooks Store, you can tap to re-download your already purchased content.)
You can setup a backup process with iCloud either of these methods.
- How to enable automatic iCloud backup on your iPhone or iPad or iPod Touch
- How to manually take a backup of your iPhone or iPad using an iCloud
How to enable automatic iCloud backup on your iPhone or iPad or iPod Touch
If you are new to this iCloud backup and it is the first time you do this process, then you will have to wait for a while to complete your backup process. But if you do next time, iCloud will only upload the data that is newly added or updated and this makes the process much faster than the first.

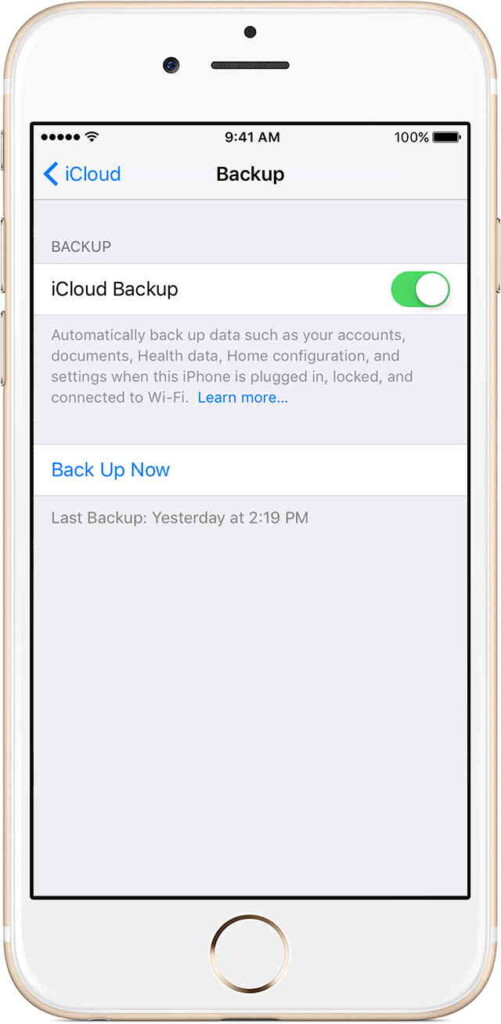
- Go to Settings on your iPhone or iPad or iPod Touch.
- Select iCloud.
- Scroll down and tap on Backup. Make sure you are connected to Wi-Fi network.
- Enable the iCloud Backup by moving the slider to the right.
- By enabling this automatic backup process, you will be warned that your iPhone will no longer back up to your computer automatically. Tap on OK.
Note: If you are having too many backup files, then you can delete the older iPhone file that isn't needed anymore.
How to manually take a backup of your iPhone or iPad using an iCloud
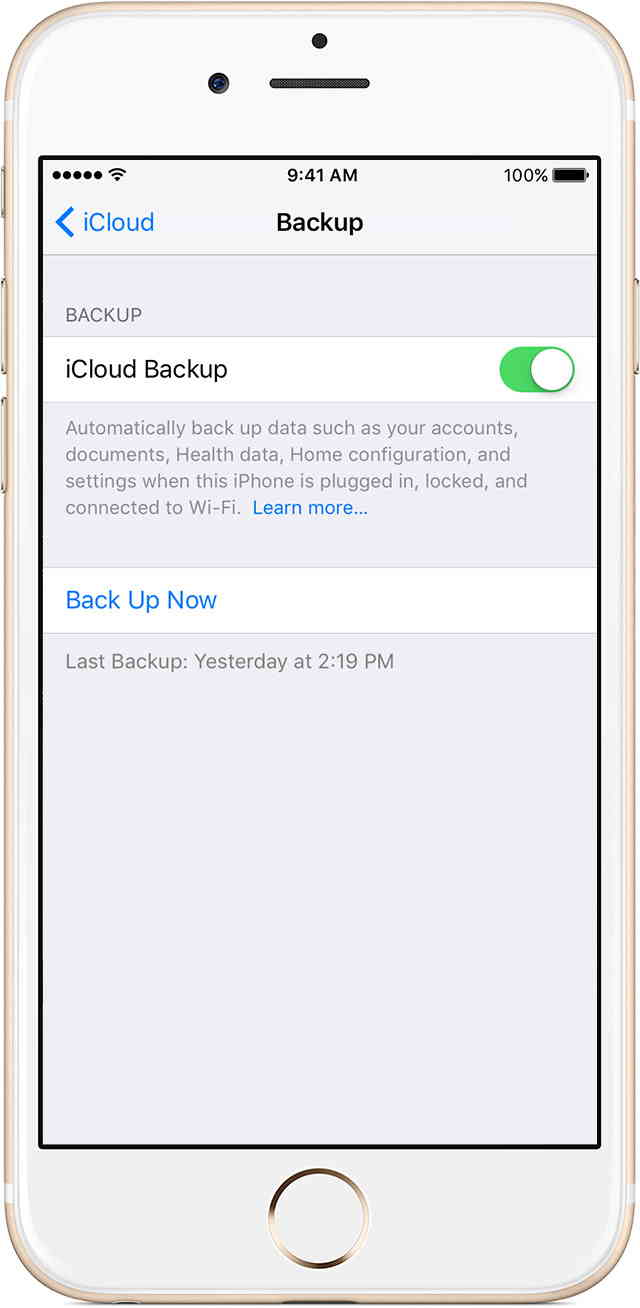
- Before getting started, connect your device to a Wi-Fi network.
- Go to Settings on your iPhone or iPad or iPod Touch.
- Tap on iCloud.
- Select Backup option.
- Then tap on Back Up Now.
By doing this action, your data will get stored immediately on your backup history where you can restore them back at any cause.
How to back up your iPhone or iPad or iPod Touch using iTunes

With iTunes, you can store backups on your Mac or Windows PC and the storage space depends on your device's available space. By default, they offer encrypted backups and lets you create and use backups from your Mac or PC anytime around the world.
The backup data excludes certain information from your iPhone 7/7 Plus/6/6s/5/5s/SE/4/4S or iPad or iPod Touch while on the process.
An iTunes backup doesn't include:
- Touch ID settings.
- Unless you do an encrypted backup method in iTunes, you can't backup things like Health, Activity, and Keychain data.
- Apple Pay information and settings.
- Photos stored in the cloud, iCloud Photo Library and like my Photo Stream.
- Content synced from iTunes, like imported MP3s or CDs, videos, books, and photos
- Content from the iTunes and App Stores or PDFs downloaded directly to iBooks (You can back up this content using Transfer Purchases in iTunes.)
Steps to back up your data with iTunes
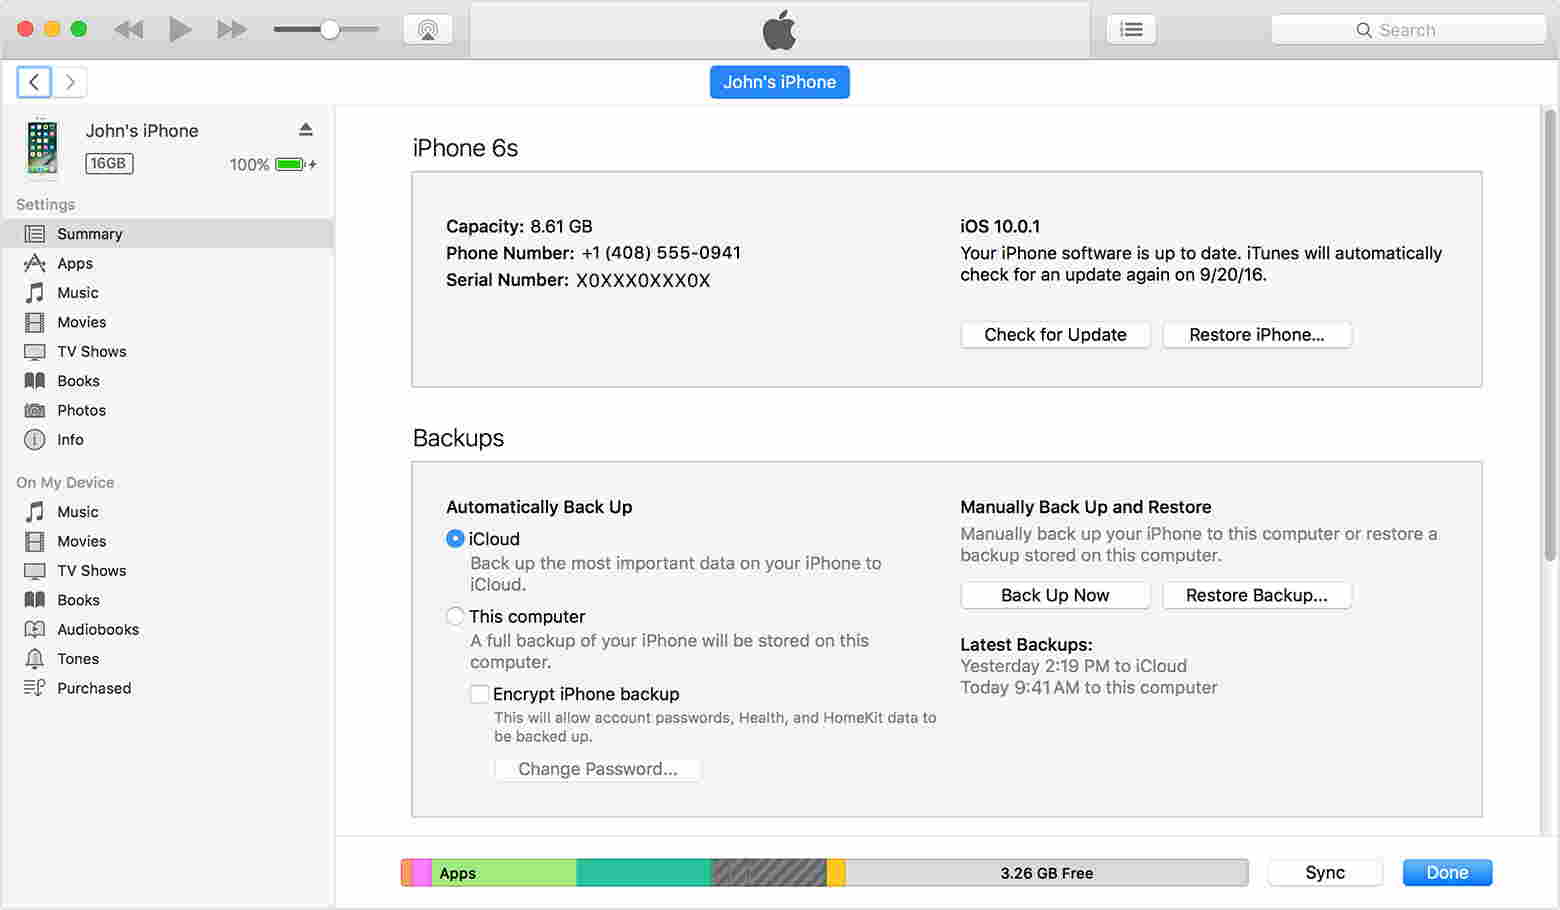
- Launch iTunes and connect your iPhone or iPad or iPod Touch to your computer.
- Select your device when it appears in iTunes. If your connected device isn't recognized by iTunes, get help.
- Now, select the specific file that you want to be on your backups or take a complete backup.
- But iTunes backup may exclude some data like Health and Activity data from your iOS device or Apple Watch. But, it is possible only if you encrypt your backup. Select the box called Encrypt [device] backup and create a memorable password. If you forgot your password, then you can't recover your iTunes backup. Be cautious.
- In case, If you don't need to save your Health and Activity data, you can make a backup that isn't encrypted. Just click Back Up Now.
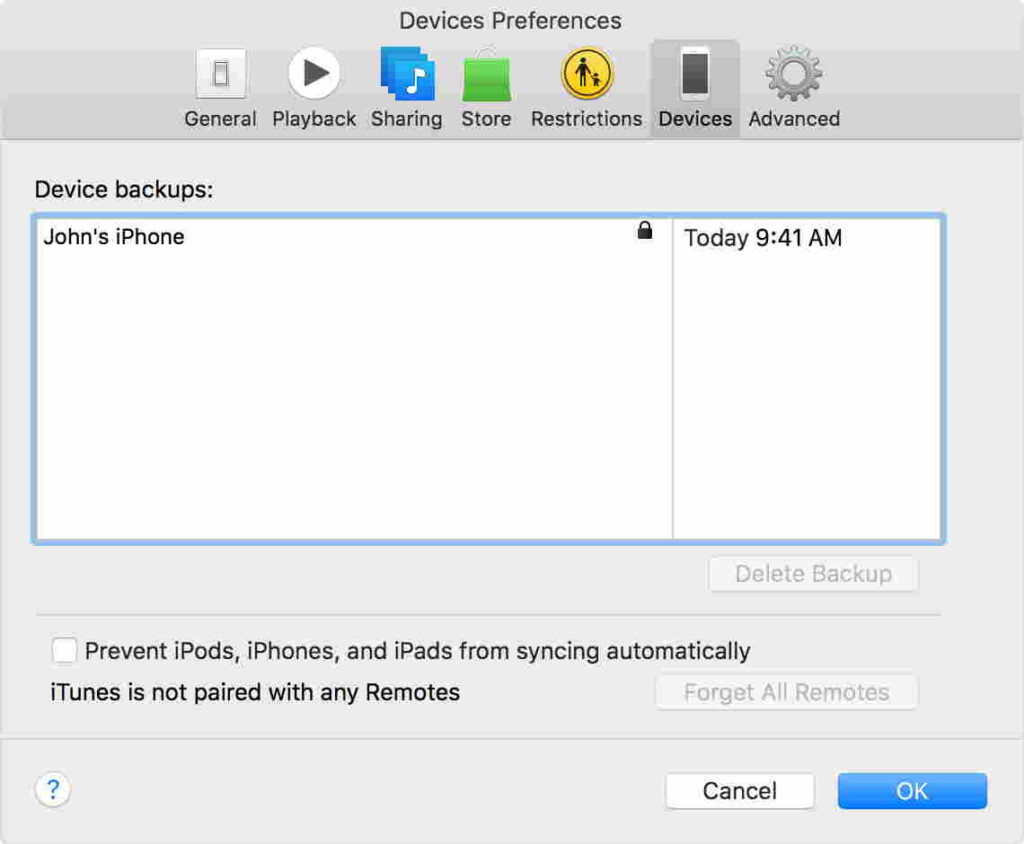
- Once the backup process completes, go to iTunes Preferences > Devices to check the updated backups with their creation date and time.

Once after completing the backup process, you can transfer your data to any devices like Android, iOS (iPhone, iPad, iPod Touch) and other smartphones. If you need an assistant, get help here.
- How to transfer data from iPhone to iPhone
- How to transfer data from iPhone to iPad
- How to transfer data from Android to iPhone
If your iCloud backup and iTunes backup couldn't be completed or you can't store from a backup, follow the article to make an iTunes and iCloud backup works better.
Related


Get expert insights on threats, breaches, scams, and security trends — delivered every Monday.
Most Popular

Get expert insights on threats, breaches, scams, and security trends — delivered every Monday.
Most Popular