When you purchase through links on our site, we may earn an affiliate commission. Here’s how it works.
How to Set Up and Use CyberGhost VPN on PlayStation
Last updated June 17, 2024


If you're a frequent gamer, setting up a VPN connection on your PlayStation gives you many benefits, like lower pings, bot lobbies, and more. It is also important for security because you never know when you will become a victim of swatting or a DDoS attack. Unfortunately, PlayStation doesn't support VPN clients natively. Hence, you can't directly install CyberGhost VPN on your PS4 or PS5.
Instead, you'll have to use workarounds like using the CyberGhost Smart DNS feature, installing the VPN on your router, or sharing the VPN's connection from a Windows PC. Among these, the router setup is the most recommended method because it provides full encryption, unlike Smart DNS, which only masks your IP address.
In this article, we'll teach you how to set up and configure CyberGhost VPN on your PlayStation.
How to Set Up CyberGhost VPN on PlayStation
You can set up CyberGhost VPN on PlayStation 4 and 5 by setting up its DNS servers in your device's settings. Alternatively, you can also install CyberGhost on your router or share its connection from your PC and then connect the PlayStation to this VPN-enabled Wi-Fi. Let's look at all these methods in detail.
Method #1: Setting up CyberGhost on Playstation 4 With Smart DNS
To set up CyberGhost's Smart DNS on PlayStation, just access the VPN account dashboard, copy the DNS addresses, and update them in your PlayStation settings. Here's a step-by-step guide.
1. Sign up for CyberGhost VPN from your computer.
2. Open your CyberGhost VPN's account dashboard on its website.
3. Click on 'Smart DNS' from the left bar and choose 'Enable Smart DNS on the right.'

4. Note your Primary and Secondary DNS addresses for your chosen location.
5. Next, turn on your PlayStation and move to the main menu from the top of your screen.
6. Choose Settings and navigate to Network.
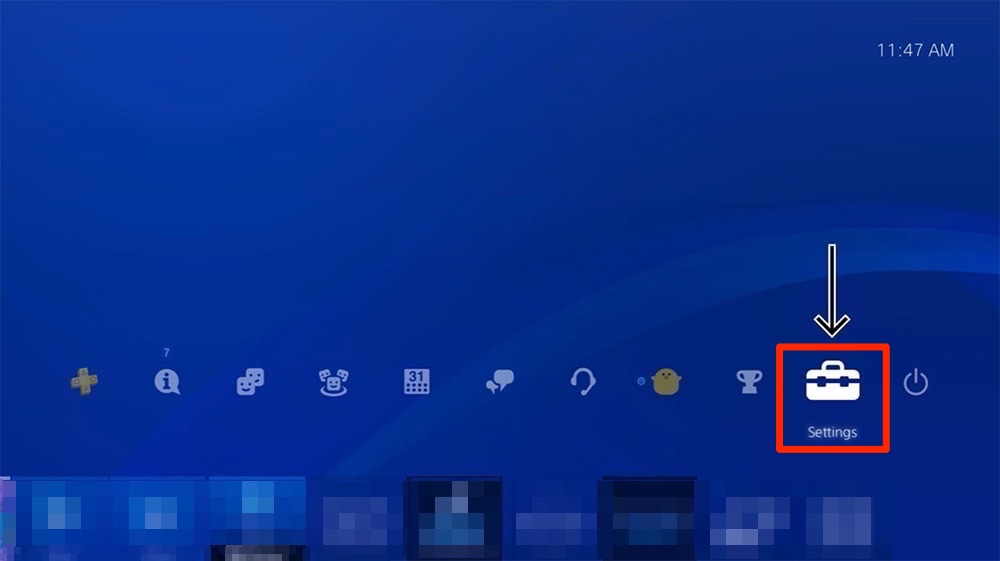
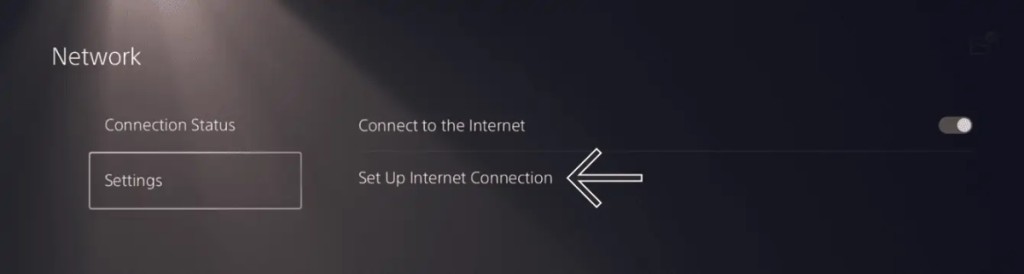
7. On this page, select Set Up Internet Connection.
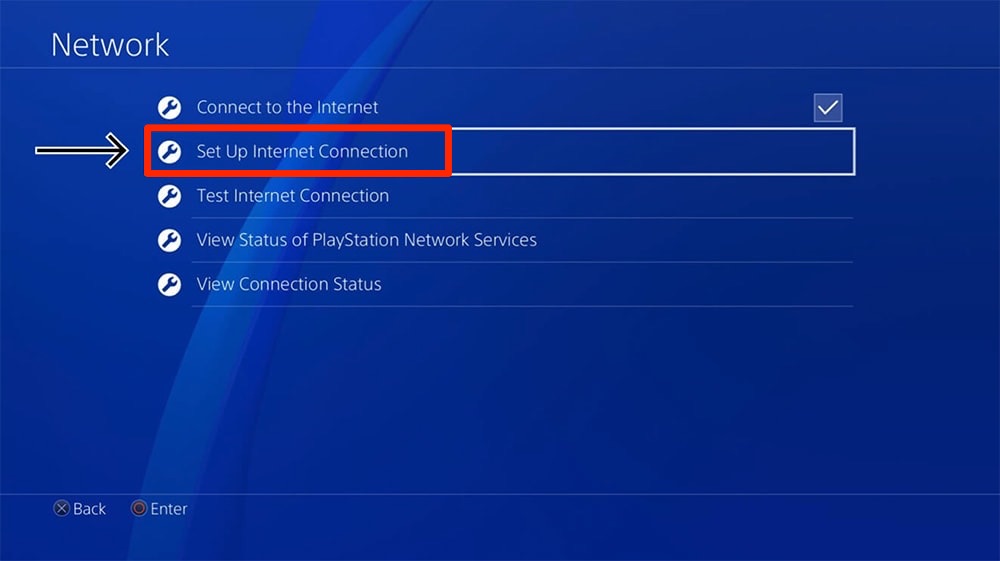
8. Pick 'Use Wi-Fi' when asked how to connect to the Internet.
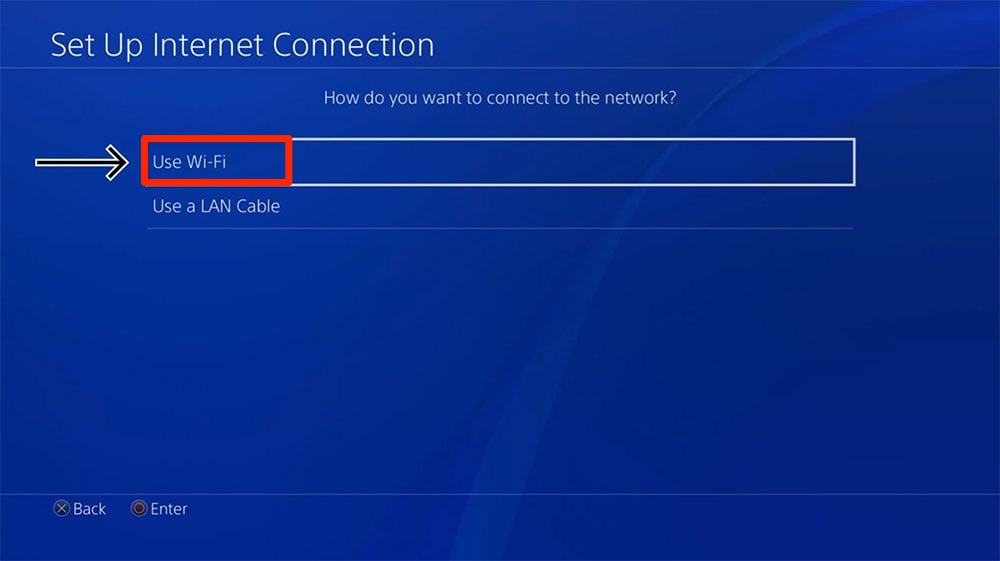
9. You'll be asked to use your existing Wi-Fi settings at this point; click Yes.
10. Next, choose Custom when you're asked, 'How do you want to set-up the Internet Connection?'
11. Choose the current Wi-Fi you're using and provide your password.
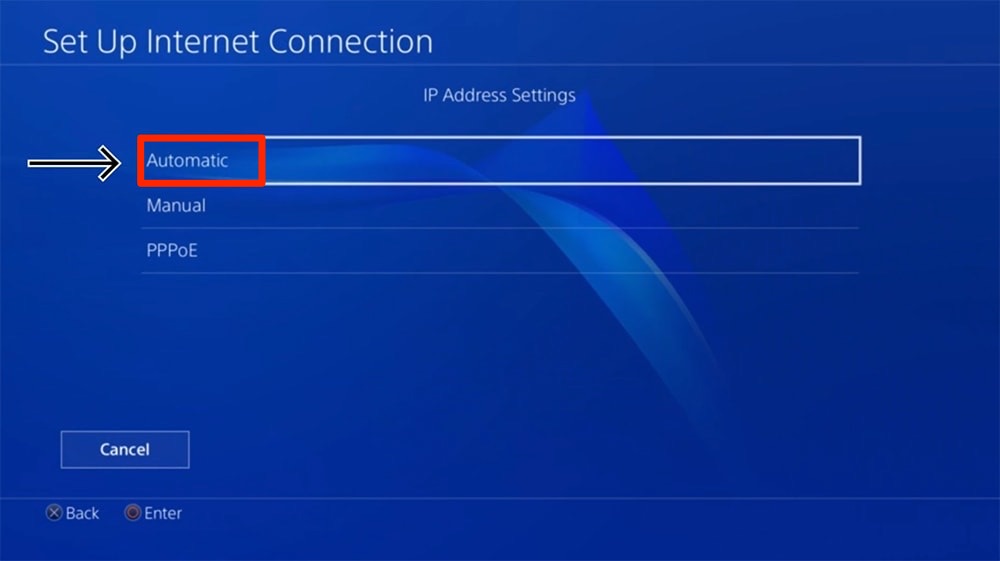
12. The IP Address Settings sub-menu will open, where you need to select 'Automatic' from the list.
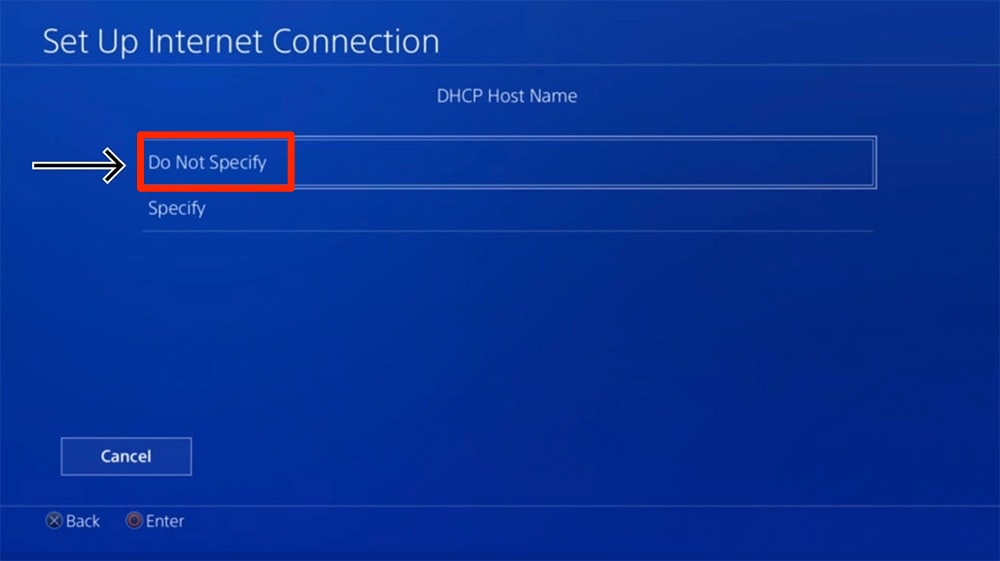
13. On the next screen, choose Do Not Specify under DHCP Host Name.
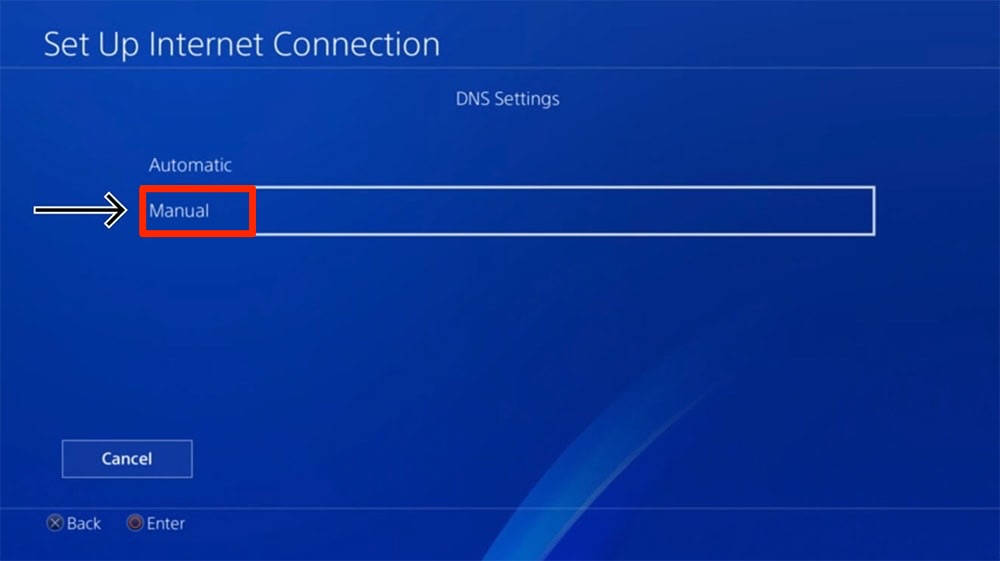
14. Now, select 'Manual' on the 'DNS Settings' screen.
15. Then, the Primary and Secondary DNS screen will appear.
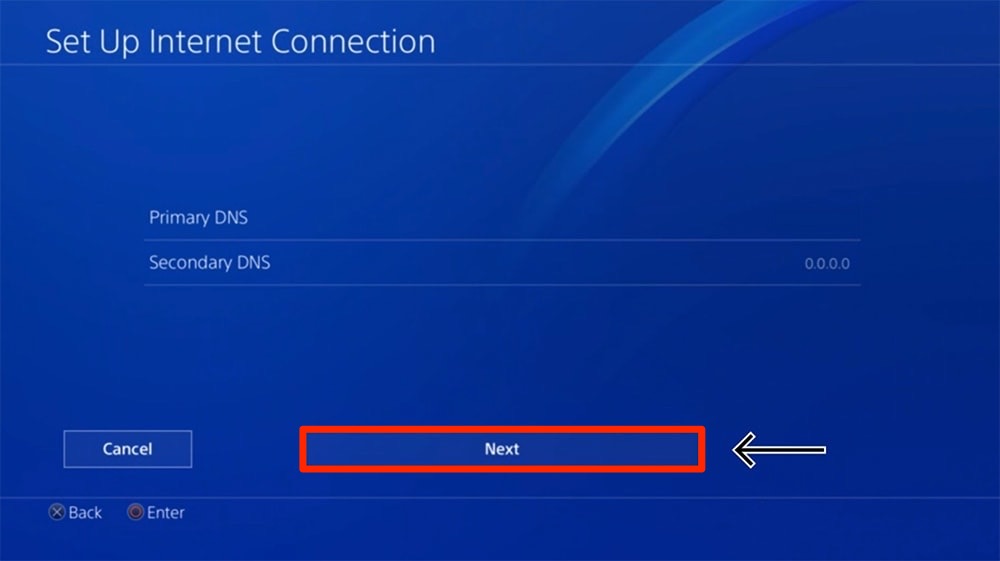
16. Here, you need to change the 'Primary DNS' with the DNS address from your CyberGhost account.
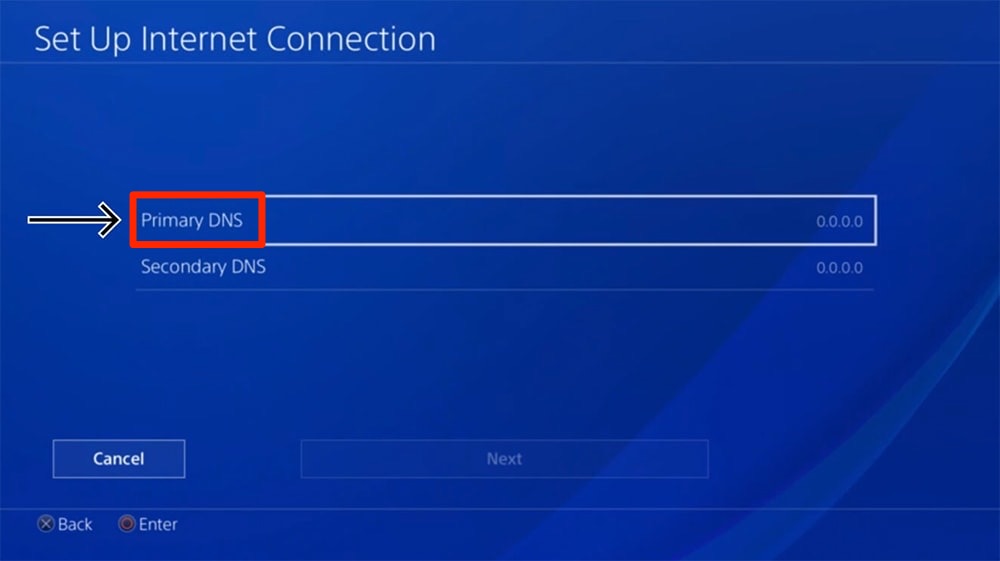
17. Once done, click the 'Next' button.
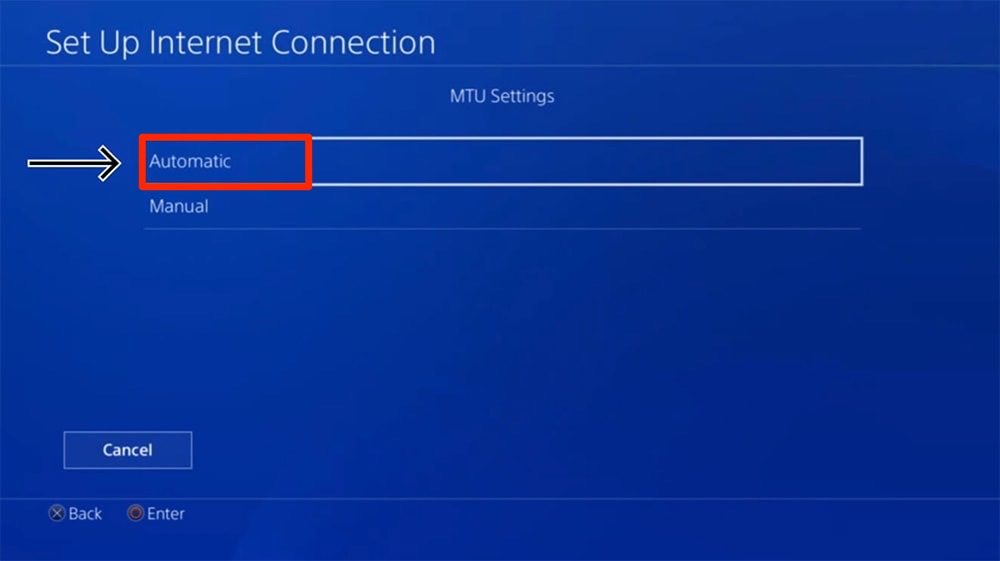
18. Next, the MTU Settings screen will appear; choose 'Automatic.'
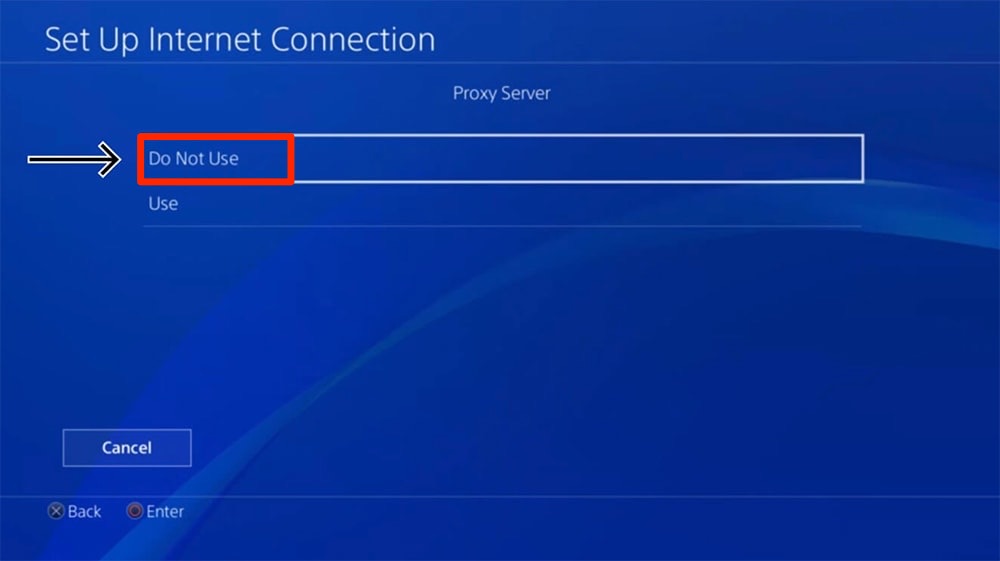
19. Under Proxy Server, pick 'Do Not Use.'
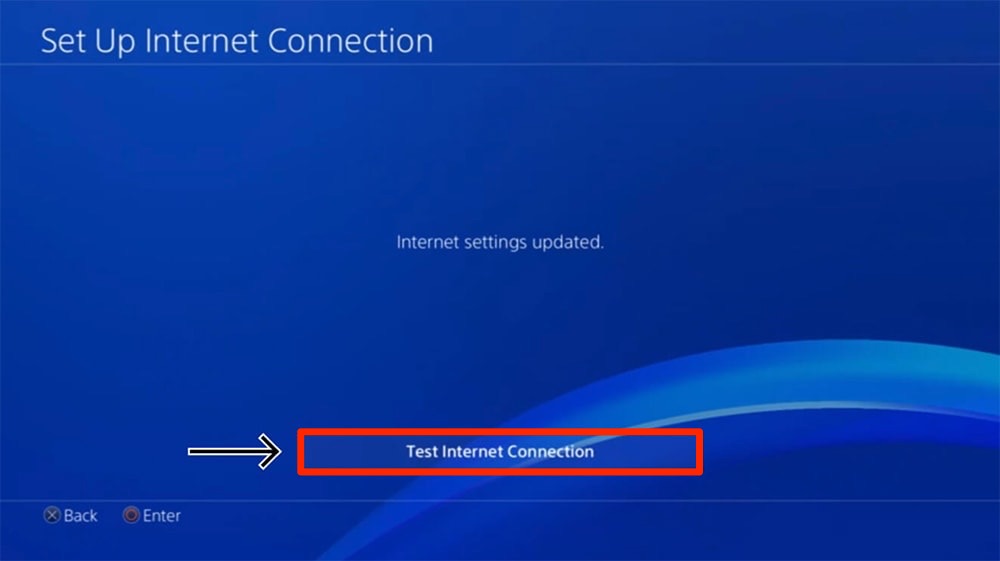
20. Now, you'll receive a message, 'Internet settings updated.'
21. Hit the 'Test Internet Connection' button and restart your PlayStation.
Method #2: Setting up CyberGhost VPN on a PlayStation 5
You can also set up CyberGhost VPN on a PlayStation 5 by using its smart DNS feature, which will reroute your traffic through a DNS proxy server. Here is a step-by-step guide.
1. Subscribe to CyberGhost VPN using a computer and a Web browser.
2. Go to your CyberGhost VPN's account dashboard.
3. Choose 'Smart DNS' from the left bar and then click on 'Enable Smart DNS on the right.'
4. Note your Primary and Secondary DNS addresses for your chosen location.
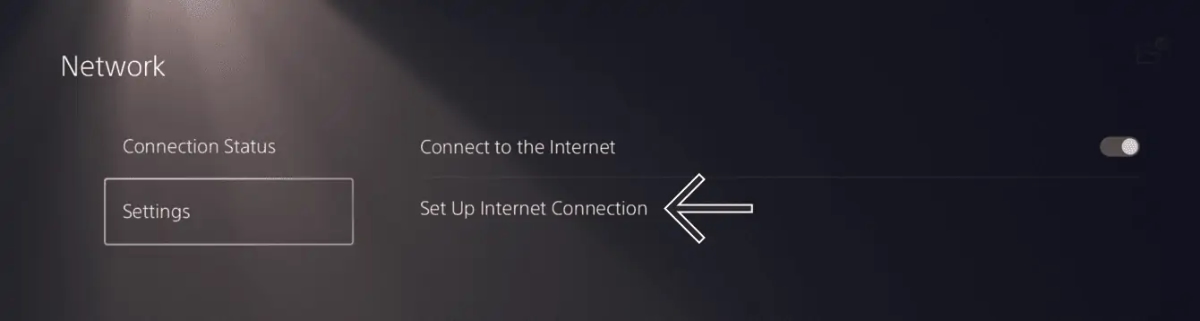
5. On your PS5, navigate to 'Settings' > 'Network' > 'Settings' > 'Set Up Internet Connection.'
6. Choose the currently active network.
7. Go to ‘Advanced Settings’ > ‘DNS Settings’ > ‘Manual.’
8. Click on 'Automatic' (IP Address Settings) > 'Don't Use' (Proxy Server) > 'Don't Specify' (DHCP Host).
9. Enter the primary and secondary DNS addresses copied earlier.
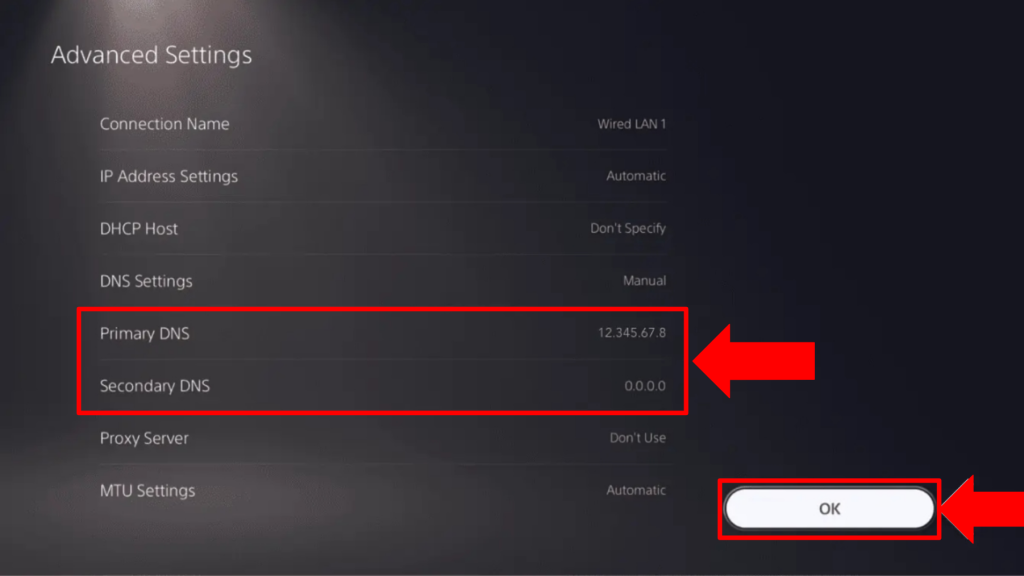

10. Click 'OK' and restart your PlayStation 5 to enable the new DNS settings.
Method #3: Setting up CyberGhost VPN on a Router
To set up CyberGhost VPN on a router, you need to download its OpenVPN config files from the account dashboard and then upload them to your router's control panel. Let's look at the steps involved.
1. Subscribe to CyberGhost VPN using a Web browser and any Internet-connected device.
2. Open your CyberGhost VPN's account login page and enter your Username and Password.
3. Head to your account dashboard and choose 'VPN' > 'Configure Device' under Manual Setup.
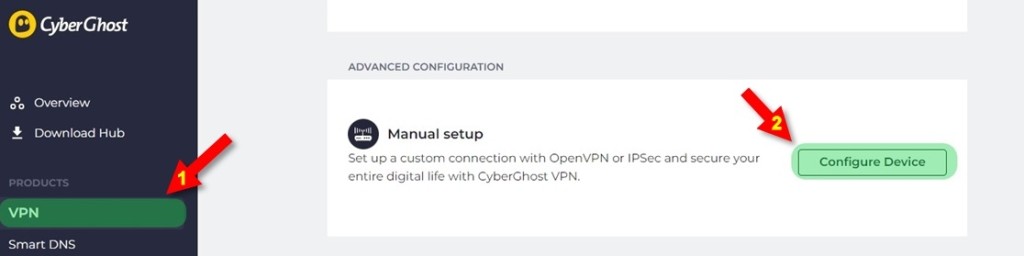

4. Click on the 'Configure' button.
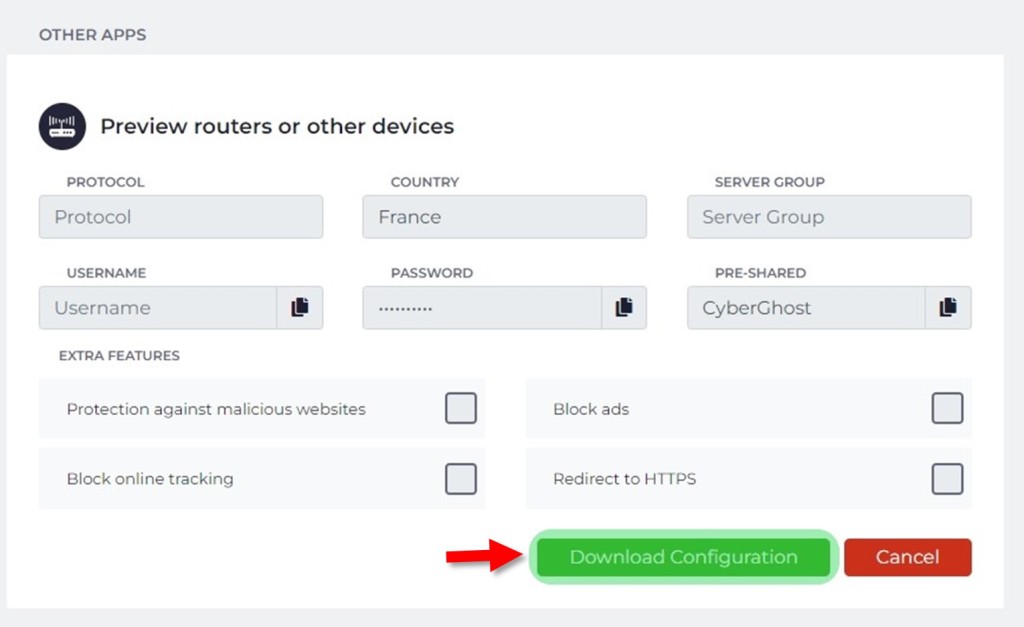
5. Now, fill in the below details as mentioned:
- PROTOCOL - OpenVPN 2.3 or OpenVPN TCP 2.3
- COUNTRY - Select your preferred location
- SERVER GROUP - Choose the available server group (UDP/TCP)
- DEVICE NAME - OpenVPN NAS Synology
- EXTRA FEATURES - Tick all the boxes
6. Click on the 'Save Configuration' button.

7. You'll be redirected to Manage Devices, where you can click on 'View' under 'Router or other devices.'
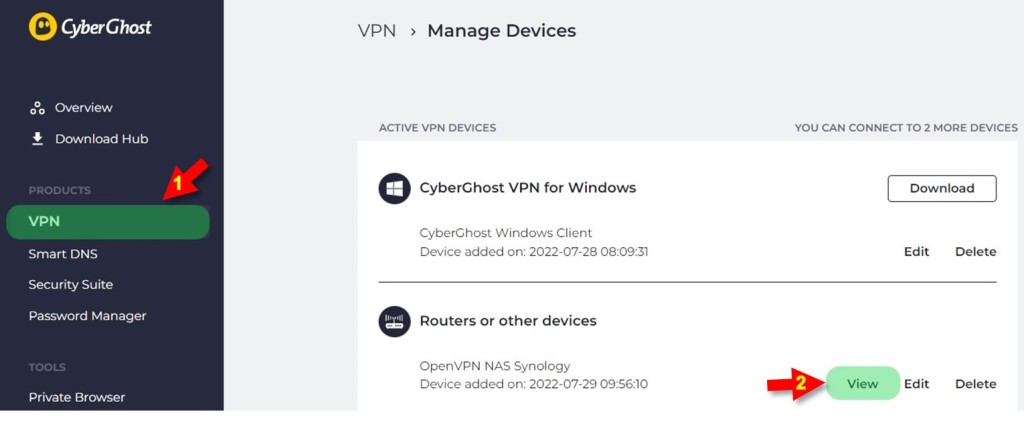

8. Note down your OpenVPN credentials for future use.
9. Now, hit the 'Download Configuration' button.
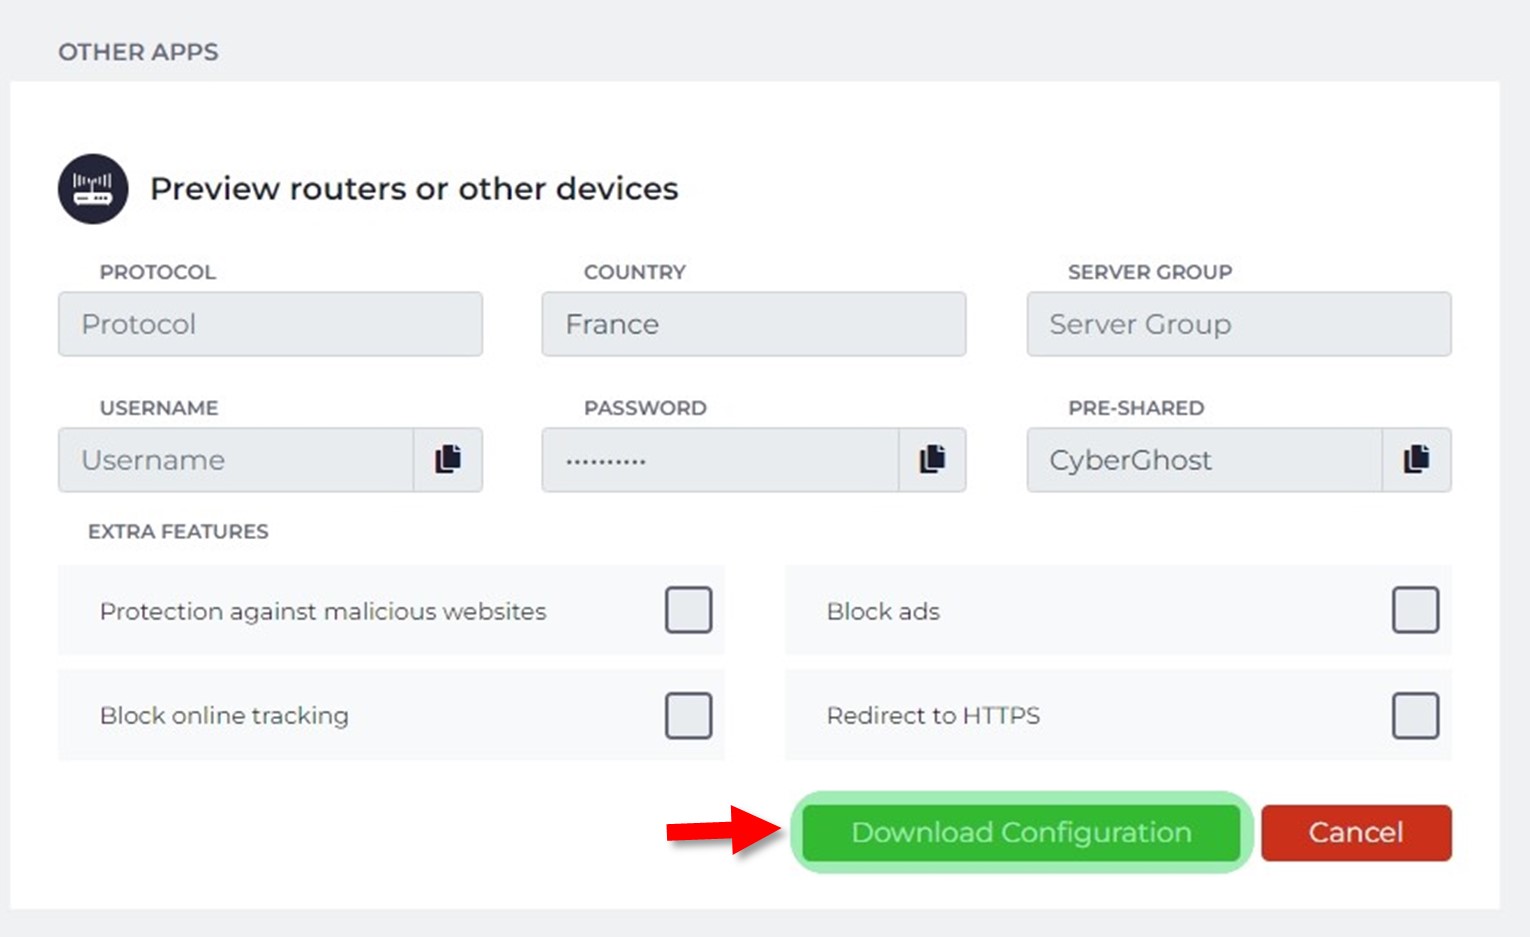
10. A .zip file will now be downloaded to your system.
11. Extract the file to get the documents below:
- ca.crt - Server security certificate
- client.crt - Client safety certificate
- client.key - Key file
- openvpn.ovpn - OpenVPN configuration file
12. Add this information to your router's settings (this will vary based on your router's make and model)
13. Once CyberGhots is set up on your router, connect your PlayStation to its VPN-enabled Wi-Fi.
14. That's it! PlayStation will now use a connection protected by CyberGhost VPN.
For more information and exact instructions based on your router's model, see our complete guide on how to set up CyberGhost VPN on routers.
Method #4: Sharing a VPN Connection From Windows
In this method, you can turn your PC into a virtual router and share a CyberGhost VPN connection with your PlayStation device. However, you'll have to turn your PC on every time you want to use the VPN on PlayStation. Here are the steps for it.
1. Subscribe to CyberGhost VPN from your computer.
2. Download and install CyberGhost VPN on your device.
3. Sign in and connect to your preferred server location.
4. Go to the Control Panel in Windows > 'Network and Sharing Center.'


5. Click on 'Change adapter settings' and look for Ethernet related to the 'TAP-Windows Adapter V9.'
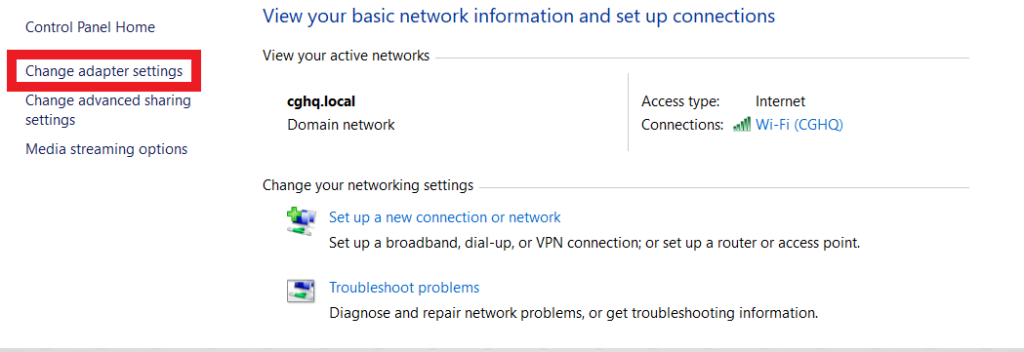

6. Right-click on it and click on 'Properties.'
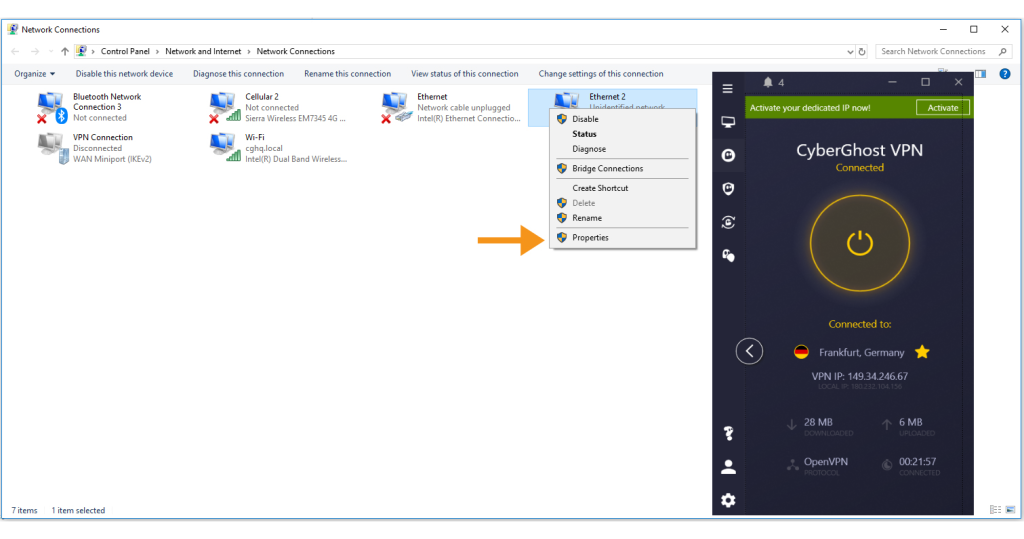

7. In the 'Sharing' tab, check the box titled, 'Allow other network users to connect through this computer's Internet connection.'
8. Click on the 'Home networking connection' dropdown and choose the suitable connection (in this case, it's 'Ethernet').
9. Now, all you have to do is connect your PlayStation to this new VPN-enabled Wi-Fi hotspot.
Final Thoughts
Among these methods, using the Smart DNS feature is easy because it does not require you to tinker with router or Windows settings. However, the router setup method is superior because it allows you to fully encrypt your Web traffic on PlayStation and all other household devices.
Of course, PlayStation and other gaming consoles like Xbox are not the only devices you'd want to use a VPN with. You can learn how to install and set up CyberGhost on a wide range of other devices by taking a look at our central guide.
We hope that you now know how to install and use CyberGhost VPN with PlayStation. If you have any questions, feel free to comment below. Thanks for reading!
Related