
How to Protect Your Privacy on Facebook – Prevent Your Personal Data From Being Exploited
Last updated July 12, 2021

The chances are that you’re reading this article worried about the latest Facebook breach. Even though this wasn’t the first time that something like this has happened, the latest development will have long-term consequences. As a result, many of you might be thinking of deleting your Facebook account. Still, this isn’t an option for all of us.
The majority of us will agree that Facebook has become an integral part of our everyday lives. It’s not all about posting selfies and tagging other people in photos. Facebook makes it easy to stay in touch with friends and relatives living abroad. When it comes to business, Facebook helps them connect with customers. The bottom line is – there are a million reasons to delete your account, and there are a million reasons to stay on Facebook. This is why we’ll teach you how to protect your privacy on Facebook by taking a look at your account settings.
How to Protect Your Privacy on Facebook?
When was the last time you took some time and really took a look at your account settings? It has probably been a while. Facebook is trying to be as transparent as possible, at least when it comes to privacy settings. Then, it’s up to you to understand them and make sure you’re using them right. Let’s jump right in.
Step #1: Turn Off Location Services
By default, Facebook keeps track of your every move. This is why location data is highly valuable to third-party services and advertisers. Just imagine Facebook knowing where you live, where your work, what’s your favorite restaurant, and what are your hobbies. In fact, plenty of information can be extracted from your location data. As you can imagine, Facebook can sell or give over that kind of information whenever it wants to do that. So, here’s how to turn off location services.
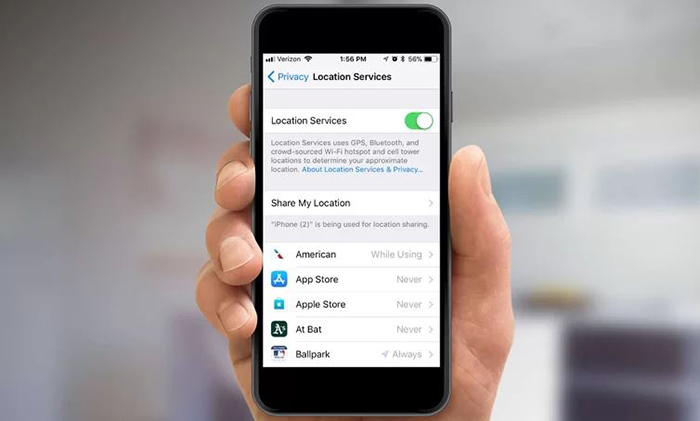
- iPhone Users: To disable Facebook from tracking your movement, you need to open the Settings app on your phone. Then, go to Privacy under the General tab, and tap on ‘Location Services’. This is where you can see all of the apps that have request access to your location. Scroll down to Facebook and select either ‘While using the App’ or ‘Never’.
- Android Users: Depending on your smartphone manufacturer, there are different ways to disable location services on Android. In general, you need to open the Settings app, tap on ‘Account Settings’ and then select ‘Location’. This is where you can fine-tune location data for each installed app. If you’re having trouble locating this option, do a Google search based on your smartphone model’s name.
Step #2: Revoke Access to Third-Party Apps
In the case of Cambridge Analytica, an app named ‘thisisyourdigitallife’ act as an intruder. This app was used by 270,000 people who thought this is a silly little app that predicted their personality. As it turns out, the app collected all your sensitive data as well as data about your friends. In order for this to happen, all you needed to do is to sign-in using your Facebook credentials and grant permissions to this app. So, here's how to protect your privacy on Facebook and eliminate those problematic apps.
In case you didn’t know, Facebook allows you to review all of the apps you’ve used in the past. These are apps that you connected to your Facebook account. When was the last time you reviewed this list? Probably never. Now is the best time to take control of your account and revoke access to those apps that you no longer use.
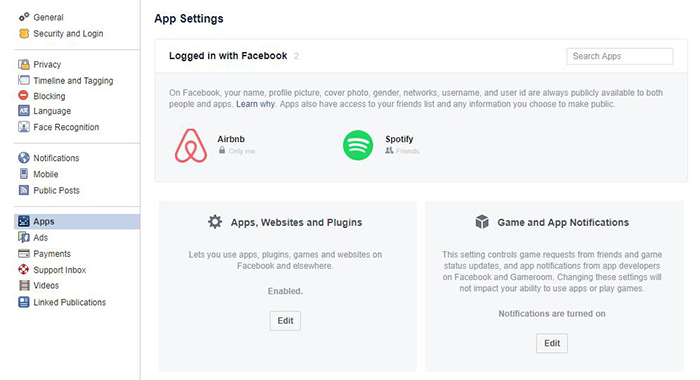
To revoke access to these apps, sign-in to your Facebook account on your computer. The same could be done on smartphones as well, but it’s not as intuitive). Open your Settings and click on ‘Apps’. This is where you will see probably a long list of applications that you’ve logged into using this social network. You can click on the 'X' icon next to each app to disable it. Moments later, it should disappear.
Next, you can scroll to the bottom to the ‘Apps, Websites and Plugins’, click Edit, and disable all sketchy apps. However, you should know that this will break integrations with apps. So, if you’re using Airbnb or Lyft, which are trustworthy apps, there’s no need to disable those.
Step #3: Limit Sharing Settings
There is a whole segment in your account settings that let you limit sharing. The problem is that this page is somewhat hard to navigate. Don’t worry, we are here to help you find your way through these options. Also, we recommend you to do this on your computer since having a large screen really helps in this case.
When you open your Facebook profile, click on the downward-facing triangle. It’s located next to the question mark icon in the upper right corner of the page. Then, find the ‘Settings’ option and click on ‘Privacy’ in the left-hand column.
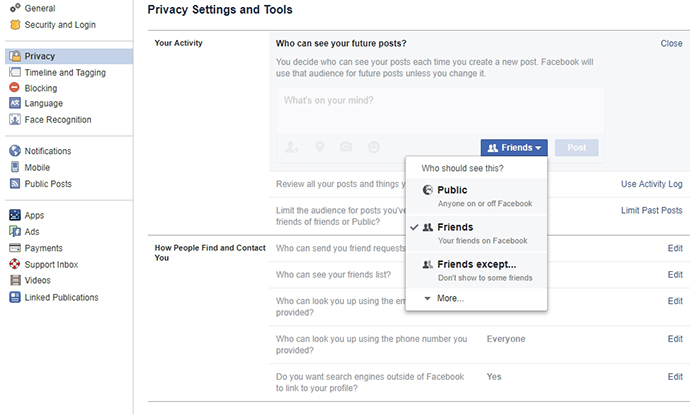
This is where you’ll see a comprehensive list of sharing options. For example, if you want to keep your profile visible and if you want everyone to see your posts and photos. As you can imagine, this isn’t a good idea and it’s always wise to restrict the amount of data that strangers can see. Therefore, it’s best to change this option to ‘Friends Only’. Make sure to also find the option that says ‘Limit past posts’ and restrict your past posts to your friends only.
On this page, you will also see how people can find you on the platform and contact you. It’s also interesting to note that you can disable your Facebook page from being visible on search engines. When it comes to this group of settings, your last resort should be to select ‘friends of friends’ and make sure you’re limiting the amount of data you present.
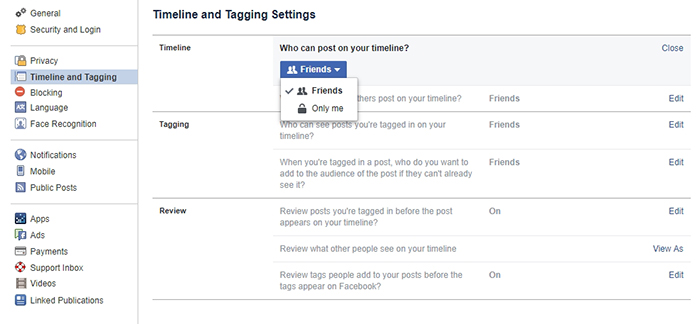
Last but not the least, make sure to check out the ‘Timeline and Tagging’ from the left-placed sidebar. This set of options controls who can post on your Facebook profile and who can tag you in photos. Our best advice is to limit everything to ‘Friends’.
Step #4: Remove Personal Info
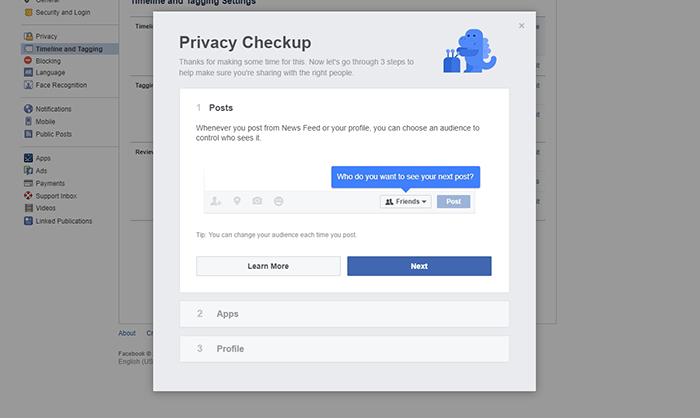
You might want to rethink how much info you’re providing about yourself. To do this, click on the question mark icon in the top-right corner and select ‘Privacy Checkup’. Feel free to go through the first step. Once you’re at the second step, you can fill out ‘About Me’ information. This is a good way to delete existing information and keep certain info that you think is safe to share. As you’ll see, this is where you can share your work history, education, places where you’ve lived, your email address, phone number, and pretty much everything else. Deleting all this information might make it harder for others to find you on Facebook. However, that is the price you’ll need to pay if you want to tighten up your privacy on this social network.
Finally, you can perform a check and see how your profile looks to other people. This feature can be found by click on the three small dots next to the ‘View Activity Log’ option overlaid on top of your cover photo. In the drop-down menu, you will see ‘View As’. This is an easy way to see all of the changes you’ve made and how they look.
Step #5: Restrict Ad Preferences
Last but not the least on how to protect your privacy on Facebook, you can restrict the amount of information you’re giving to advertisers. These options can be found on the Ad Preferences page. Click on the provided link and log in your using your Facebook credentials. You will see a dozen of categories based on the information you’ve previously provided.
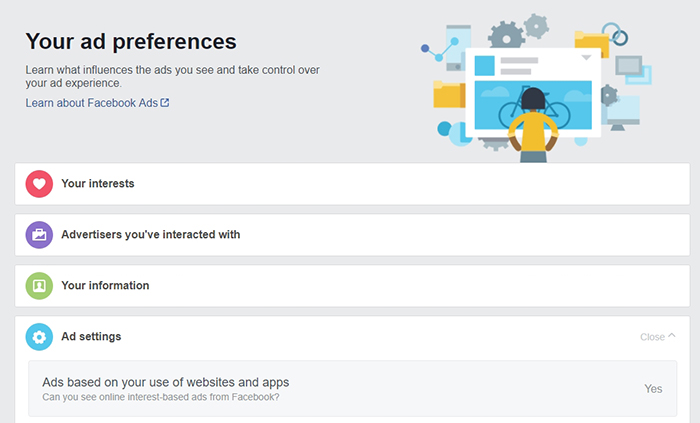
It’s also worth noting that this is where you’ll see the pages you like. All of these are used for advertising purposes. Take a look at the bottom of the screen and disable the ability for advertisers to use these pages.
Final Thoughts
That would be all you need to know about how to protect your privacy on Facebook. Still, we all know that this social network is good at hiding useful features. Therefore, feel free to share if you know other useful options. As always, you can post a comment below in case you have any questions.
If you want to warn other Facebook users about their privacy, why not share this article with them? Thanks!
Related


Get expert insights on threats, breaches, scams, and security trends — delivered every Monday.
Most Popular
Get expert insights on threats, breaches, scams, and security trends — delivered every Monday.
Most Popular