How to Set Up a VPN on Windows in 2024
Windows lets you run a VPN in more ways than one. More precisely, there are 3 methods to set up a VPN on Windows. The easiest one is to go for a native application (if your chosen VPN service offers one). Then, you can rely on third-party software (OpenVPN Connect), or you can configure a VPN on Windows manually.
No matter which method you pick, you'll get to connect to a secure server and boost your online privacy (among many other benefits that VPNs offer). So, here's how to get started with a VPN on Windows 7, 8, 8.1, 10, and 11.
How to Set Up a VPN on Windows
Let's get to the point. There are 3 different methods to set up a VPN on any version of Windows, as explained just below:
- Method #1: Use Your VPN's Native Software
- Method #2: Use 'OpenVPN Connect' to Set Up a VPN
- Method #3: Configure a VPN Manually via Windows' Built-In Client
Method #1: Use Your VPN's Native Software
The easiest method of getting started with VPNs on Windows is by using native software. For this purpose, you need a VPN with an application made for this operating system, which you can install in the following way:
1. Subscribe to a VPN that has a native application for Windows, such as ExpressVPN. (You can try it risk-free for 30 days.)
2. Return to ExpressVPN's website and click 'My Account.'

3. Access your online dashboard using your ExpressVPN credentials.
4. You should see a banner at the top. Click 'Download for Windows.'

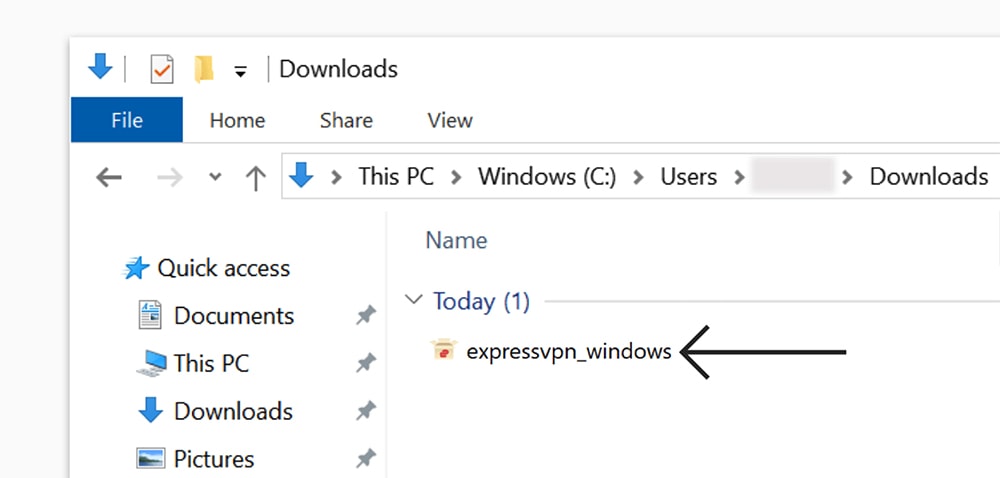
5. Launch the installation file and install ExpressVPN on your computer.
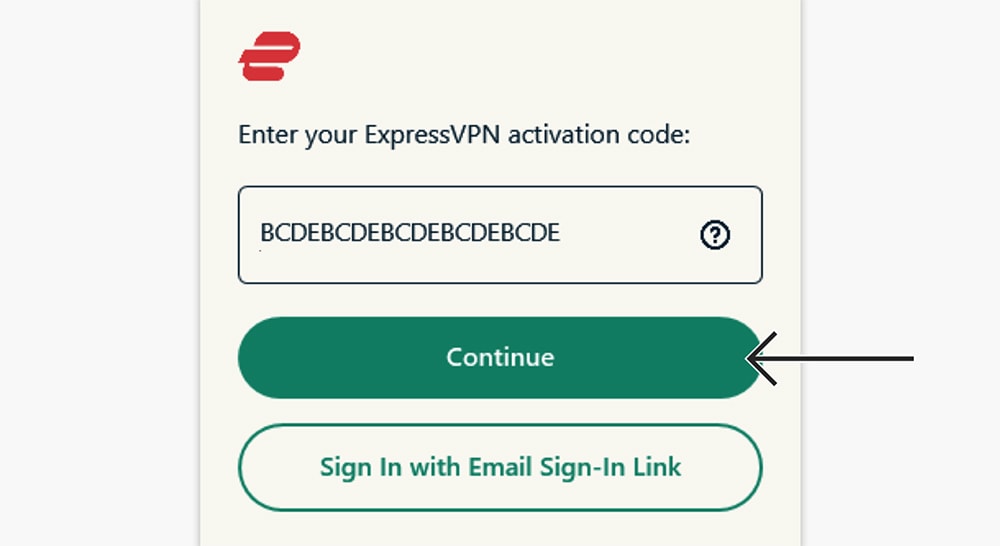
6. Open ExpressVPN. Access your account using your ExpressVPN activation code.
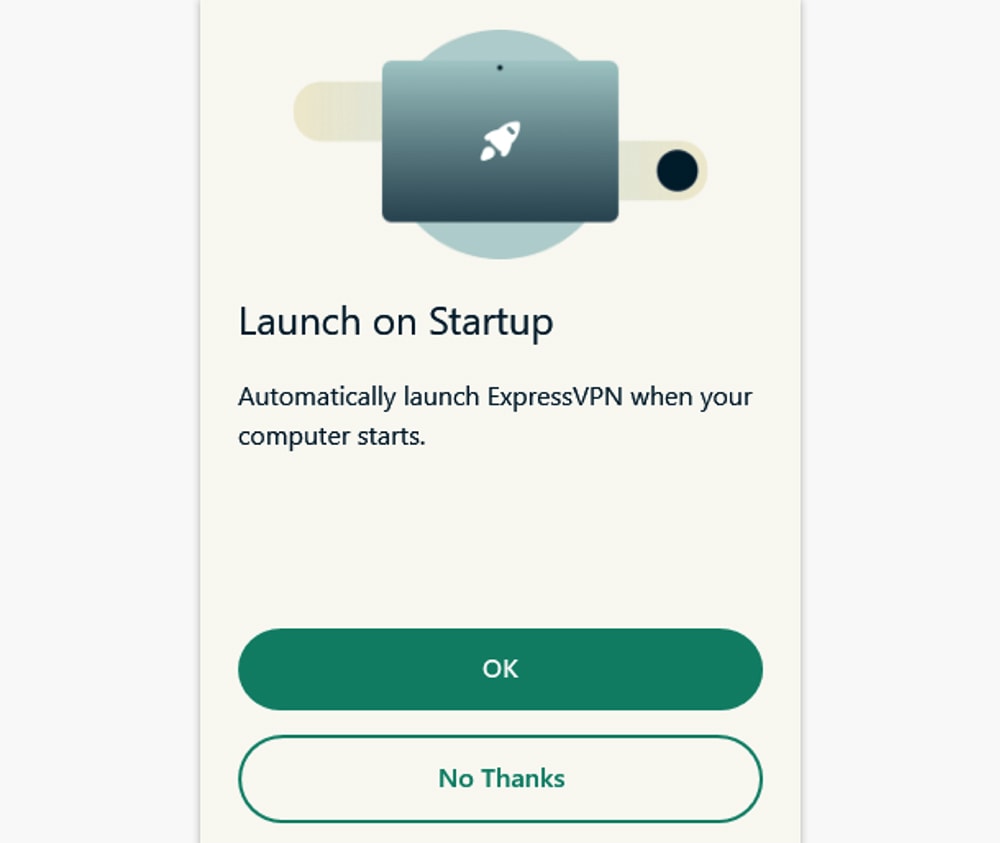
7. Decide if you want to allow ExpressVPN to launch on start-up.
8. Decide if you want to send anonymous data to ExpressVPN.

9. You should now be looking at ExpressVPN's home screen.

10. Pick any server (using the button below the ON/OFF switch) and connect. That's it!
Method #2: Use 'OpenVPN Connect' to Set Up a VPN
If your chosen VPN doesn't offer a native Windows application, there's a different way to run it. Using 'OpenVPN Connect,' you can set up a VPN on Windows and create an OpenVPN connection, done in the following way:
1. Get a VPN that supports manual OpenVPN connections, like ExpressVPN.
2. Once you subscribe, return to ExpressVPN's home page. Click 'My Account.'
3. Click 'Set Up Other Devices.' Then, select 'Manual Configuration.'

4. Pick 'OpenVPN,' and you'll see your username and password. Keep that page open.
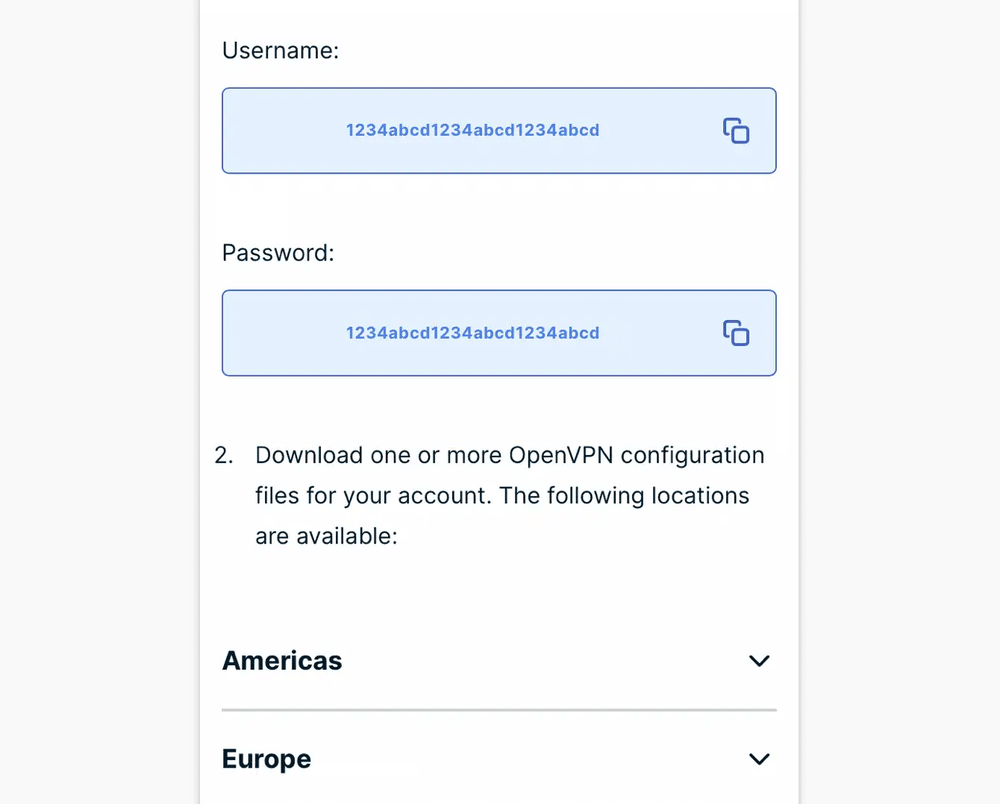
5. Pick a server and download its OVPN file to your computer.
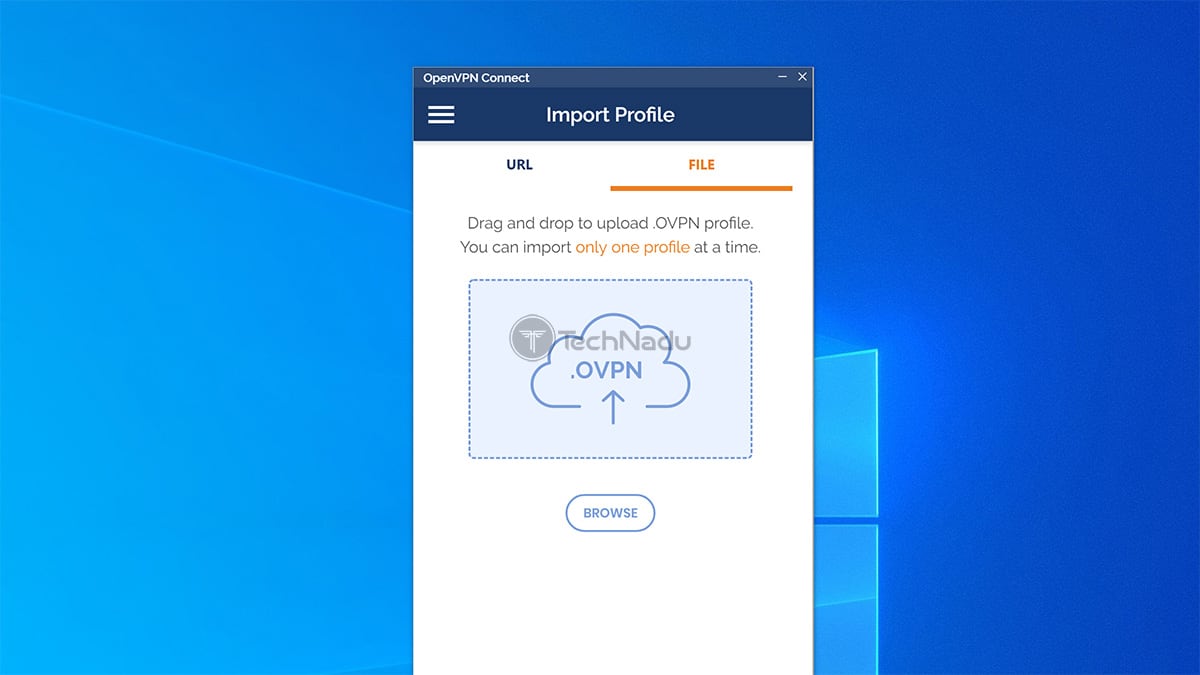
6. Now, download OpenVPN Connect. Install and open the app on your Windows PC.
7. Select the 'File' tab and drag and drop the recently downloaded ExpressVPN OVPN file.
8. You'll be asked for your username and password. Provide your credentials.
9. Click 'Add' to add your newly created connection to OpenVPN Connect.
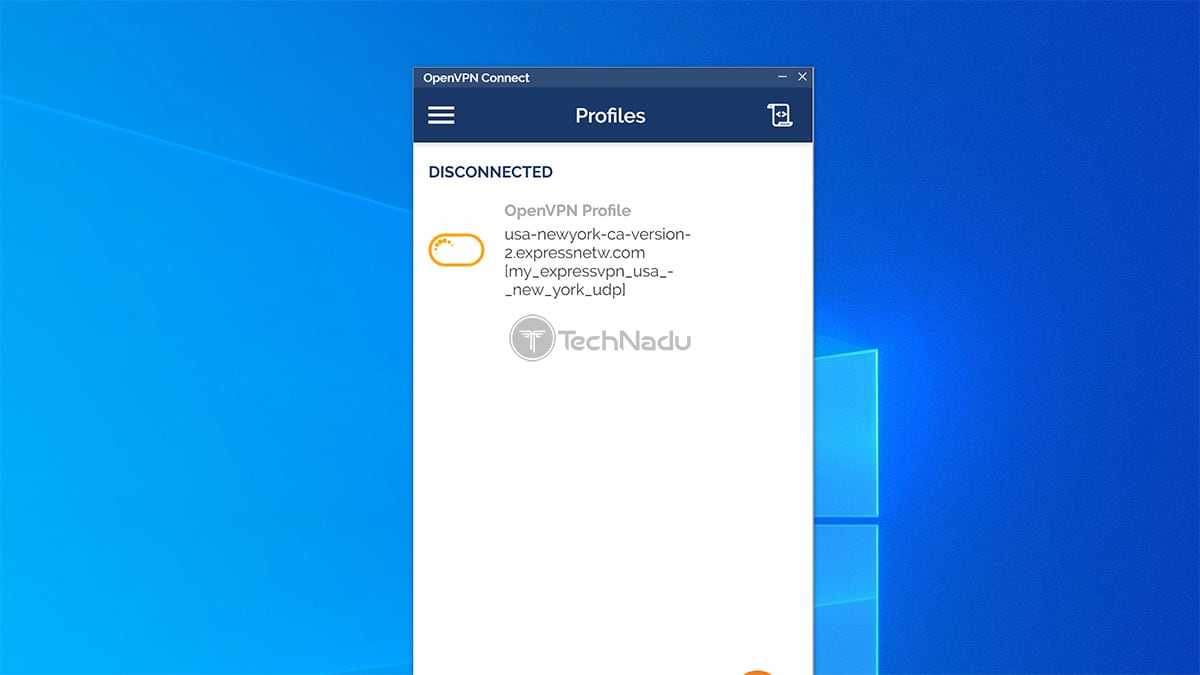
10. Lastly, feel free to connect. You can also add more connections. That's it!
Method #3: Configure a VPN Manually via Windows' Built-In Client
In case you don't want to use a third-party VPN client, you can rely on Windows to set up and run your VPN connection. Remember that you'll need a VPN that lets you manually configure new VPN connections.
1. Pick a VPN that supports manual configuration, such as ExpressVPN.
2. Once you subscribe, return to ExpressVPN's home page and click 'My Account.'
3. Access your online dashboard and pick 'Set Up Other Devices.'
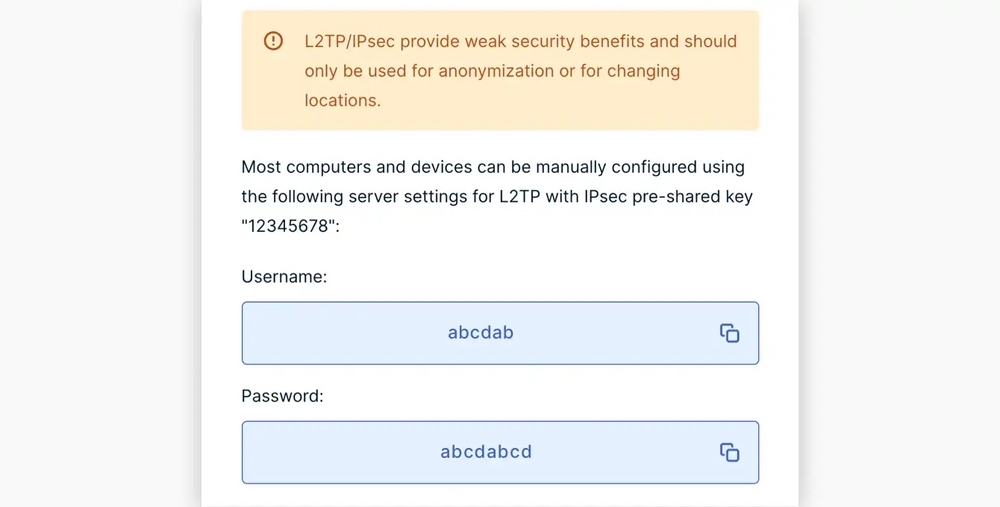
4. Select 'Manual Configuration.' Then, click on the button labeled 'L2TP/IPsec.'

5. You'll now see your username and password. You'll also need to pick a server address.
6. Then, launch the Start Menu, type in 'VPN,' and press Enter.
7. Proceed by clicking 'Add a VPN Connection.'

8. Select 'Windows (built-in)' as your VPN provider, and input a connection name.
9. Input the desired server address - found on your ExpressVPN online dashboard.
10. Next, select 'L2TP/IPSec with pre-shared key' in the 'VPN Type' field.
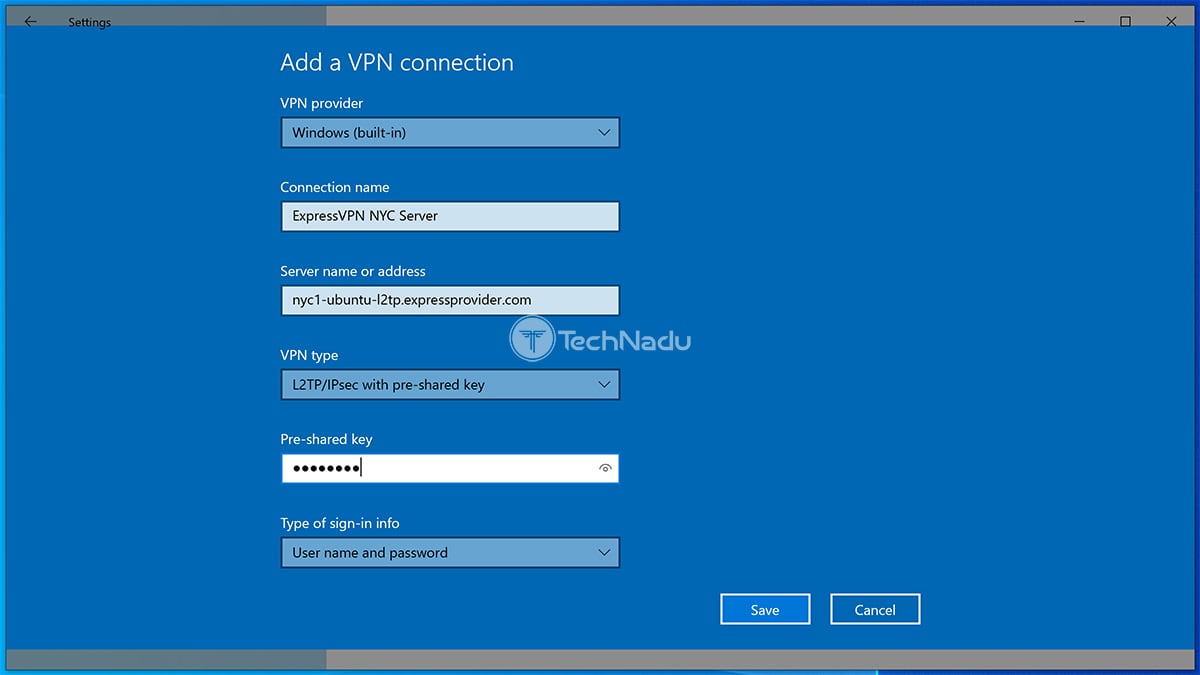
11. Go with '12345678' for the 'Pre-shared key.'
12. Pick 'User name and Password' in the 'Type of sign-in info' field.
13. Click 'Save' to input your newly added information.
14. Select your newly created VPN connection and use the 'Connect' button.

15. Provide your L2TP username and password (from your ExpressVPN dashboard). That's it!

You can repeat the procedure above to add more connections. ExpressVPN gives you all the info you'll need for this purpose, which is one of the benefits of choosing this particular VPN service.
You can also remove a VPN connection.This is done by going to Start > Settings > Network & Internet > VPN. That's where you'll see the list of your (manually configured) VPN connections. Click on the 'Remove' button (twice) to delete any of those.
Final Thoughts
When it comes to setting up a VPN on any version of Windows, the most straightforward route to take is using native VPN software. However, depending on your level of knowledge regarding VPNs, you can always opt for manual configuration. So, you have plenty of options overall.
We'll also remind you that we've focused on ExpressVPN in this guide, as that's the best VPN for Windows (you can try ExpressVPN risk-free for 30 days). Other VPNs have similar installation methods but make sure to consult their support guides for more info.
So, you now know how to set up a VPN on your Windows PC. If you have any questions, let us know via the comments section below. Thanks for reading!